
Still have a shoebox of home movies on VHS and wonder if those shaky, fading memories can be rescued in crisp, digital form?
This ultimate guide compares five top VHS capture devices and walks through choosing a dependable VCR and prepping tapes so you get clean, lasting transfers.
Designed for home users rather than pros, it breaks down buying decisions into simple steps and practical tasks.
Whether you’re a weekend archivist, a nostalgic family member, or someone clearing out an attic, you’ll find clear advice that skips jargon and delivers results.
We translate real-world feedback and hands-on testing into easy-to-understand recommendations about capture quality, ease of use, and reliability.
You’ll also get straightforward tape-prep techniques and VCR selection tips to avoid common transfer problems and protect irreplaceable footage.
Skip the trial-and-error and the boxes of mismatched cables — this guide is built to save time and frustration.
Read on to discover the best VHS player for digitizing your tapes and simple, do-able steps to preserve your family movies for years to come.
We’ll help you balance budget, ease-of-use, and image quality so you can pick the capture path that fits your needs and patience level.
No matter the footage condition, the right pairing of player and converter plus a few careful prep steps will yield far better digital results than a rush job.
1. Elgato Video Capture Review

VHS to Digital Converter USB Video Capture Card RCA
Effortlessly capture analog video through USB and RCA inputs, preserving memories as high-quality digital files on your computer.
Check PriceAs a photographer who’s digitized dozens of family tapes, I consider the Elgato Video Capture the gold standard for home VHS transfers. It’s praised for plug-and-play simplicity and consistently delivers excellent video and audio quality that preserves as much detail as possible.
Setup is painless — the device works with both Windows and macOS and the included software is intuitive for trimming and basic editing. That means you can start capturing tapes in minutes without wrestling with drivers or complex settings.
The Elgato supports multiple input types (RCA, S-Video, SCART), so you can get the best possible picture from whatever VCR you’re using. In practice that translates to sharper, cleaner captures when you choose S-Video over composite, or when your VCR offers cleaner outputs.
If you value reliability, recent Windows and macOS versions play nicely with the unit, so you’re less likely to run into compatibility headaches mid-project. However, the bundled software is intentionally basic — great for quick trims and capture, but limited if you want color grading, noise reduction, or multi-track audio work.
Bottom line: buy the Elgato if you want a near-effortless, high-quality digitizing workflow at home and are willing to invest a bit more. If you need advanced editing, plan to pair it with third-party software.
- Extremely easy setup and use
- Excellent video and audio quality
- Supports RCA, S-Video, SCART
- Reliable on recent Windows and macOS
- Relatively expensive vs. budget options
- Included software is basic; need third-party for advanced edits
2. Portta VHS to Digital Converter Review

Portta VHS to Digital Converter Video Recorder with Remote
Standalone recorder converts tapes into MPEG files; intuitive remote control and built-in playback make transfers simple without a computer.
Check PriceAs a photographer who’s spent hours rescuing old tape footage, I appreciate the Portta VHS to Digital Converter for its straightforward, no-frills approach. It’s popular with users who want a compact, portable box that just works without fuss.
Setup is painless — truly plug-and-play with no driver installs required — so you can start capturing in minutes. It records up to 1080p, which helps retain a surprising amount of detail from VHS sources for casual archiving or quick sharing.
In everyday use the Portta is reliable, with minimal connection glitches, which makes batch-digitizing an afternoon of tapes much less stressful. The small footprint means you can move it between a living room VCR and a laptop without any hassle.
There are a couple of trade-offs to be aware of. It sits above the very cheapest converters in price, so it’s a mid-range buy rather than a bargain-basement pick. Also, some users find the image a touch flat compared to higher-end converters, so if you care deeply about color richness or need the absolute best-looking captures, plan to do a bit of post-processing.
Overall, I’d recommend the Portta to home users and photographers who need a dependable, portable capture solution that delivers solid 1080p results with minimal fuss. If you want ultimate image pop without later editing, consider that limitation; otherwise it’s a very practical tool for digitizing family archives.
- Simple plug-and-play setup
- Compact and portable
- Records up to 1080p
- Reliable with minimal connection issues
- More expensive than some budget options
- Image can appear slightly flat
3. Digitnow Video Capture Converter Review
Portta VHS to Digital Converter Video Recorder with Remote
Compact device digitizes analog tapes to USB or SD; scheduled recording and remote operation streamline batch conversions.
Check PriceAs a photographer who’s digitized dozens of tapes, I appreciate the Digitnow Video Capture Converter for what it is: a budget-friendly, straightforward tool that gets the job done without a computer. It’s praised for ease of use and the ability to record straight to an SD card, which simplifies the workflow for quick transfers.
The built-in screen is genuinely useful. You can monitor playback and framing without hauling a separate monitor or laptop to the living room or attic. The unit also offers multiple output options—SD card, HDMI, and USB—so you can plug it into different setups depending on the job.
This device is best for casual users who want a no-fuss solution for family tapes or short projects. Recording directly to SD means you can start capture quickly and review files immediately on another device. Its affordable price point makes it an attractive entry-level choice when you don’t need a full desktop capture rig.
That said, there are trade-offs to consider. Some users report audio sync problems on longer recordings, so I’d test a sample from any long tape before committing to a full archive run. There are also reports of device failure after relatively light use, so treat it as a convenient backup or starter tool rather than a heavy-duty, long-term archive solution.
In short, Digitnow is mostly good for quick, low-cost digitizing and on-the-go monitoring, but I wouldn’t rely on it alone for extensive archival projects without extra verification and backups.
- Direct-to-SD recording (no PC needed)
- Built-in screen for real-time monitoring
- Multiple outputs: SD card, HDMI, USB
- Affordable price point
- Audio sync drift on long recordings
- Reported early device failures
4. ClearClick Video to Digital Converter Review
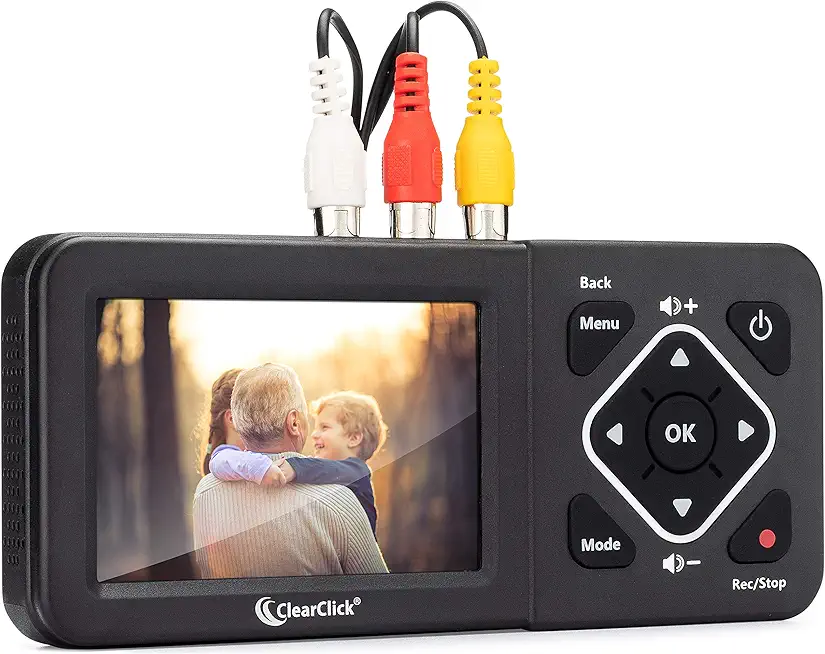
ClearClick Video to Digital Converter 2.0
User-friendly converter with one-button capture and clear instructions, turning camcorder and VCR footage into shareable digital files.
Check PriceThe ClearClick Video to Digital Converter is a compact, mid-range option for anyone serious about preserving VHS tapes without paying premium prices. It’s known for high-quality recording and a user-friendly design that feels thoughtful for home archivists.
In practice the ClearClick delivers improved detail and better color accuracy over earlier models. That makes a visible difference when you’re trying to rescue family footage or small production demos where color and fine detail matter.
Setup is straightforward and doesn’t demand messy driver installs or complicated software. The unit is compact and portable, so you can digitize tapes wherever your VCR lives without a bulky workstation.
Performance is reliable; users report minimal connection issues and steady captures, which is exactly what you want when converting dozens of tapes. It’s a good middle ground if you want better results than budget devices but don’t want to spend top-tier money.
One caveat: the ClearClick leans toward users comfortable with a modest learning curve. It’s not wildly complicated, but it can be slightly less intuitive than the simplest plug-and-play boxes. Overall, if you value improved image fidelity, portability, and stable operation, ClearClick is a sensible pick for most home digitizing projects.
- Compact and portable design
- Improved recording quality and color accuracy
- Simple setup; no complicated software or drivers
- Reliable performance with minimal connection issues
- More expensive than some budget options
- Can be slightly less intuitive to use compared to premium competitors
5. Diamond VC500 Capture Device Review

Diamond Multimedia VC500 One Touch VHS to Digital DVD Converter
One-touch transfer creates editable digital videos and DVDs from old tapes; includes software for easy editing and burning.
Check PriceThe Diamond VC500 is a budget-friendly capture device that delivers surprisingly solid results for the price. As a photographer who’s digitized dozens of tapes, I find it gives good capture quality without needing a big investment.
Image and audio preservation are respectable for home archives. You won’t get the absolute best restoration, but for family tapes and quick projects it preserves detail well enough to be satisfied with the results.
Setup is straightforward and user-friendly. It requires no complicated drivers and generally performs reliably with minimal connection issues, which keeps a digitizing session moving instead of wasting time troubleshooting.
One big plus is the included PowerDirector software, which provides more advanced editing than the bare minimum applications. However, the bundled EZ Grabber software can be less reliable, so I often drop into PowerDirector or use VirtualDub when I need more control.
Be aware of a couple of caveats. Windows compatibility can become an issue after system updates and may necessitate reinstalling drivers or software. My workflow is to test a short clip first and keep installers handy so I’m not stalled mid-transfer.
- Good capture quality for the price.
- Includes PowerDirector software for more advanced editing.
- Simple setup and operation; no complicated drivers required.
- Reliable performance with minimal connection issues.
- Windows compatibility can be an issue after system updates; may require reinstalls.
- Included EZ Grabber software less reliable than alternatives like PowerDirector or VirtualDub.
Choosing the Right VCR for Digitizing
When you’re digitizing tapes, think like a conservator. The goal is to capture the original image and sound, not to over-process it. That starts with a VCR that runs smoothly and treats the tape gently; any scraping, sticking or sloppy loading will cost you irretrievably in dropouts and warped frames.
Mechanically sound machines should be your first filter. Look for a VCR that loads cleanly, has a solid tape path and responsive transport mechanisms. Run the deck for a few minutes before a session so the heads and lubrication reach their stable operating temperature.
Playback features matter. A 4-head VCR offers a steadier, more detailed picture than a basic 2-head model, so prioritize one if you can find it. If your tapes were recorded on S‑VHS, a compatible machine will retain extra resolution and color fidelity; otherwise S‑Video output is the next best thing for sharper luminance detail compared with composite RCA.
Manual tracking control is worth its weight in gold. It lets you eliminate fuzz and jitter on tricky tapes without resorting to automatic fixes that can mask true signal problems. Likewise, avoid VCRs that apply aggressive digital processing—noise reduction, edge enhancement and color tweakers may look pleasing on a TV, but they alter the archival source you’re trying to preserve.
Since new units aren’t made, focus on well-maintained used or refurbished machines from Panasonic, JVC, Sony or Toshiba. Prefer models that allow easy access to the heads for cleaning and that have replaceable belts and parts. These are easier to maintain and will last longer through many hours of transfers.
Finally, run a short test clip before committing to a full tape. Check tracking, audio sync and output via S‑Video or composite. A few minutes of testing and a quick head-clean can save you hours of rework and keep your digitized files faithful to the original.
Preparing VHS Tapes for Digitizing
Before you press play and start capturing, take a moment to treat your tapes like the fragile, one-of-a-kind negatives they are. Inspect each cassette for cracked shells, loose reels, or visible mold and sticky residue; any sign of flaking magnetic tape or severe damage should be stabilized or repaired before playback to avoid permanent loss. If the shell is cracked, transfer the reels into a replacement cassette; if tape is broken, use proper splicing tape to reattach it, not household tape.
Gentle cleaning goes a long way. Wipe cassette exteriors with a lint-free microfiber cloth and, if needed, a tiny bit of isopropyl alcohol around the shell edges—never on the exposed tape. Use canned air sparingly to dislodge dust from the cassette opening, and avoid water or soap which can warp plastics and attract residue.
Always rewind tapes fully before digitizing to equalize tension and reduce the risk of snags. Handle cassettes by their edges and never touch the exposed magnetic surface; fingerprints and static attract dust and degrade the image. Work in a clean, dry space free of dust and moisture to minimize contamination during playback and capture.
Let your VCR warm up for a few minutes before starting serious transfers; a warmed head produces a steadier image and fewer mysterious noise bursts. Do a short test play to check picture, sound, and tracking; adjust manual tracking if your VCR has it to eliminate jitter and fuzz. If you see persistent dropouts or flutter, pause and address the tape or machine rather than pushing through.
Finally, protect the originals while you create digital masters. Enable write protection on tapes to prevent accidental erasure, and label each cassette and its digitized file carefully so you don’t lose context. A little patience up front—the right cleaning, gentle handling, and a quick test—will save you hours of rework and preserve more of your memories in the final transfer.
What People Ask Most
What is the best VCR for digitizing VHS tapes?
Choose a well maintained unit from a reputable manufacturer and prioritize serviceability. Models with four‑head playback and S‑Video support are often preferred when tapes and capture equipment allow it.
Can any VCR be used to digitize VHS tapes?
Most VCRs can play tapes but not all are ideal for digitizing. Use a machine in good working order with clean heads and smooth tape loading to avoid damaging tapes and degrading video quality.
Do I need a VCR with a time base corrector (TBC) to digitize VHS tapes?
A TBC can help stabilize shaky timing and reduce visual jitter, which improves capture consistency. It is not strictly necessary for basic transfers, but it can be useful for problematic or older tapes.
What connections do I need to connect a VCR to a computer for digitizing?
Standard composite RCA outputs are commonly used to connect a VCR to a capture device that interfaces with a computer. If available, S‑Video offers a cleaner connection, so check compatibility between the VCR and your capture hardware.
Is S-Video better than composite for digitizing VHS tapes?
S‑Video separates luminance and chrominance, which generally yields a sharper image and better color separation compared with composite. Not all VCRs or capture devices support S‑Video, so verify connections before starting.
What settings should I use when digitizing VHS tapes?
Capture the source as directly as possible and avoid in‑device enhancements that alter the original signal. Test a short segment first to confirm tracking and audio sync, then proceed with consistent settings for the rest of the tape.
Is it better to use a VCR or a professional transfer service for digitizing VHS tapes?
For routine home collections, digitizing with a personal VCR can be convenient and cost effective. For fragile, damaged, or unique tapes, a professional service can offer specialized equipment and handling that may yield safer results.
Conclusion for Best VHS Player for Digitizing
In short, if you want the simplest, highest-quality home transfers Elgato stands out as the premium choice, Portta and ClearClick offer reliable mid-range compromises, and Digitnow and the Diamond VC500 are sensible budget options for one-off jobs or tight budgets.
Pair your chosen capture device with a well-maintained VCR — preferably a serviceable 4‑head machine with S‑Video output when available — and avoid VCRs that heavily process the image so you capture the source as faithfully as possible.
Before you press play, inspect and clean tapes, repair or re‑shell any damaged cassettes, rewind and test playback, and warm up the VCR so you reduce dropouts and tracking issues during digitization.
If you want to sharpen your workflow or compare approaches, browse more guides on the site to build skills and confidence before tackling a larger transfer project.
Have questions or want advice about a specific converter, VCR, or tape issue? Leave a comment below and we usually reply within a few hours.

0 Comments