How to know what size filter for lens? Feeling stuck with all the numbers on your lens?
This guide gives quick, accurate methods to find your filter size. Look for the Ø marking, check the cap or manual, or measure the filter thread.
You’ll also learn common screw-in sizes, square-holder systems, and when to use step-up rings. I include a quick answer box, clear photos, and a printable cheat sheet to make buying easy.
Read on and you’ll know exactly what to buy and how to avoid vignetting or color cast. Start with the quick answer near the top, then follow the simple step-by-step checks.
How to know what size filter for lens — quick, accurate methods
Look for the Ø (diameter) number on the front of the lens or inside the front cap; if not present, check the manual/specs or measure the thread with calipers.
If you’re asking how to know what size filter for lens, the fastest way is to check the markings that are already on your gear. Almost every lens tells you the filter thread size if you know where to look. In a minute you’ll be able to find filter size on lens without guessing.
Start by inspecting the front rim of the lens barrel. You’re looking for a symbol like Ø followed by a number, such as Ø77mm or ø49mm. That number is the filter thread size in millimeters, and it’s the size you need for screw-in filters like UV, CPL, and ND.
If the front of your lens looks bare, flip the front lens cap and look inside. Many caps have the thread size stamped on the inner face, often as the only number printed there. If you’re using a third-party or mismatched cap, it might not match the lens, so double-check.
Still not sure? Look up your exact lens model’s specifications. The owner’s manual or the product page lists “filter diameter” or “filter thread size,” usually near the end of the specs. Retail listings also include it, and it is normally a single number like 58mm or 82mm, not a range.
If the markings are missing, measure the opening with calipers. Open the calipers to span the inside edge across the threads and read the value in millimeters. Round to the nearest whole millimeter because filters come in whole-mm sizes, and avoid measuring the glass itself.
No calipers? Use a ruler and your eye. Measure straight across the inner diameter where the filter would sit, keeping the ruler level with the thread. It’s less precise than calipers, so round sensibly and confirm with the manual if possible.
Some lenses don’t have front threads at all. Ultra-wide zooms, fixed-lens compacts, or certain cine lenses often need a dedicated filter holder, an adapter plate, or a drop-in filter near the mount. In those cases, check the lens manual for the correct holder size or drop-in spec.
Quick checklist: 1) find Ø marking, 2) cap/manual, 3) measure, 4) adapt if needed. For a short refresher, see how to find the right lens filter size before you buy.
Read lens markings: lens diameter (Ø) vs focal length (mm)
Many photographers mix up the numbers on a lens. A lens labeled 50mm refers to focal length, while Ø49mm refers to the filter diameter. Focal length and filter thread size are unrelated, and the focal length does not tell you which filter to buy.
The Ø symbol means diameter. Brands may print it as Ø, ø, or φ, followed by a number and “mm,” like Ø77mm or φ72mm. In manuals, you might simply see “Filter diameter: 77mm,” without the symbol, but it means the same thing.
Markings usually live on the front ring, the outer rim near the glass, or on the underside of the lens hood. Many front caps repeat the same number inside the cap. Some lenses print small text on the barrel side, so rotate the lens and scan carefully.
If you see “18–55mm 1:3.5–5.6” and no Ø, don’t confuse those numbers with filter size. The range is focal length, and the ratio is maximum aperture across the zoom. Neither is useful for the filter thread size you need.
When you can’t find the diameter symbol, turn to the cap or the manual. The term you want is “filter thread,” “filter diameter,” or sometimes simply “filters: 67mm.” Any of those confirm the size directly, even if the lens barrel lacks the marking.
On older or heavily used lenses the paint may be worn, and used caps may be mismatched. In that case, measuring with calipers is the cleanest way to know what size filter to buy. It’s the most reliable step when you must be certain how to know what size filter for lens with missing labels.
Common filter sizes and types (circular, square and rectangular)
The most common screw-in filter sizes you’ll see are 37mm, 39mm, 43mm, 49mm, 52mm, 55mm, 58mm, 62mm, 67mm, 72mm, 77mm, and 82mm. Among these, 77mm and 82mm show up frequently on professional zooms and fast primes because those lenses have larger front elements.
Small primes and compact lenses often live between 49mm and 58mm. Kit zooms and everyday telephoto zooms tend to sit between 55mm and 67mm. Standard and pro zooms often land between 67mm and 82mm, with the higher end more common on fast, high-end optics.
Keep in mind that two lenses with the same focal length can use different filter sizes. Optical design, aperture, and how the lens is built all change the required thread. That’s why the Ø number is the only reliable guide for screw-in filters.
Circular screw-in filters like circular polarizers, UV, and neutral-density filters use the thread size directly. If your lens says Ø77mm, you buy 77mm filters to fit that lens without any adapters. This applies to most consumer and professional still-photo lenses.
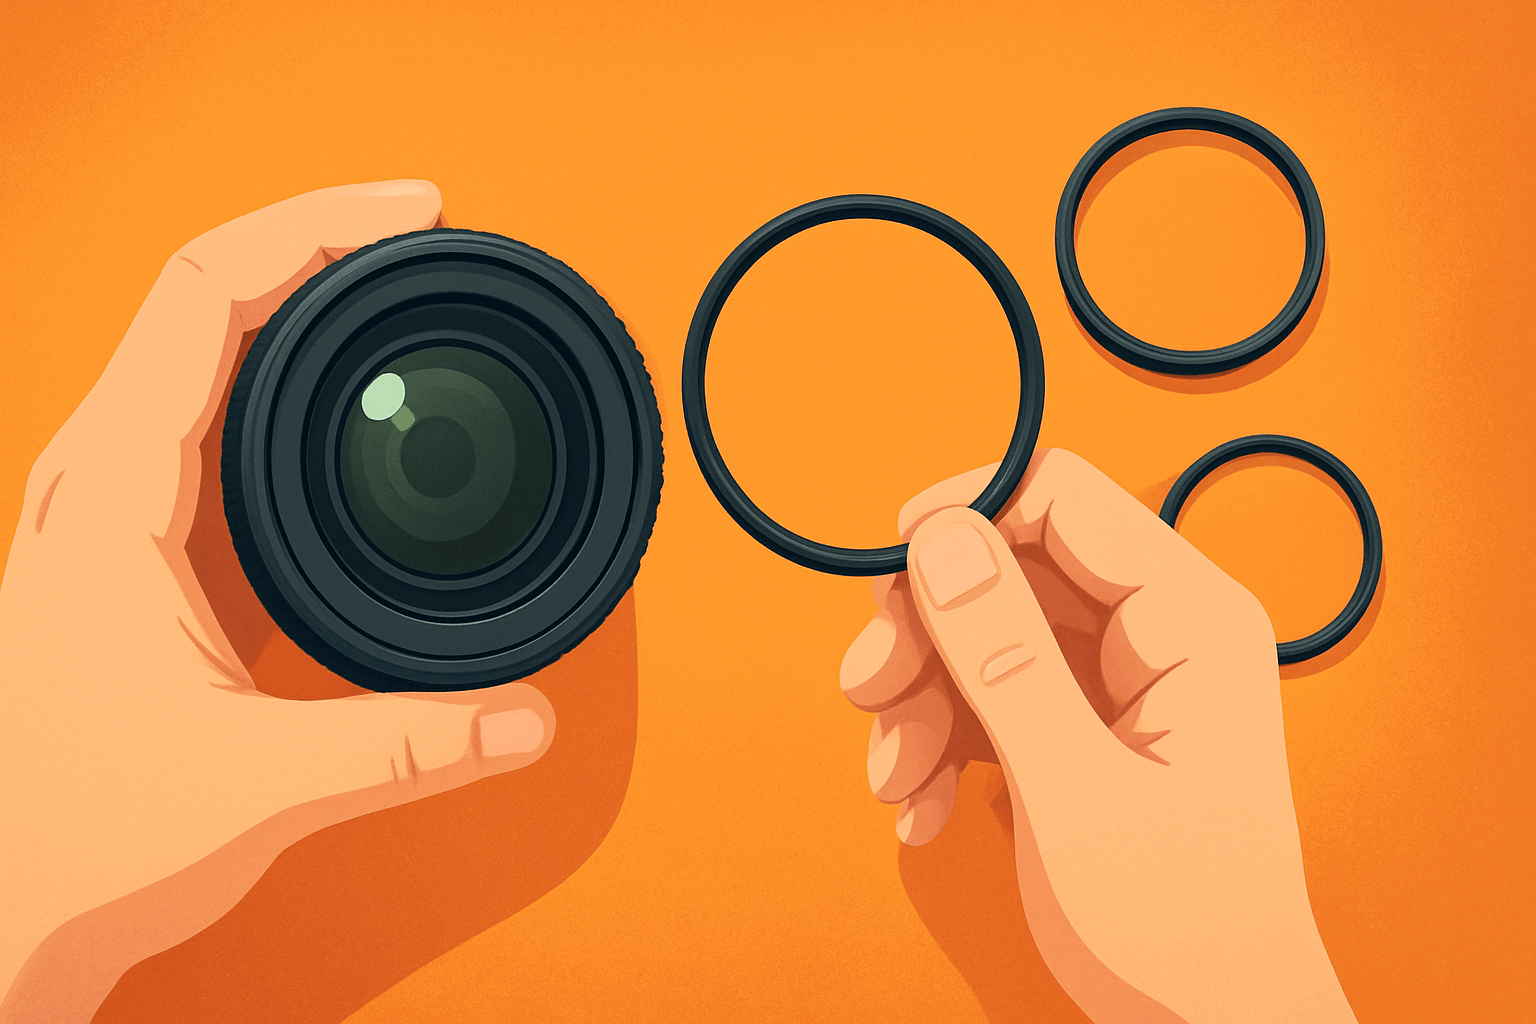
Square and rectangular systems follow a different rule. The filters themselves are sized by the holder standard, such as 75mm, 100mm, or 150mm systems, and the holder mounts to the lens with an adapter ring that matches your lens’s thread. The filter size is independent from the thread size because the holder does the adapting.
Some long telephoto lenses use rear or drop-in filters. The filter slides into a small tray near the lens mount, so the front diameter doesn’t matter for that filter. Always check the manual for the correct drop-in size and holder type for your specific lens.
If you want a deeper primer on what each filter does before you buy, read lens filters explained to understand how UV, CPL, ND, and GND filters affect your images. A simple printable cheat sheet of common diameters also helps when you pack or shop.
Step-up vs step-down rings and filter holders — adapt filters the right way
A step-up ring lets a smaller lens accept a larger filter. It screws into your lens’s smaller thread and presents a bigger thread on the front, so you can standardize on one large filter size. This is usually the best route because it avoids vignetting and saves money.
A step-down ring does the opposite by putting a smaller filter on a larger lens. It’s rarely ideal, and on wide-angle lenses it can cause heavy dark corners because the small filter blocks the edges of the frame. Use step-down adapters only when you know you have spare coverage.
The practical rule is simple. Buy filters for your largest-diameter lens, and use step-up rings on the rest so every lens can share the same high-quality filters. For example, if your lens says Ø77mm, buy 77mm screw-in filters; to use that same 77mm filter on a 58mm lens, add a 58→77mm step-up ring.
Avoid stacking many rings because they add thickness, create alignment issues, and can stress the threads. Make sure circular polarizers can still rotate freely after you adapt them, and check that your lens hood still fits or that you can replace it with a compatible one.
Choosing the right adapter ring is straightforward. Match the inner size to your lens thread and the outer size to your filter, such as 58 to 77 for the example above. Camera filter threads use a standard metric pitch, usually 0.75mm, so cross-brand thread fit is not an issue.
Practical buying & usage tips: avoid vignetting, choose coatings, and maintain filters
When you buy, prioritize multi-coated optical glass. Good coatings reduce reflections, preserve contrast, and minimize color cast, which keeps your edits simple. Cheap uncoated glass often flares, lowers micro-contrast, and can soften fine detail.
For wide-angle lenses, look for slim or low-profile frames to reduce vignetting. If you plan to stack an ND and a CPL, a slim polarizer can prevent the dark corners that thick frames create. Test at your widest focal length to confirm clean corners.
If your budget is tight, buy one excellent filter in the largest size you own and adapt down with step-up rings. For graduated ND work, pick a square or rectangular system and the matching adapter rings so you can slide the gradient where you want it. This approach helps you choose the right filter size without overbuying.
Protect and clean your filters like you do your lenses. Use caps or pouches, blow off grit before wiping, and clean with a soft microfiber and a few drops of lens-safe solution. When a new filter arrives, shoot a quick test to check for color cast or sharpness issues.
If you see vignetting after adding a filter, switch to a slim frame or move to a square holder. Dark corners from stacking often vanish when you use one larger filter and an adapter instead of piling several small ones. Once you know how to know what size filter for lens, check your lens now: look for Ø, check the cap or manual, or measure — then decide whether a screw-in filter or a square holder plus adapter fits your shooting best.
What People Ask Most
How to know what size filter for lens do I need?
Look for the diameter symbol (Ø) and number printed on the front or side of the lens; that number is the filter size you need.
Where on my lens can I find the filter size?
The size is usually printed on the front rim, near the glass, or on the side of the lens barrel and sometimes on the lens cap.
Can I use a filter that’s a different size than my lens?
You can use a larger filter with a step-up ring or a smaller one with caution, but using a smaller filter can cause dark corners on wide lenses.
How to know what size filter for lens when using adapters or converters?
If an adapter changes the front threads, use the adapter’s filter size or add a step-up/step-down ring to match the filter to the new thread.
Is filter size the same as focal length or lens diameter?
No, filter size is the front thread diameter (marked with Ø) and is different from focal length or overall lens diameter.
How can I measure the filter size if the marking is worn off?
Measure the inside of the front filter thread across the opening with a ruler or caliper to get the diameter in millimeters.
Will any filter that matches the thread size work with my lens?
If the thread size matches the filter will attach, but check for vignetting on wide lenses and choose the right filter type for your shooting needs.
Final Thoughts on choosing the right filter size
Remember the one-line answer — look for the Ø marking on the front of the lens, check the cap, consult the manual, or measure the thread; even a stray number like 270 isn’t the filter size unless it’s labeled with Ø. That simple check saves money, avoids vignetting, and helps you standardize filters so you spend less time guessing and more time shooting. This guide showed those quick checks, common sizes, and smart adapter choices so you won’t be left wondering what to buy.
Be realistic: stacking filters or using step-down rings can cause vignetting or alignment headaches, so favor step-up rings and slim filters for wide angles. This advice is for hobbyists and enthusiasts who own a mix of primes and zooms and want a simple, repeatable way to match filters to lenses. It also points out when square holders or drop-in systems are a better fit than screw-in glass.
Use the quick answer and visual checks before you buy so you avoid returns and wasted time. You’ll get cleaner images and more confidence next time you reach for a filter.


0 Comments