
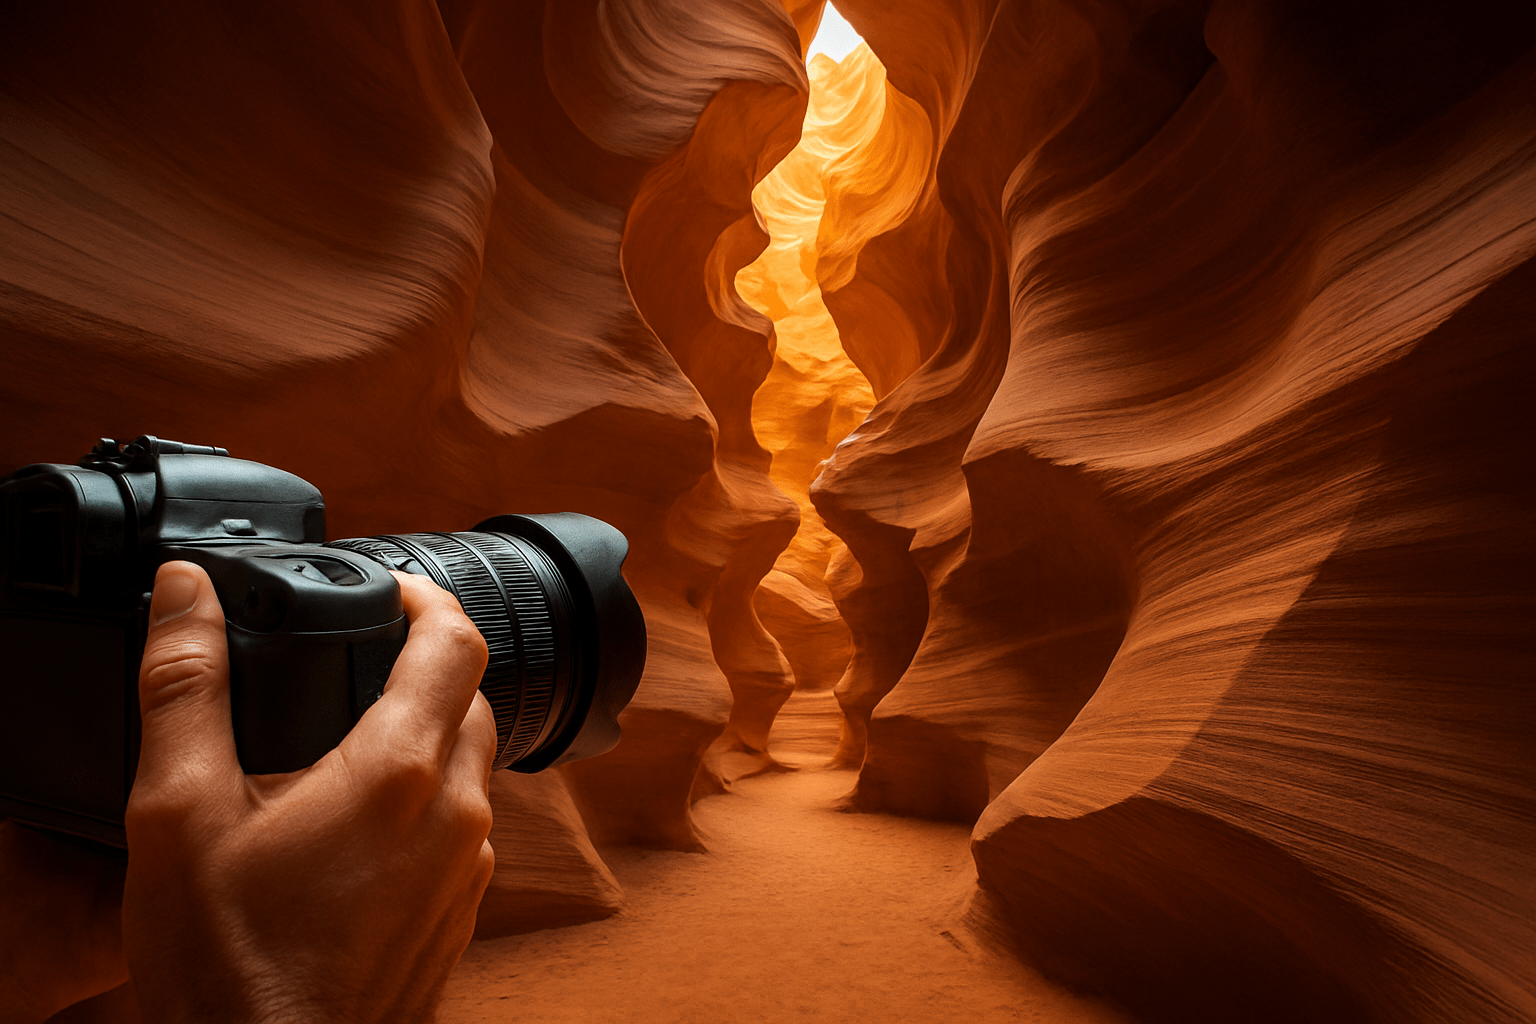
How to photograph antelope canyon and capture those glowing light beams and smooth sandstone curves?
Quick answer: shoot RAW, protect highlights, and use a wide lens with a tripod on photography tours. If you must shoot handheld, open the aperture and raise ISO to freeze moments.
This guide walks you through camera settings for tripod and handheld shooting, the best lenses to bring, composition tips, how canyon light works, and tripod tricks. You will also get example settings, shot ideas, and a short before-you-go checklist.
All tips are simple and practical so you can focus on great images, not gear. Read on to learn step-by-step advice that works on any Antelope Canyon tour.
Camera Settings
If you want the quick answer to how to photograph antelope canyon, shoot RAW, protect your highlights, and match your settings to whether you have a tripod or must shoot handheld. In simple terms, use low ISO and longer shutters on a tripod, or raise ISO and use faster shutters when you cannot use one. Keep your eyes on the histogram and bracket when the light turns extreme.
Start with the basics. Always shoot RAW because you will need the extra latitude for highlight recovery and color work. Expose to protect highlights, check the histogram, and bracket exposures when you see harsh contrast or bright shafts of light.
On a photography tour with a tripod, use a low ISO strategy. Set ISO 50–200 or your camera’s base ISO and stop down to f/8–f/11 for edge-to-edge sharpness. Let the shutter speed float from half a second to several seconds and use a remote release or 2-second timer with mirror lock-up or electronic front-curtain shutter.
Example settings, tripod: ISO 100, f/11, 2 seconds for a clean, sharp wall study. For a darker alcove, ISO 100, f/8, 6 seconds can hold deep detail with controlled noise. Bracket ±1 to ±2 EV for insurance when beams or bright skylight enter the frame.
If you are on a standard tour without a tripod, treat it like low-light street photography. Open your aperture to f/2.8–f/5.6 to gather more light while keeping some depth. Aim for 1/60 second or faster, and raise ISO to 800–3200 as needed to keep your shutter speed safe.
Example settings, handheld: ISO 1600, f/3.5, 1/80 second at 24mm is a solid starting point. If you zoom to 50mm, push to 1/100 second or faster, or raise ISO again. Use burst mode and take several frames, then pick the sharpest one later.
Sand and light-beam shots need extra thought. To freeze sand falling through a beam, use 1/200–1/500 second and adjust ISO to reach that speed. To show motion blur, slow down to 1/8–1/2 second and steady yourself carefully.
Autofocus can struggle in dim, low-contrast sections. Use single-point AF on a sharp edge or a textured corner of the rock, then recompose. When AF hunts, switch to manual focus, zoom in with live view, and use back-button focus so you can pre-focus and save time.
White balance can shift wildly as light bounces between orange, magenta, and blue-toned walls. Shoot RAW and leave white balance on Auto, then adjust in post for consistency. Only set a custom WB if you must shoot JPEG and want predictable color.
Do not fear higher ISO on a standard tour. A slightly noisy but sharp image beats a blurry one, and modern sensors clean up nicely in post. When a tripod is allowed, keep ISO low because you can afford the longer shutter.
Watch your histogram and turn on highlight warnings if your camera has them. Bright shafts can clip quickly, so add modest negative exposure compensation such as -0.3 to -1.0 EV. Rely on your bracketed RAW files to recover shadows and protect the glow of the beam.
Avoid filters that cut light or cause uneven polarization on the curving walls. Polarizers can darken parts of the frame and cost you precious light, so leave them off. If you mount your camera on a tripod, turn off lens stabilization or IBIS to prevent micro-blur from the system hunting.
Plan a simple HDR workflow for the most contrasty scenes. A standard bracket of three frames at ±2 EV or five frames at ±1 EV works well in slot canyons. Blend in Lightroom’s HDR Merge or manually merge exposures in Photoshop to retain color and delicate texture without halos.
Example settings, smartphone: use the 0.5x ultra-wide, enable RAW or ProRAW if available, and tap to expose for highlights. Hold as steady as you can or lean your back against a corner with guide approval. Take several frames and pick the crispest one, then recover shadows in post.
The Best Lens for Antelope Canyon
Ultra-wide to wide zooms are the essential lenses here. On full-frame, a 14–24mm or 16–35mm lets you capture sweeping curves and towering walls in tight spaces. On APS-C bodies, reach for a 10–22mm, 10–24mm, or 12–24mm equivalent.
These focal lengths help when the canyon is narrow and you stand just a few feet from your subject. You can fill the frame with fluid rock lines without stepping back. You also keep your ISO lower because wider lenses tolerate slower shutter speeds.
Carry a 24–70mm for mid-range scenes and abstract details. It lets you isolate shapes, color gradients, and textures when the ultra-wide starts to look too stretched. A 70–200mm has limited use but can compress distant shapes or pick out a beam fragment when space permits.
If you want fast glass, primes work too. A 24mm or 35mm f/1.4–f/2.8 can be a lifesaver on a no-tripod tour, but watch your depth of field at wide apertures. Zooms remain the most flexible choice because scenes change quickly as your group moves.
Avoid a fisheye unless you want deliberate distortion. The canyon already bends and flows, so heavy fisheye curves can fight the scene. Keep lines expressive yet believable, and correct mild barrel distortion in post for a clean look.
Bring a quick-release plate and a compact, low-profile travel tripod if your tour allows it. A small ball head saves space in tight corners and speeds up framing. Keep your setup simple so you can move fast when the guide calls time.
Protect your lenses from sand. Pack a microfiber cloth, a small blower, and a lens pen so you can gently clean glass without grinding grit. A short lens hood helps with flare and gives the front element a bit of protection from accidental bumps.
Skip unnecessary filters that cut light or add glass surfaces that can catch dust. If you use a protective filter, clean it often and check for scratches. The hood usually offers enough defense in the canyon.
Smartphone shooters should use the ultra-wide lens most of the time. Turn on RAW or ProRAW if your phone supports it, and avoid digital zoom. Hold the phone with two hands, breathe out, and shoot a short burst to find the sharp frame.
Composition tips
Look up and think vertical. Many iconic images are made by pointing the camera toward the sky and letting curves pour in from the edges. A portrait orientation often matches the canyon’s height and flow.
Use leading lines to guide the eye. Rocks carve S-curves and sweeping diagonals that can start in a corner and pull the viewer inward. Move your feet to control where lines enter and exit the frame.
Create depth with a deliberate foreground. Sand ripples, a small rock, or the lip of a ledge can anchor the front of the frame and lead into the walls. Keep the element simple so it adds, not distracts.
Add scale with a human figure when allowed by your guide. A person in a distant bend or silhouetted in a beam gives context to the space. Ask permission and coordinate so you do not block the path.
Switch between portrait and landscape orientations on every scene. Some walls breathe better as a vertical slice, while a wide curve or a peek at the sky wants landscape. When one frame cannot hold the height, consider a vertical panorama.
For vertical panoramas, overlap each frame by 25–30 percent and lock your exposure to keep brightness consistent. If you have a tripod, rotate the camera gently without shifting your position. Handheld works too if you brace well and shoot deliberately.
Balance color and texture in your compositions. Place warm orange layers against cooler blue bounce to create contrast and depth. Keep highlights under control so the glow stays rich and the colors do not wash out.
Use negative space and shadow to shape the scene. Deep, carefully exposed shadows can make bright curves punch harder. Let darkness breathe around your subject and embrace mood over even exposure.
Quick composition checklist in the canyon: frame the curves, find a clean entry line, and choose the orientation that fits. Pre-focus on a textured edge, then recompose to save time. If the light is contrasty, fire a quick bracket before moving on.
Example shot ideas you can try today include the classic beam shot, framed vertical with a clean sand foreground and bracketed exposures. Create an abstract texture at 50–100mm, low ISO, and side-light to show striations and fine color bands. Build a vertical panorama of 3–5 frames when a single shot cannot hold the full sweep of the walls.
If you plan to photograph the lower section, study framing ideas in advance and note how groups move. You can browse some helpful examples of Lower Antelope photos to spark ideas for tighter, more abstract compositions. Bring those mental notes so you can react quickly in the narrowest parts.
What not to do in these tight slots is just as important. Do not block walkway bottlenecks for a shot, and never toss sand without guide permission. Avoid heavy filter stacks and resist changing lenses in blowing dust.
Understanding how the light works in the canyons
The light in a slot canyon is unlike anywhere else. Narrow openings overhead let in small windows of sun, which bounce across the walls and pick up color. That reflected light paints the stone with warm and cool shifts that change by the minute.
Direct light beams appear when sunlight passes through the top slit at just the right angle. Dust in the air makes the beam visible and gives it shape and character. Without dust, the beam can be faint even when it hits the floor.
Midday in summer is usually best for vertical beams. Depending on the canyon’s orientation, 10:30 to 14:00 often gives a window for shafts to appear. Beams are never guaranteed, so be ready to pivot to textures if they do not show.
Check current policies and timing advice before you go, because crowding and seasons affect access and light. Local resources on visiting the canyon can help you plan ethically and efficiently. Combine that knowledge with your camera prep and you will waste less time searching for the right tour slot.
Summer midday brings the beam but also the biggest crowds. You will move quickly and share space, so pre-visualize shots and settings before your group enters. Expect dust, bright highlights, and fast-paced shooting.
Winter and the shoulder seasons are calmer and cooler. The light is softer and angled, with fewer harsh beams but more layered color and texture. You can work slower scenes with longer shutters and deeper depth of field.
Early and late tours trade direct beams for gentle side-light. Side-light reveals texture and can be easier to expose because the dynamic range is friendlier. The palette often shifts cooler, which you can tune later in RAW.
Use the light to shape your subject. Move your position to catch side-light along a ribbed wall, or aim into a beam for silhouette drama and graphic lines. Expose for the highlights and bracket to save the shadow detail for later.
Make on-the-spot adjustments as the guide rotates scenes. Check your histogram often and watch for blinking highlight warnings on beams and sky slices. If a moment looks special, fire a quick bracket and then take a safer single exposure so you have both options.
Example lighting approaches include a backlit beam with sand frozen at 1/500 second for a crisp shaft. Try an even-light texture at f/11, ISO 100, 1–3 seconds to pull out fine striations. In a dim bend, expose long at ISO 100, f/8, 8 seconds for a calm, glowing abstract.
Tripod Challenges
Tripod rules change by operator and by tour type. Many standard tours do not allow tripods, and some only allow them on designated photography tours. Confirm policies before booking so your plan matches your gear and goals.
If you need a refresher or want a second perspective on how tours run, browse reputable guides for current advice and photography tips. Operators may update timing, beam expectations, or group sizes from season to season. Checking ahead helps you pack the right tools and set the right expectations.
Pick a compact travel tripod that fits in tight corridors. A small carbon tripod with a low-profile ball head is easier to place and faster to adjust. Keep a quick-release plate on your main camera so you can mount it in seconds.
Set up with care on uneven sand and rock. Place one leg low and two legs up when the wall slopes, and extend only as much as you need. Do not wedge legs into cracks, scrape the rock, or block the passage as people move through.
When tripods are not allowed, use alternatives. A monopod can buy you one to two stops of stability and stays compact in crowds. You can also tighten your camera strap against your neck or brace your back near a corner if your guide approves.
Use solid technique when you do get to mount a tripod. Turn off lens stabilization or IBIS, engage mirror lock-up or electronic front-curtain shutter, and trigger with a remote or 2-second delay. Stop down to f/8–f/11 for depth and bracket exposures for dynamic range.
Handheld technique matters in motion. Plant your feet, tuck your elbows, breathe out gently, and shoot short bursts to increase your odds of a sharp frame. Follow the 1/focal length guideline or faster and let ISO rise to keep motion under control.
Time management and etiquette keep the experience smooth for everyone. Get your shot, then step aside to let others pass, and follow the guide’s direction at all times. Never leave your bag or tripod unattended where people walk.
Dust is part of canyon life, so protect your gear. Keep your bag zipped, use a simple plastic cover between scenes, and minimize lens changes. Carry a blower and microfiber cloth, and plan a sensor clean after the trip.
Sort your memory and power before you enter. Clear your cards, bring two or three spares, and split the day across multiple cards to reduce risk. Pack extra batteries and keep a phone power bank if you rely on a smartphone for RAW captures.
Before you go, book a photography-specific tour if you need time and a tripod. If you book a standard tour, expect no tripod, a moving group, and quick stops at each scene. Plan your settings in advance so you can shoot with confidence under pressure.
Your core kit should be simple and reliable. Bring a camera body, a wide zoom like a 14–24mm or 16–35mm, and a 24–70mm for details, plus a compact tripod or monopod, a remote release, and cleaning tools like a blower and lens cloth. Toss in a small headlamp or flashlight, a microfiber towel, and a ziplock bag for dust protection.
Dress and behave for safety and respect. Wear closed shoes, long pants to keep sand out, a hat, water, and sunscreen because the approach can be hot, and always follow your Navajo guide’s instructions. Do not climb or touch fragile formations, ask before staging people or tossing sand, and leave no trace behind.
Finish with a clean RAW workflow to maximize your images. Preserve highlights on capture, merge bracketed frames for dynamic range, and remove dust spots before fine color work. Correct white balance selectively and add local contrast to make the stone glow without pushing it too far.
Put all of this together and you now know how to photograph antelope canyon with confidence. Keep your technique simple, respect the space, and let the light guide your choices. The canyon will reward careful exposure, thoughtful compositions, and patience under changing conditions.
What People Ask Most
How do I photograph Antelope Canyon?
Join a guided tour, use a tripod, and bracket exposures to capture the canyon’s light and texture safely and clearly.
When is the best time to photograph Antelope Canyon?
Midday in late spring to summer often produces the strongest light beams, but early morning and late afternoon give richer colors and fewer people.
Can I use a phone to photograph Antelope Canyon?
Yes, modern phones can work well if you stabilize them, use HDR or night mode, and avoid changing lenses in the dusty environment.
Do I need a permit or guide to photograph Antelope Canyon?
Yes, most sections require guided tours or permits, so book a photography-friendly tour in advance and follow guide rules.
How do I capture the famous light beams in Antelope Canyon?
Shoot when the sun is high, ask guides about allowed dust releases, use a tripod, and bracket exposures to keep both beams and shadows balanced.
What common mistakes should I avoid when photographing Antelope Canyon?
Avoid rushing, using a handheld slow shutter, overexposing highlights, and blocking other visitors’ shots.
How can I protect my camera gear in Antelope Canyon?
Keep gear covered from sand, limit lens changes, carry a blower and cloth, and use straps or a secure bag to prevent drops.
Final Thoughts on Photographing Antelope Canyon
If you were wondering how to photograph Antelope Canyon, this guide gave a hands-on path from camera settings to composition, and even a little 270 reminder to tuck into your pocket before the tour. The real benefit is practical control: shoot RAW, protect highlights, and choose lenses and exposure strategies so the canyon’s colors translate into images you recognize. It’s ideal for photographers who plan ahead and want pictures that match the moment they saw.
One realistic caution: light beams and tripod privileges aren’t guaranteed—sun angle, season, and tour rules all affect what you’ll get—so be ready to adapt quickly. By focusing first on exposure, lens choice, and composition you’ll still capture texture, curves, and scale whether you’re on a slow photography tour or a fast no-tripod group. That flexibility is the main payoff of the techniques we covered.
We opened by answering the “how” with clear settings and example shots, and we closed by showing how lenses, light timing, and tripod strategy turn that answer into reliable photos in the canyon. Keep experimenting and you’ll keep discovering new, memorable frames in the rock.


0 Comments