How to photograph glitter and make it sparkle like a million tiny stars?
This guide gives clear, practical steps to capture glitter that really shines.
We cover the gear you need, glitter types and safety so you can plan a clean, safe shoot. You will also see setups for portraits, tossed glitter, macro close‑ups and long‑exposure trails.
Get exact camera settings, lighting recipes and example setups with photos to copy on set. We also walk through editing, cleanup and export tips, plus a shoot‑day checklist and quick troubleshooting to keep your session running smoothly.
What You need: gear, glitter types and safety
Start with a camera that lets you control shutter speed, aperture, and ISO. A fast prime like a 50mm or 85mm gives clean, punchy light and shallow depth when you want it. A 90–105mm macro reveals tiny facets when you need close-up sparkle.
Stability matters, so pack a sturdy tripod and a remote trigger. Off‑camera speedlights or strobes are ideal, but high‑output LEDs work if you want to see the effect live. Bring stands, a softbox for the key, and small modifiers like a grid, snoot, barn doors, and flags to shape hard accents.
Glitter behaves differently by size and finish. Microfine glitter gives dense highlights and silky bokeh, but it clings to everything and can look hazy if overlit. Chunky glitter throws bold, discrete flares that read from a distance and is easier to clean.
Finish changes color and punch. Metallic glitter reflects pure specular hits and looks crisp under hard light. Iridescent and holographic types shift hue with angle, which can be stunning, but they need careful angle control to keep colors balanced.
Keep consumables close: black and colored backgrounds, a drop cloth, cosmetic adhesive or skin‑safe gel for portraits, sticky rollers, clean makeup brushes, and safety goggles. Consider biodegradable glitter when possible to reduce environmental impact. A blower and lens cloth will save your sensor and glass.
Put safety first. Avoid craft glitter near eyes and always choose cosmetic‑grade for skin. Patch‑test adhesives, ventilate the space for long shoots, and give models breaks to remove glitter safely with oil or micellar water before washing.
A quick pre‑shoot checklist helps the day run smooth: charged batteries, extra cards, tripod and clamps, drop cloth, sticky rollers, blower and lens cloth, skin‑safe adhesive, and an assistant briefed on toss timing. Having spare towels and a trash bag speeds cleanup.
How to Photograph Glitter (camera settings & shooting techniques)
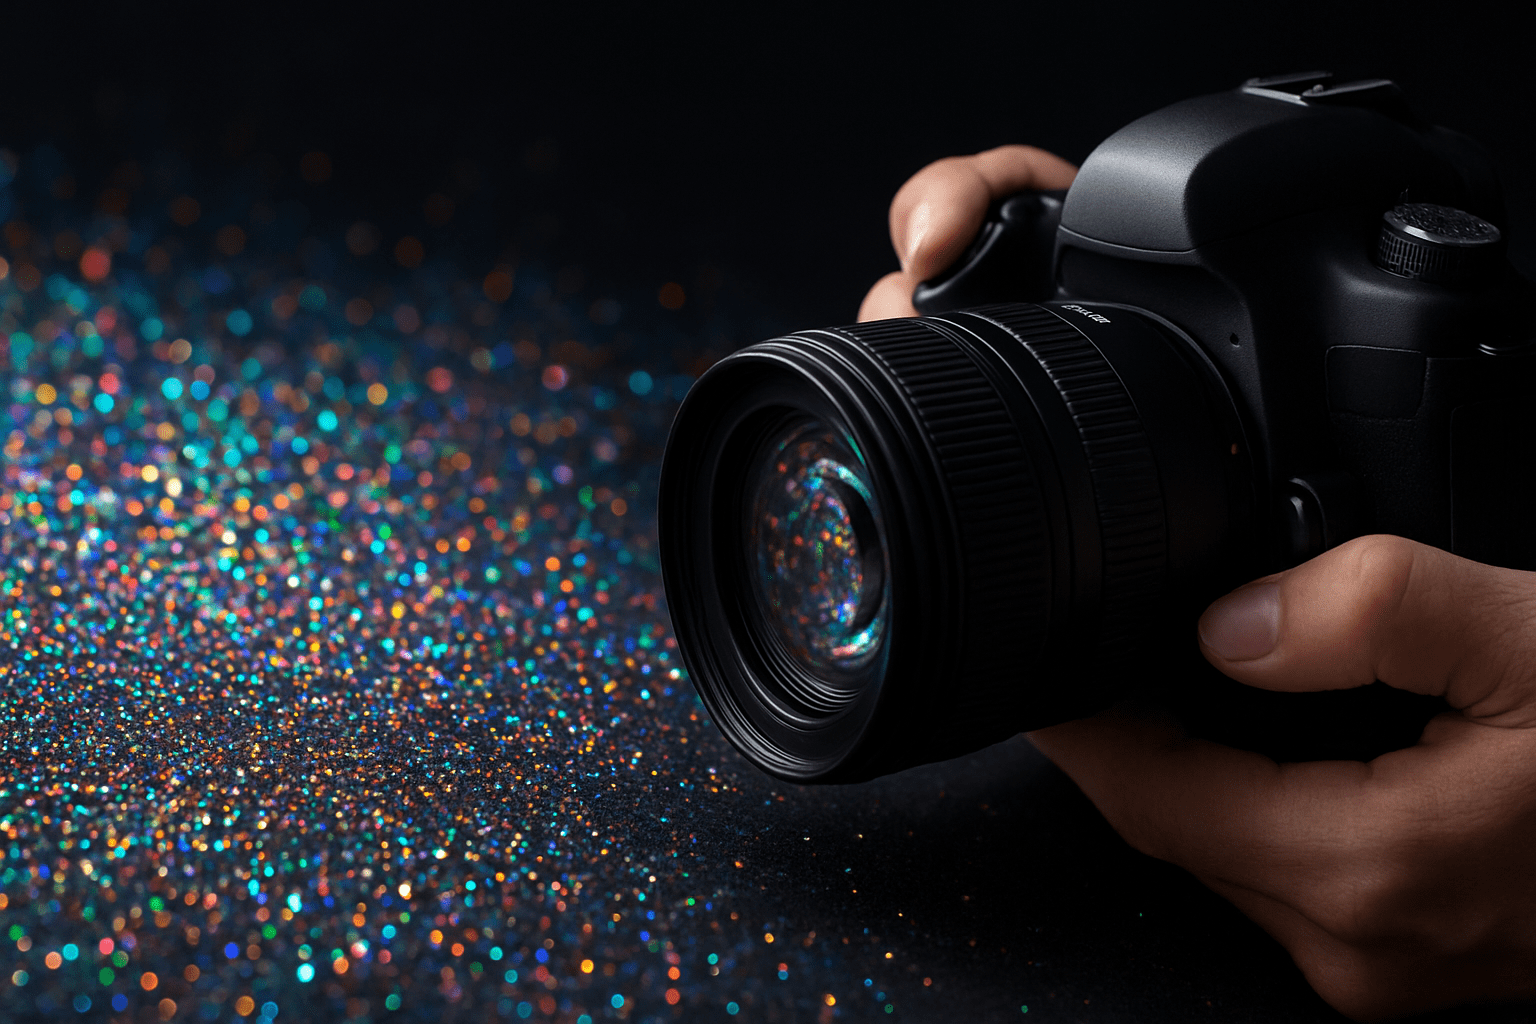
The heart of glitter photography is specular highlights. You control how they look by balancing shutter, aperture, and focus with the right light angle. If you’re learning how to photograph glitter, start simple and build confidence with repeatable setups.
For tossed or flying glitter with continuous light, use a fast shutter around 1/1000–1/2000s. Set aperture between f/4 and f/8 and ISO 400–1600 depending on your LEDs, or use HSS on a flash if you need the speed. Toss across the light, not at it, to catch crisp sparkles.
To freeze tossed glitter using strobes, lock your shutter at the camera’s sync speed, typically 1/160–1/250s. Choose f/4–f/8 at ISO 100–400, and rely on a short flash duration at lower power to stop motion. Keep the room dim to avoid ambient blur.
For portraits with glitter makeup, set shutter to 1/125–1/200s and aperture around f/2.8–f/5.6 to separate subject from background. Light the face with a soft key and add a hard rim to spark the glitter on cheeks or hair. Watch for flare and flag the rim if needed.
For macro and detail shots, mount on a tripod and stop down to f/8–f/16 for depth. Use flash so you can keep ISO 100–400 and maintain sharpness. If one frame can’t hold it all, shoot a focus stack and merge later for glitter sharpness front to back.
To create long‑exposure glitter trails, secure a tripod and work at 0.5–5s at f/8–f/16, ISO 100. Use rear‑curtain sync so you capture a clean frozen end to the motion with a light trail behind it. Have the model or assistant move slowly and repeat the path.
Focus and drive modes can make or break the session. Pre‑focus on the plane where the glitter will fly, then switch to manual focus so the camera doesn’t hunt. Use high‑speed burst for action, and try back‑button focus or AF‑C for moving faces.
Meter for the highlights and let the scene ride a touch dark so sparkles don’t clip. Check your histogram and blinkies often, and use manual flash power for repeatable results, letting TTL only get you close before switching. For more ideas on angles and exposure, study how to make glitter sparkle with simple light changes.
Understand HSS trade‑offs if you raise shutter past sync speed. HSS eats flash power fast, so you’ll need the light closer, a wider aperture, higher ISO, or a beefier flash. If you can, stay at sync speed and let flash duration do the freezing.
If you’re still wondering how to photograph glitter when autofocus fails, pre‑focus and shoot manual. If highlights look dull, change the angle between light, glitter, and camera rather than just cranking power. Small angle shifts often unlock the magic.
Lighting: make the glitter sparkle
Glitter wants small, hard, directional sources to throw bright pin‑point reflections. Big, soft light looks great on skin but can flatten sparkle into a sheen. The sweet spot is a soft key for faces and hard accents for the glitter.
Use a softbox or umbrella for your key at a gentle angle for flattering skin. Then add a bare speedlight or a gridded head as a rim or backlight to ignite the glitter. Balance the ratio so the key holds form while the rim drives sparkle.
Try a rim/backlight placed 30–45 degrees behind the subject, aimed across the glitter toward camera. Keep it out of frame and use a flag if you see flare. Think of a triangle: light, glitter, and lens aligned so reflections bounce straight back.
For even twinkles, place two bare speedlights behind and off to each side, aimed slightly forward. Their overlapping beams create a field of micro‑highlights. Start low power, then nudge angles until the brightest facets light up.
If you only have one small source, pair it with a reflector. Aim the hard light to make the sparkles, and use the reflector to fill shadows without softening the highlights. Keep the reflector farther away than the hard source to preserve crispness.
Speedlights and strobes have the punch and short flash duration to freeze motion. Continuous LEDs show you the effect live, but you’ll need a fast shutter or more output to stop motion. Ring lights give pretty catchlights, but add a hard backlight so texture doesn’t vanish.
Modifiers steer the beam where you need it. Grids and snoots confine specular hits; diffusion belongs only on the key if you want soft skin. For more portrait ideas and angles, browse techniques for glittery portraits and adapt them to your set.
If the scene lacks sparkle, move the accent light closer or reduce diffusion. Shift the angle between light, glitter, and lens by a few degrees, or add a second hard light from the opposite side. Small changes create big differences with glitter.
Setup & composition: backgrounds, angles, movement and sample set‑ups
Background choice sets the mood and contrast. A black background makes bright highlights pop and isolates color. Colored or lighter backdrops soften the look and can echo tones in iridescent glitter for a dreamy palette.
Create separation by pulling the subject away from the background. A longer lens and a wider aperture help blur the backdrop and turn stray glitter into pleasing bokeh. Avoid busy patterns that compete with the sparkles.
Angle is everything. Rotate the subject, the light, or yourself until you see reflections flare in the viewfinder. Work three basic camera‑to‑light angles: near‑axis for subtle sheen, side for texture, and back/diagonal for maximum sparkle.
For a portrait glam setup, place a soft key in a small softbox at about 45 degrees to the face. Add two bare speedlights behind at shoulder height for crisp rims that catch cheek and hair glitter, as in a classic glitter portrait. Try 1/160s, f/4, ISO 200 and tune flash power to taste.
For tossed glitter action, shoot against a dark background with a backlight and a side key. Pre‑focus where the glitter will pass, switch to manual focus, and fire in burst as your assistant tosses from just off‑frame. Start at 1/200s with strobes or 1/1000s with LEDs, f/5.6, ISO 400.
For macro sparkle, mount on a tripod, snoot a strobe onto a small area, and stop down to f/11–f/16. Move focus in small steps and capture a series for stacking if needed. Keep the light low and hard so you reveal edges without filling every shadow.
For glitter trails, set 2 seconds at f/11, ISO 100, with rear‑curtain sync. Have the subject sweep glitter or a glittered prop through the frame, then hold still for the flash pop at the end. Repeat the motion path until you get clean arcs and a sharp subject.
Plan cleanup and logistics before the first toss. Clamp backgrounds, define a throw zone on a drop cloth, and keep a sticky roller and small vacuum nearby. An assistant makes timing easier and helps control mess between takes.
If you’re still dialing how to photograph glitter on location, test outdoors in open shade with a small hard backlight for safety and easy cleanup. Watch wind direction so glitter doesn’t blow back into eyes. Pack resealable bags for used glitter and wipes for hands.
Post-Processing Glitter Photos
Start by importing RAW files into Lightroom and culling for clean highlights and expressions. Glitter frames vary a lot, so pick the ones with the best angles of reflection. Keep white balance consistent across the set before deeper edits.
Globally, nudge exposure and contrast, then raise whites and highlights until sparkles sing without clipping. Pull blacks slightly for depth and add a touch of clarity only if it doesn’t roughen skin. Fine‑tune HSL to prevent iridescent colors from oversaturating.
Use local masks to enhance only the glitter. Paint small areas with extra clarity and texture, and sometimes a hint of dehaze, leaving skin untouched. Luminance or color‑range masks help target bright particles and keep noise out of shadows.
For sharpening, mask aggressively so you sharpen sparkles, not pores. In Photoshop, a high‑pass layer on Soft Light or Overlay can add micro‑pop; invert the mask and paint it back onto glitter. Keep it subtle so edges stay believable.
If you want a dreamy glow, duplicate the layer, apply a light Gaussian blur, and blend on Screen or Soft Light at low opacity. Protect key details with a mask and avoid blooming over eyes and lips. Add a tiny bit of grain if the glow looks too plastic.
Clean up stray glitter with spot heal, especially near eyes and along the nose. Use frequency separation only when heavy skin retouch is needed, and always preserve real skin texture. Remove color fringing around hot highlights if lenses introduced it.
Balance noise reduction with detail retention. Apply stronger NR to shadows, then sharpen selectively on the glitter layer. Export web files in sRGB with tailored output sharpening, and prepare print files at full resolution with appropriate profiles.
Deliver a few before‑and‑after frames to show the transformation and your lighting intent. A short raw‑to‑final GIF or screen recording helps clients understand the craft. With a consistent workflow, you’ll know exactly how to photograph glitter from set to screen every time.
What People Ask Most
What’s the easiest way to photograph glitter?
Start simple with a clean surface, steady camera support, and good light; close-up shots help capture the sparkle.
Do I need special equipment to photograph glitter?
No, a smartphone or basic camera works fine—lighting and stability matter more than expensive gear.
How do I avoid blurry glitter photos?
Keep the camera steady with a tripod or firm support, focus carefully, and use brighter light so the camera can use a faster exposure.
Should I use flash when photographing glitter?
Flash can make glitter pop but may create harsh reflections, so try diffused or angled light for more even sparkle.
How can I make glitter sparkle more in photos?
Use angled light and a contrasting background, and move around to find the angle where the glitter catches the most reflection.
Any tips for composing glitter shots for beginners?
Fill the frame, try different focal points, and add simple props or color contrast to make the glitter stand out.
What common mistakes should I avoid when learning how to photograph glitter?
Avoid harsh direct light, busy backgrounds that hide the glitter, and skipping focus checks before you shoot.
Final Thoughts on Photographing Glitter
If you remember one set of numbers from this guide, make it the gear list and the 270 test shot as a quick baseline — they’ll save you time when you’re dialing in light and motion. The real benefit here was turning chaotic specks into calm, controllable highlights so your images sing with texture and life. This guide walked through gear, glitter types, lighting recipes, and the sample settings and setups you asked for, so you won’t be guessing on shoot day.
A realistic caution: it gets messy and can irritate—avoid craft glitter near eyes, patch-test adhesives, and give yourself ventilation and cleanup time. Portrait and commercial shooters, macro fans, and creative hobbyists will find the most payoff from these recipes.
Start with a gentle rim-lit portrait then try a tossed-glitter burst with an assistant — small shifts in angle and source size make all the difference. You’ve got the recipes and troubleshooting here, so enjoy experimenting and let the sparkle lead the way.


0 Comments