how to photograph andromeda? Want to capture its faint spiral arms from your backyard tonight?
This guide shows where to find M31 and how to frame it for lenses or telescopes. It also explains the best months, moon phases, and how to beat light pollution.
You’ll learn camera setups, lens choices, and simple exposure rules for untracked and tracked shooting. The article includes stacking and editing steps plus copy‑paste starter settings.
There is a short checklist and quick troubleshooting to keep you shooting all night. Read on to learn how to photograph Andromeda step by step.
Find The Galaxy
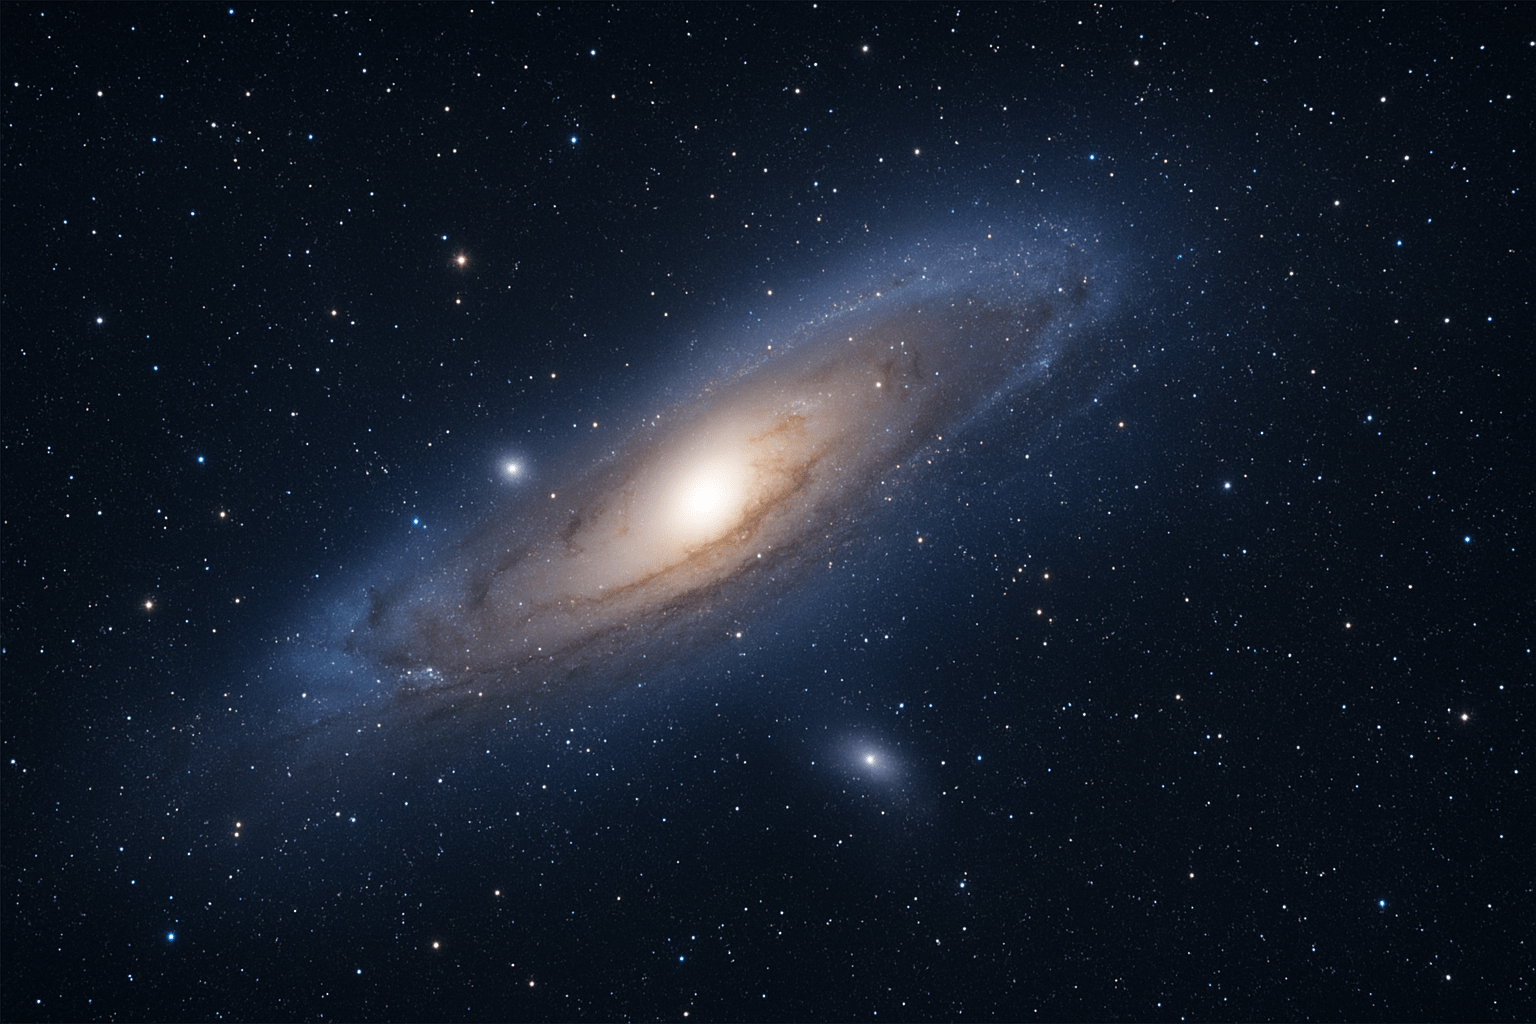
Andromeda, cataloged as M31, is the nearest large spiral galaxy to us and spans about 3 degrees of the sky. That is six Full Moons across, so it is far larger than most people expect through a camera. Two bright satellites, M32 and M110, sit nearby and are easy to capture once your exposure is dialed in.
Under very dark skies, M31 is a faint smudge to the naked eye. In a camera, it becomes a glowing core with dust lanes and pastel arms. If you are wondering how to photograph andromeda, start by understanding its size so you can choose a lens that frames it cleanly.
The best time to shoot Andromeda is from late summer through early winter in the Northern Hemisphere. Aim for a new Moon or a thin crescent, and try to shoot when the galaxy is high above the horizon to reduce haze and light pollution. Higher altitude improves contrast and allows longer exposures before skyglow overwhelms the frame.
Altitude and azimuth matter more than most think. Near the horizon, atmospheric extinction robs you of light and sharpness, and exposures clip the background quickly. Plan to shoot when M31 crosses the meridian and sits 45 degrees or higher for the cleanest data.
Locating Andromeda is easy with star-hopping. Find Cassiopeia’s W shape and draw an imaginary line from the central V toward the Andromeda constellation. Or hop from Mirach (Beta Andromedae), then a short step to Mu Andromedae, and you are there. After a few tries you will see the oval haze pop into view in live view or on a test shot.
Planetarium apps make this faster. Use Stellarium, SkySafari, Sky Guide, or PhotoPills to overlay the sky with AR and to preview the field of view. These apps also show lens FOV frames, so you can decide whether 50mm shows the whole galaxy or 135mm gives you a tighter crop with the satellites.
Pick a dark-sky site and check conditions before you drive. The Bortle scale is your friend; Bortle 4 or darker helps the outer arms appear without heroic processing. Look for good transparency on ClearOutside or Meteoblue, and avoid thin haze and moonlight that wash out the dust lanes.
Decide on your framing ahead of time. At 24–35mm on full-frame, you get a wide field that shows M31 with Cassiopeia or autumn Milky Way context. At 50mm, the entire galaxy fills a nice chunk of the frame, while 85–200mm starts to show dust lanes and the satellites more clearly. Over 200mm, you will want a tracker to keep stars sharp. For more sky planning context, this complete guide is helpful for orientation and visibility tips.
Camera Setup and Lens Selection
You do not need a telescope to make a strong Andromeda image. A stable tripod, a DSLR or mirrorless camera, a fast lens, and a remote or intervalometer are the essentials. A Bahtinov mask helps nail focus, and a star tracker is optional but powerful when you want longer exposures.
Primes usually beat zooms for night work because they are brighter and cleaner in the corners. Great ranges for M31 are 35–135mm for wide or medium fields, and 200–500mm if you plan to use a tracker. A small apochromatic refractor with a focal reducer is an excellent step up once you crave more detail.
Shoot your lens as wide as you can while keeping stars tight. Many primes look better stopped down one stop to tame coma and reduce vignetting. If vignetting is heavy, plan to shoot flats later to fix the darker corners in processing.
Set your camera to RAW and manual mode. Keep white balance neutral, since you will balance color later, and disable long-exposure noise reduction so you do not double your capture time. Stacking and dark frames provide better control over hot pixels and noise than in-camera processing.
Use the 500-rule as a starting point for untracked shutter speed: 500 divided by focal length and crop factor. On high-megapixel cameras, try 300–400 instead to avoid tiny trails when you zoom in. For example, a full-frame 50mm gives about 10 seconds, while 200mm is around 2–3 seconds; on APS-C, multiply focal length by 1.5 before you do the math.
Focus manually on a bright star using 10–20× live view. A Bahtinov mask creates diffraction spikes that tell you when focus is perfect, and it works on lenses and telescopes alike. Do not trust the infinity mark on the lens, and recheck focus as temperatures drop.
ISO is not one size fits all. For untracked wide fields, ISO 800–3200 is common, with ISO 1600 a good starting point. On a tracker, try ISO 200–1600 depending on how long your single exposures are and how your camera handles dynamic range.
Plan to capture many short sub-exposures rather than a few long ones. Start with 30–60 subs if you are new, and push toward 100–200 as your confidence grows. Use an intervalometer, enable mirror lockup or an electronic shutter, and add a 2-second delay so your tripod stops shaking before each frame begins.
How to Photograph the Andromeda Galaxy Without a Telescope
This is the easiest path for most people. Put the camera on a tripod, point a fast lens at M31, take many short exposures, and stack them. It is a simple, repeatable workflow that delivers impressive results from suburban or rural skies.
Start by picking a lens and composing using your app’s field-of-view overlay. A full-frame 50mm frames the whole galaxy with room for M32 and M110, while 85–135mm tightens the view and reveals more shape in the arms. Keep the galaxy slightly off-center to balance the frame and leave space for the satellites.
Set the camera to manual exposure. Open the lens wide or stop down one stop if stars look messy at the edges, then pick a shutter using the 500-rule. Use ISO 1600 as a baseline and adjust after a couple of test shots to keep the histogram lifted but not clipping the sky.
Focus carefully before you start the series. Use live view on a bright star or a Bahtinov mask, then tape the focus ring so you do not bump it. Leave the aperture unchanged after focusing, because changing it can shift focus on many lenses.
Take many subs instead of a handful of long frames. Aim for 40–120 images for your first session so you can stack away noise. Capture flats, darks, and bias frames to calibrate out vignetting, dust motes, and hot pixels in processing.
Here are simple starting templates you can try. On full-frame with a 50mm f/1.8 lens, set f/2, 10 seconds, ISO 1600, and shoot 60 frames. On APS-C with a 35mm f/1.8, set f/2, 8 seconds, ISO 1600, and shoot 50–80 frames.
If you want a tighter untracked view, a 200mm on APS-C works with short subs. Use f/4, 1.5–2 seconds, ISO 3200, and plan for 200 or more frames to build signal. The short shutter keeps stars round while the stack boosts faint arms.
Composition can be creative even without a tracker. Try a starry-landscape approach by shooting one set for the sky and a separate short, low-ISO frame for the foreground, then blend them later. Keep M31 off-center on the upper third line to let the scene breathe.
Common problems have quick fixes. If you see star trailing, shorten the shutter or consider a tracker. If edges look soft or show comma-shaped stars, stop down a little or plan to crop the center in post; if the sky glows orange, stack more frames and remove gradients during editing.
Here is a simple sample shoot timeline you can copy. In the afternoon, check ClearOutside and Meteoblue, charge batteries, and pack a tripod, intervalometer, red headlamp, warm layers, and a Bahtinov mask. Around sunset, drive to a Bortle 4–5 site, arrive early, and use your app to confirm when M31 is highest.
As darkness falls, polar alignment is not needed for an untracked session, so you can start quickly. Frame M31 with your chosen lens, focus on a bright star, and run a test sequence of three images to confirm exposure and composition. Then start the intervalometer for your full set and keep an eye on dew and lens fog.
After you get home, back up your files and shoot your calibration frames if you did not do them on site. Load everything into your stacking software and move into the edit. This is the part of the journey that completes how to photograph andromeda without buying more gear, and it is where the galaxy really comes alive.
If you need encouragement that consumer gear works, see how a photographer captured Andromeda with a zoom lens and careful technique. The approach is nearly identical to what you are doing here.
Using a Star Tracker for Longer Exposures
A tracker unlocks longer single exposures and reveals the outer arms, dust lanes, and subtle blue star clouds. Instead of shooting thousands of one-second frames at long focal lengths, you can shoot minutes per sub and keep your stack count reasonable. This is a major upgrade when you want more detail from the same skies.
Portable tracker heads like the Sky-Watcher Star Adventurer and the iOptron SkyGuider mount on a sturdy tripod with a wedge. Heavier equatorial mounts track more accurately and carry bigger lenses and small telescopes. Balance your setup and use counterweights if your lens is long or front-heavy.
Polar alignment controls how long you can expose before stars trail. Use the mount’s polar scope, a smartphone app for Polaris position, or a USB camera solution like PoleMaster or SharpCap plate solving. Better alignment buys longer subs and sharper stars, especially above 200mm.
Guiding takes tracking a step further by correcting small errors in real time. A small guide scope plus a guide camera, controlled by PHD2, keeps the mount honest and enables five to twenty-minute exposures. Add dithering between frames to spread out pattern noise and help your stack reject artifacts.
Plan exposures in minutes instead of seconds when you track. At 200mm unguided, 1–5 minutes per sub is common depending on mount quality and alignment. Guided sessions at 300–500mm can run 5–20 minutes per sub; watch for meridian flips, and resume after the flip to keep framing consistent.
For long runs, check focus every hour as temperatures change, and run dew heaters on lenses or refractors. Aim for 20–50 tracked subs and match them with darks, flats, and bias frames of the same temperature and settings. The extra care pays off in smoother gradients and cleaner star profiles.
If you are still practicing, start with ISO 400–800, f/4–f/5.6 on a 200mm lens, and 2-minute unguided subs. Once guiding is reliable, try ISO 200–400 and 5–10 minute subs to push fainter arms. The results will show more texture in the core and clearer dust lanes along the galaxy’s edge.
Edit and Post-Processing Workflow
Before any creative edits, do the technical cleaning. Calibrate your lights with darks, flats, and bias frames, then register and stack them in DeepSkyStacker, Siril, Sequator, or PixInsight. This removes fixed pattern noise, vignetting, and dust, and it raises the signal-to-noise ratio systematically.
Stacking software aligns stars before combining frames. Use median or sigma-clipping rejection to throw out planes, satellites, and bad frames. Remember that SNR improves with the square root of the number of subs, so four times the frames roughly halves the noise.
With a clean, linear stack, start by removing gradients caused by light pollution. In PixInsight, tools like DynamicBackgroundExtraction help, and in Photoshop you can use gradient removal techniques or plugins. Keep the background neutral and even before you stretch.
Stretch the histogram slowly using curves and levels. Bring up the midtones to reveal the outer arms, then protect the core so it does not blow out to white. Small moves and many passes keep the galaxy natural and hold color.
Balance color and add gentle saturation. Cool the background slightly if it trends warm from skyglow, and nudge saturation to bring out star colors and the galaxy’s blue and yellow tones. Apply noise reduction on the background only, and leave the galaxy’s structure crisp.
Manage stars so they do not dominate the frame. You can reduce star sizes subtly or remove stars with tools like StarNet2, edit the galaxy, and then blend the stars back. A bit of local contrast or deconvolution on the galaxy helps reveal dust lanes without oversharpening.
Advanced edits include deconvolution for fine detail, masked contrast boosts in the arms, and chromatic aberration cleanup on bright stars. If your corners are dark or stretched, flats and careful masking help balance vignetting. Always zoom out often to keep a natural look.
For output, prepare two versions. Create a high-resolution TIFF or FITS master you can revisit, and then save a resized JPEG for the web with a touch of final sharpening. For prints, keep a larger file at 240–300 dpi and soft-proof for your paper.
Here is a fast pre-flight checklist to keep handy. Charge two sets of batteries, clear and format memory cards, and pack a sturdy tripod, lens caps, Bahtinov mask, intervalometer, red headlamp, dew heater or chemical hand warmers, microfiber cloth, and warm clothing. Add gaffer tape for focus and a notebook to log settings.
Quick troubleshooting saves the night. Trailing stars mean reduce shutter time or use a tracker; soft stars mean refocus and consider stopping down; heavy gradients mean take flats and remove gradients in post; hot pixels mean shoot dark frames at the same temperature and exposure. If your stack looks muddy, gather more subs and reprocess with stronger rejection.
Copy-ready settings make it easy to start. Untracked wide field: 24–50mm, f/2–f/2.8, 6–12 seconds, ISO 1600, 60–120 subs. Untracked telephoto: 135–200mm, f/2.8–f/4, 1–3 seconds, ISO 3200, 150–300 subs.
For tracked sessions, try these. Tracked unguided: 135–200mm, f/3.5–f/4, 60–180 seconds, ISO 400–800, 40–80 subs. Tracked guided: 300–500mm, f/4–f/6, 5–10 minutes, ISO 200–400, 20–50 subs with dithering.
How many subs should you aim for? Beginners can start with 20–50 and still see the galaxy’s core and some arms. Intermediate shooters target 50–150, and advanced teams capture 200+; remember that noise falls with the square root of N, so more data always helps.
Be safe and courteous at night. Respect private property, keep lights dim and red to protect night vision, and pack out every bit of trash. Park carefully, watch for wildlife, and let drivers know you are there with reflective tape on your tripod legs.
For more reading and inspiration, explore Andromeda tips, then look up a DeepSkyStacker beginner tutorial, PixInsight process guides, the PhotoPills FOV calculator, tracker setup guides, and the PHD2 guiding tutorial. The last step in how to photograph andromeda is practice, and every session teaches you something new.
What People Ask Most
What is the easiest way to start learning how to photograph Andromeda?
Begin by finding a dark spot, mounting your camera on a tripod, and taking steady long exposures to capture the faint galaxy. Practice and simple stacking of multiple shots will help you learn how to photograph Andromeda effectively.
Do I need a telescope to photograph Andromeda?
No, you can capture Andromeda with a camera and a wide lens or even a smartphone on a tripod, though a telescope can show more detail. Starting without a telescope is a great way to learn the basics.
When is the best time to photograph Andromeda?
Choose clear, moonless nights when Andromeda is high above the horizon for the best visibility. Early fall and late fall evenings often give good viewing windows in many locations.
How do I find Andromeda in the sky?
Use bright stars and nearby constellations as guides or a simple sky app to point you to the right area, then look for a faint, fuzzy patch. Familiarize yourself with the shape of the Andromeda constellation before you go out.
Can I photograph Andromeda with a smartphone?
Yes, steady your phone on a tripod or stable surface and use night mode or a long-exposure app, then take multiple shots to blend later. Small adjustments and stacking can make a big difference in the final image.
What are common beginner mistakes when trying to photograph Andromeda?
New photographers often skip using a tripod, shoot under bright city lights, or don’t check focus before long exposures. Making small fixes like finding darker skies and confirming focus will improve results quickly.
How important is post-processing when photographing Andromeda?
Post-processing is important to bring out faint details and colors, and simple edits like stacking, contrast, and noise reduction can greatly improve your photo. Even basic adjustments can turn a faint capture into a more visible galaxy image.
Final Thoughts on Finding the Galaxy
Whether you’re using a 270 mm telephoto or a fast wide prime, this guide pulls planning, gear, shooting, and post into a simple path that turns M31 from a faint fuzzy spot into a photograph you’ll recognize. It gives practical steps you’ll actually follow: frame with apps, pick the right lens, capture lots of subs, and stack/process to reveal structure and color. That clarity is the real payoff—less guesswork, more satisfying images.
Be realistic: even with good technique, capturing Andromeda takes clear skies, patience, and time—especially for collecting enough subs and doing careful post-processing. If you’re a motivated beginner–intermediate shooter who likes hands-on learning, you’ll get the most from these methods; experienced users will find refinements to speed their workflow.
Remember the opening idea about spotting M31 as a naked-eye smudge? We showed how to move from that casual glimpse to a composed frame by choosing nights, using FOV overlays, and stacking exposures for detail. Keep practicing those steps and you’ll soon be making images that match what you see in the sky and in your imagination.


0 Comments