How to blur a person in a photo? This guide on how to blur a person in a photo is simple and up-to-date. You will learn clear step-by-step methods for desktop and mobile.
We cover Photoshop, free editors, web tools, and mobile apps so you can pick the right tool. You will also learn when to use Gaussian, motion, or pixelate blur for privacy or style.
Follow a safe, non-destructive workflow with layers, masks, and Smart Filters so you can tweak later. The article includes a quick one-line answer, screenshots, and a downloadable cheat-sheet.
Read on for a full step-by-step walk-through, troubleshooting tips, and a privacy checklist to keep identities safe. Jump to the Photoshop or mobile section if you need a fast solution.
How to Blur a Person in a Photo: Step-by-Step Guide
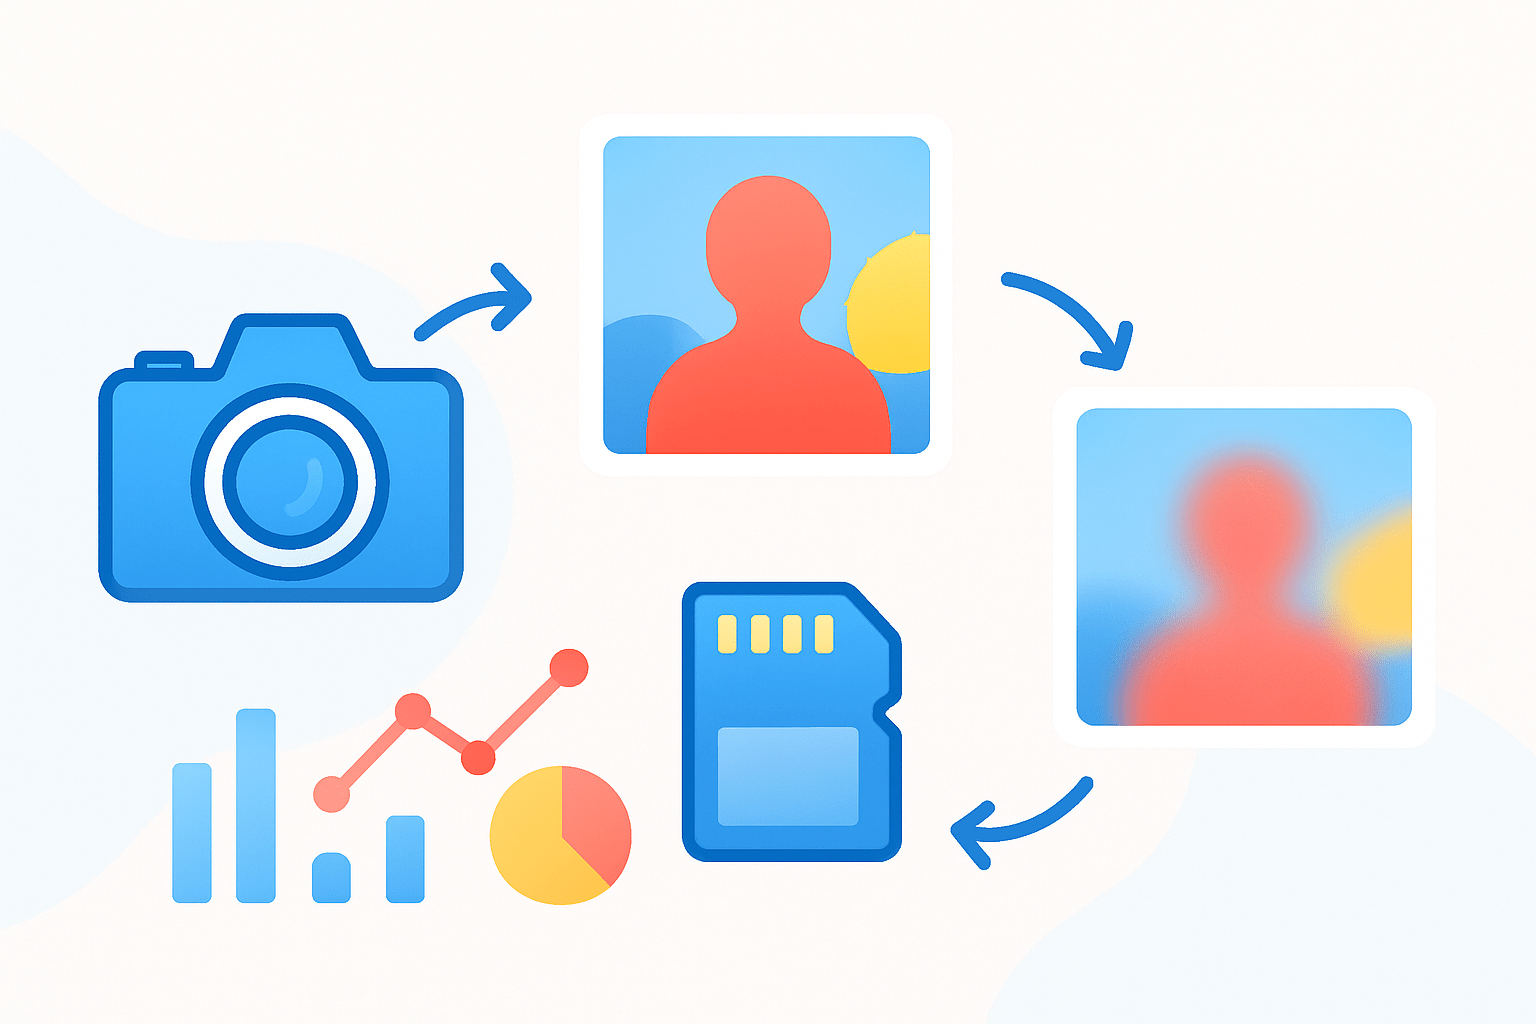
If you came here to learn how to blur a person in a photo, you are in the right place. I will keep it simple, visual, and non-destructive, so you can adjust or undo anything later.
Quick answer: Duplicate the layer, select the person, turn the selection into a mask on a duplicate, then apply a blur filter and export without metadata.
1. Open the photo and duplicate your background layer so you do not damage the original. In most editors you can right click the layer and choose Duplicate, or press a keyboard shortcut like Ctrl or Cmd + J.
2. Select the person you want to blur using the selection tools your app provides. Quick Select, Lasso, Select Subject, Brush-based selection, or face detection tools all work, and the best choice depends on the image and the software.
3. Refine the selection so the edges look natural once blurred. Add a little feather, use Select and Mask or any edge refine option, and aim to avoid a hard halo around hair or clothing.
4. Turn the selection into a layer mask on your duplicate layer, or convert that duplicate to a Smart Object first. A Smart Object lets you stack Smart Filters and edit settings later without quality loss.
5. Apply the blur filter to the duplicate layer and preview it at 100% zoom. Gaussian Blur is the most common, Field or Iris Blur creates a lens-style look, Motion Blur adds directional streaks, and Pixelate or Mosaic turns features into blocks.
6. Increase the intensity until the person is not recognizable at typical viewing sizes. Check both at full zoom and at the size people will actually see on social or a website to make sure identity is protected.
7. Soften the mask edges a touch more and fix stray pixels that reveal eyes or hair. A small, soft brush painting on the mask is usually enough to tidy things up.
8. Flatten and export a copy, and strip metadata if privacy is the goal. Remove location and device data, and keep your unedited original stored safely offline.
Use Gaussian Blur when you need clean, even softening for privacy, documents, or quick edits. Use Pixelate or Mosaic when irreversibility matters most, because blocky squares make it harder to reconstruct identity, and are a clear signal of redaction. Use Motion Blur when you want a creative, dynamic streak that suggests movement rather than strict anonymization.
Work non-destructively from start to finish. Duplicate layers, use masks instead of erasers, and lean on Smart Filters when available so you can revisit the settings a week later without starting over.
If you are a visual learner, preview a before and after, and watch the filter dialog’s live preview as you drag the radius. Save intermediate versions so you can compare subtle differences in feathering and blur strength.
For a quick pocket cheat-sheet you can save: Photoshop or Photopea, duplicate layer, Select Subject or Lasso, Mask, Gaussian or Pixelate, export without EXIF; Snapseed, Tools, Lens Blur or Brush, paint over face, save; Canva, use a blur effect or shape mask; Pixelate method, Mosaic filter with larger block size for strong privacy.
Choosing the Right Tool for Blurring
Different tools fit different skills and goals, and that choice affects speed and quality. If you only blur a face once in a while, a simple app is fine, but for repeat work or sensitive images, pick software with strong masking and export control.
Photoshop offers the best control, great selections, and Smart Filters, but it costs money and takes time to learn. If you plan to do a lot of selective blurs or want to reuse masks and batch edits, its depth pays off.
GIMP and Photopea are excellent free options for basic blur and pixelate. Photopea runs in the browser and mirrors Photoshop-style layers and masks, so it is easy to transfer skills between them.
Canva, Pixlr, and Fotor are fast and friendly for non-editors. Their selective blur can be limited, but for a quick privacy pass or a social post, they are often more than enough.
Snapseed, Facetune, and Blur Photo Editor on mobile let you brush blur right on the screen. They are ideal for travelers and reporters who need to blur someone quickly before sharing.
Dedicated redaction or pixelate tools and scripts are worth it if you must anonymize many images in a repeatable way. Look for batch features, face detection, and irreversible methods if you work in journalism, research, or public safety.
Match your blur type to the goal. For privacy, pick heavy Gaussian or Pixelate, or even a black bar if the situation is high risk and speed matters. For an aesthetic background blur, use Field or Iris Blur to mimic shallow depth of field, and for creative energy try directional blur with a light touch.
Before you choose, consider whether you need automatic face detection, non-destructive editing, batch processing, and how much you want to spend, plus your device type. If you want a pro walk-through, this guide to blur faces in Photoshop shows the process in detail for complex shots.
Blurring Faces in Photoshop
Start by opening your image, then duplicate the background layer so your original stays untouched. Right click the copy and choose Convert to Smart Object, which enables editable Smart Filters.
Go to Select, then choose Subject for a fast, AI-powered selection of the person. If it misses details, switch to Quick Selection or Lasso to add and subtract areas, then open Select and Mask to refine edges.
Inside Select and Mask, set a small feather to keep edges from looking cut out. Use the Refine Edge Brush around hair, veils, or fur, and check both On Black and On White previews to spot halos and gaps.
With the person selected, click the Mask icon on your Smart Object layer to store the selection. Now open Filter, Blur, Gaussian Blur, and slide the Radius while watching the face at 100% zoom; start around 15 to 30 pixels for web shots and push higher for big files.
For a lens-like look, try Filter, Blur Gallery, Field Blur or Iris Blur. Place the pins so the face sits in the most blurred zone, soften the transition ring, and keep the blur believable compared to the scene’s depth of field.
To suggest movement, choose Filter, Blur, Motion Blur, and set the Angle to match the subject’s direction. Adjust Distance to taste, and keep the face unrecognizable without turning it into distracting streaks; this helps when you want style plus privacy, and these motion blur effects can inspire settings.
Because you used a Smart Object, you can click the Smart Filter mask to limit the blur with a brush. Paint black to remove blur from parts that should stay sharp, and paint white to restore it where you missed.
For multiple faces, hold Shift to add each face to the selection before masking, or use Select, Save Selection to reuse it on similar photos. This saves time in event galleries and team portraits.
When you are done, export with privacy in mind. Use File, Export As to strip metadata, and share a copy rather than the original to avoid leaking location or device info.
If you see halos, add more feather or softly brush the mask edges by hand. For hair and translucent edges, use Decontaminate Colors in Select and Mask, then finish with low-opacity brush strokes to blend tricky spots.
As a starting point, try a 20 px Gaussian radius for small web faces, 40 to 80 px for large images, and 5 to 30 px feather depending on resolution. Always adjust by eye; the goal is an unrecognizable face that still fits the photo’s look.
Blurring Faces on Mobile Devices
Phones make quick blurring easy when you are on the go. If your goal is to share fast while protecting privacy, a mobile app often beats a laptop.
In Snapseed, open the photo, tap Tools, then Lens Blur, and position the ellipse over the face. Increase Blur Strength, widen Transition to avoid hard edges, and export a high-resolution copy.
For more control in Snapseed, use the Brush tool and choose Blur, then paint directly over the face. Zoom way in and adjust brush size so you can stay inside the hairline and along the chin cleanly.
Facetune offers an intuitive blur or smooth tool you can paint on like makeup. If you want extra tips and examples, this short blur faces guide shows different ways to hide a person quickly.
Google Photos and iPhone Photos can blur backgrounds when a portrait depth map exists, but that is not the same as selectively blurring a person. For faces in a crowd or non-portrait shots, use a third-party app that lets you brush the blur.
Dedicated apps like Blur Photo Editor or AfterFocus let you paint the blur, adjust feather, and set intensity with a slider. They are handy for group shots where each face needs attention.
For precision, pinch to zoom, use a stylus if you have one, and lower brush opacity for subtle passes near edges. Save intermediate copies so you can compare results before you share.
When exporting, keep the original resolution if possible and remove location data from the share menu. If privacy is critical, post a screenshot of the blurred image instead of the original file to drop hidden metadata.
Remember the mobile cheat-sheet: Snapseed Lens Blur for a quick oval blur, Snapseed Brush for precise painting, Facetune or Blur Photo Editor for fast manual blurs, and export without location data. This is the simplest way to master how to blur a person in a photo on the go.
Best Practices for Blurring Faces (Privacy, Ethics & Common Mistakes)
Blurring helps, but consent still matters. When in doubt, ask for permission, and if you cannot, consider heavier redaction or not posting at all.
Remove EXIF metadata and keep original files private if the situation is sensitive. Share copies only, and avoid cloud backups that sync unblurred versions.
Some cases require irreversible methods, especially with minors, witnesses, or victims. Use strong pixelation, a black bar, tighter cropping, or choose not to publish if safety could be at risk.
Too little blur is the most common mistake, so test at 100% and on a large screen before posting. If you can still recognize unique features, increase radius or switch to pixelation.
Hard edges break the effect, so always feather your selection and refine masks. If the person is against a complex background, spend an extra minute cleaning transitions by hand.
Watch for reflections in windows, sunglasses, and mirrors, and check duplicates of the photo saved elsewhere. A great blur on the main face means nothing if a reflection stays sharp in the corner.
For aesthetics, match blur type to the scene so the edit feels natural. Use Field or Iris Blur for a bokeh-like look, Gaussian for neutral softening, and Motion Blur sparingly so it complements the lighting and direction.
Before you publish, run this quick mental checklist: confirm the person is unrecognizable; scan for reflections and duplicates; remove EXIF data; save an archived original; and if risk remains high, switch to heavy pixelation or cropping. When you keep these steps in mind, how to blur a person in a photo becomes both fast and trustworthy.
What People Ask Most
What is the quickest way to blur a person in a photo?
Use a selection tool to outline the person then apply a blur effect or a portrait-mode blur in your photo app for a fast result.
Can I blur a person in a photo without removing them from the scene?
Yes, selective blur lets you soften or obscure the person while keeping the rest of the image intact.
Will blurring a person in a photo hide their identity completely?
Blurring helps protect identity but is not foolproof, so combine it with cropping or pixelation for better anonymization.
Can I learn how to blur a person in a photo on my phone without special skills?
Absolutely, most phones and free apps have simple blur tools that work with a few taps and basic guidance.
Does blurring a person in a photo ruin the overall image quality?
Properly applied blur affects only the selected area and usually keeps the rest of the photo sharp, so overall quality stays good.
Is it okay to blur a person in a photo for privacy or social sharing?
Yes, blurring is a common and acceptable way to protect privacy before posting or sharing images online.
What common mistakes should I avoid when trying to blur a person in a photo?
Avoid over-blurring, leaving hard edges, or editing the original file instead of a copy to prevent mistakes.
Final Thoughts on Blurring People in Photos
If your question was “how to blur a person in a photo,” this guide gave a clear, step-by-step path that balances privacy and style — and even a 270-pixel face can be anonymized when you follow the selection, mask, and blur steps. The biggest payoff is control: you can hide identity without ruining the shot and keep originals safe with a non-destructive workflow. It also showed when to choose Gaussian, motion, or pixelate blurs so the result fits the goal.
One caution: blur isn’t always irreversible — test at 100% and watch reflections or close-ups that can reveal people; use pixelation or cropping for sensitive cases. This approach helps photographers, editors, journalists, parents, and casual users who need privacy and a polished look. The guide emphasized tools and export tips so edits stay reversible until you finalize.
By covering selection, masking, filter choice, and metadata stripping, the piece answered that opening how‑to hook with practical actions you can follow right away. Expect a bit of practice — you’ll build speed and confidence each time.

0 Comments