What is av on a camera? Want to control background blur without fussing over shutter speed?
This 2026 guide explains Av (Aperture Priority) in simple steps. You’ll learn how aperture changes depth of field and how the camera picks the matching shutter speed.
I will show how to set Av on Canon, Nikon, and Sony. You will get quick settings for portraits, landscapes, and street shots, plus common mistakes to avoid.
There are practice drills, image examples, and EXIF notes so you can try Av right away. By the end you’ll have ready-to-use f-stop cheats and tips to check the shutter speed the camera chose.
What does Av stand for on a camera?
If you have ever wondered what is av on a camera, here is the answer. Av on the mode dial means Aperture Priority, where you set the aperture (f-stop) and the camera chooses the shutter speed for a correct exposure. “Pick f/2.8 for a blurred background; the camera will pick the shutter speed to expose the image.”
Av can also appear in menus and EXIF as Aperture Value, which simply records the f-number used for that photo. Canon labels the mode as Av, while Nikon and Sony usually show A, but the function is the same. When people ask what is av on a camera, they are asking about this fast, creative way to control depth of field.
Use Av when you care how much of the scene is sharp and you want the camera to handle timing. If the idea is new, a quick read on aperture basics will make the next steps simple.
Caption: Mode dial close-up with Av highlighted and an exposure display showing f/2.8 chosen and 1/250s selected automatically (EXIF: 50mm, f/2.8, 1/250, ISO 200).
Aperture priority mode overview
In Av, you set the aperture and ISO, and the camera meters the scene and sets the shutter speed. This is the exposure triangle in action: aperture controls depth and light, shutter controls motion and light, and ISO controls sensor sensitivity. Understanding what is av on a camera helps you connect these three without getting lost in settings.
Exposure compensation lets you bias the meter brighter or darker without leaving Av. If faces are too dark against a bright sky, tap +1 EV; if a reflective scene blows out, try -1 EV and recheck your preview.
Many photographers pair Av with Auto ISO and set a maximum ISO and a minimum shutter speed. The camera tries to hold that shutter to stop blur, only raising ISO when needed, and you still control depth of field. This workflow is quick and reliable when light changes.
Sometimes the camera cannot reach a correct exposure because the needed shutter is outside its limits. If the shutter becomes too slow, open the aperture, raise ISO, use a tripod, or switch to Manual or Shutter Priority; if it becomes too fast in bright sun and you want motion blur, add an ND filter. Compared with full-auto, Av gives creative control of depth without sacrificing speed.
Always glance at the shutter speed the camera has chosen before you press the shutter. Caption: Exposure readout in Av — user set f/4, camera chose 1/500s, Auto ISO 400 (EXIF: 35mm, f/4, 1/500, ISO 400).
Aperture and depth of field explained
F-numbers measure the size of the lens opening. A smaller f-number like f/1.8 means a wider opening, more light, and a shallower depth of field; a larger f-number like f/11 means less light and a deeper zone of focus. This is why Av is the go-to for background blur or front-to-back sharpness.
The common full-stop progression goes f/1.4 to f/2 to f/2.8 to f/4 to f/5.6 to f/8 to f/11 to f/16. Each full stop halves or doubles the light, so moving from f/2.8 to f/4 halves the light and the camera compensates with a slower shutter or higher ISO.
Depth of field also depends on focal length, subject distance, and sensor size. Longer lenses or moving closer to your subject create stronger blur, while shorter lenses or stepping back deepen the in-focus area. A larger sensor adds to the shallow look at the same framing and aperture.
Bokeh is the look of the out-of-focus areas. The number and shape of aperture blades affect highlight shapes and smoothness, so lenses with more rounded blades often render creamier, rounder bokeh balls.
There are trade-offs to remember. Very small apertures like f/16 to f/22 can soften details due to diffraction, while very wide apertures can force very fast shutters or higher ISO to keep images sharp. Balance your aperture with light and subject movement to avoid surprises.
For portraits, start between f/1.4 and f/4 based on your lens and distance. For group portraits use f/5.6 to f/8, and for landscapes choose f/8 to f/16; for street, f/2.8 to f/8 keeps you agile. A quick example many beginners love is “shoot an 85mm at f/1.8 for creamy background; shoot 24mm at f/11 for deep landscape focus.”
If you want a structured refresher, browse a concise learn aperture guide and then run a test series. Caption: Aperture sweep of the same scene at f/1.8, f/2.8, f/5.6, and f/11 showing the background melt and sharpening as the aperture closes (EXIF: 50mm, ISO 100; shutters range from 1/4000 to 1/125).
How to set your camera to aperture priority (Av) mode
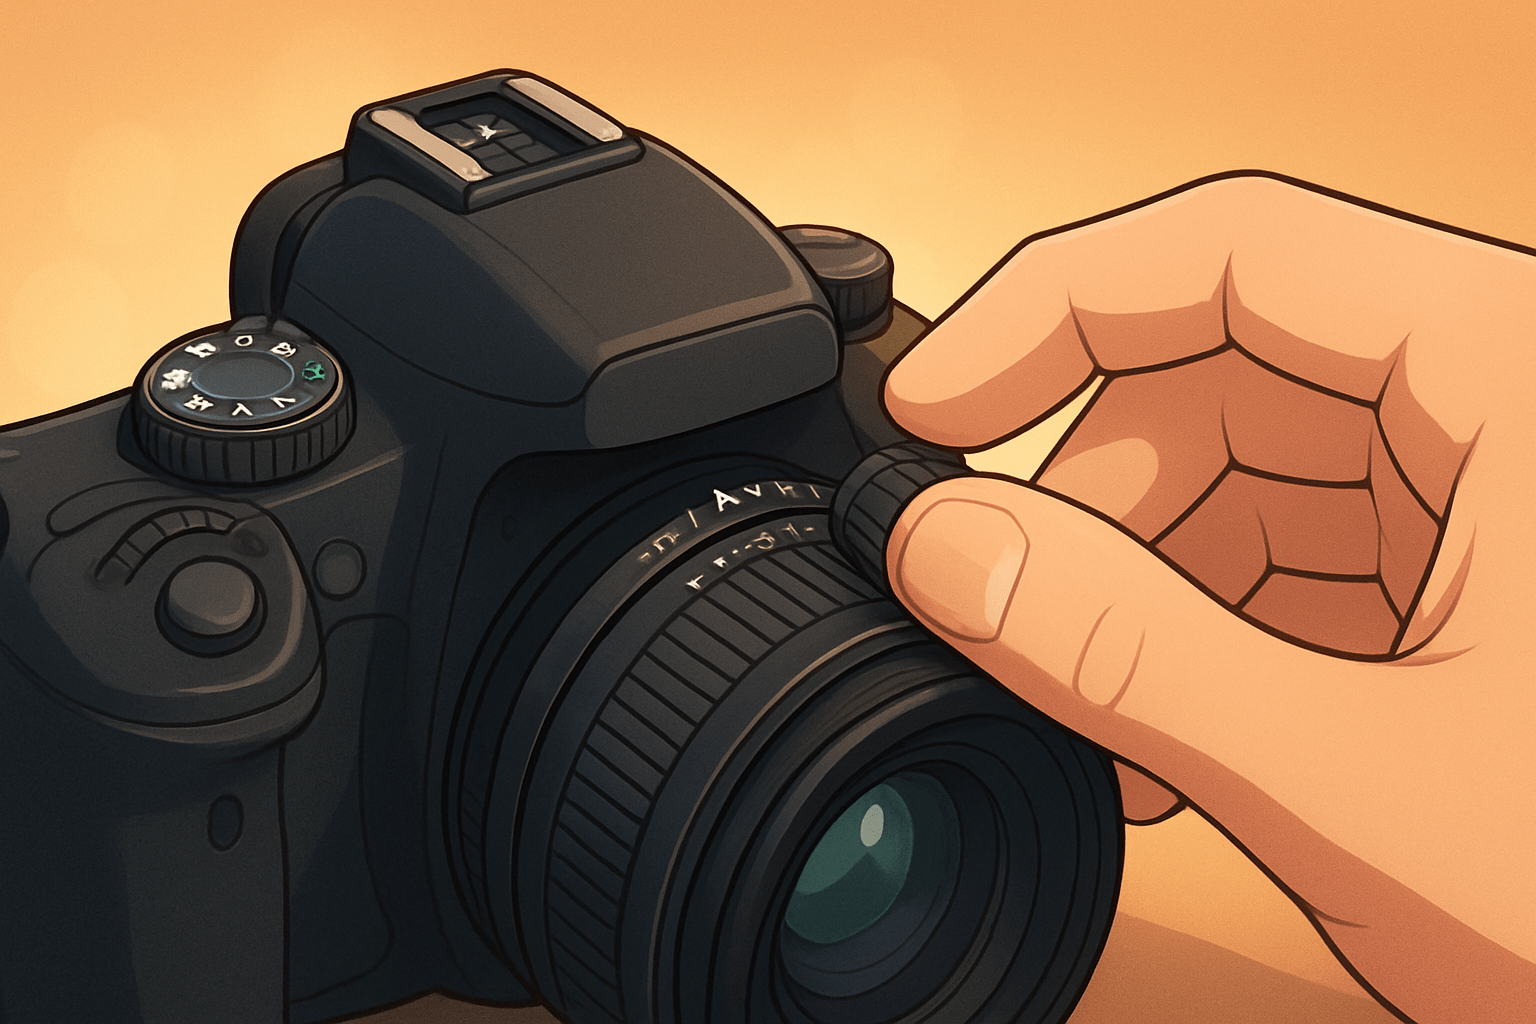
Set your mode dial to Av on Canon or A on Nikon and Sony. Rotate the main or command dial to change the f-number, half-press the shutter to preview the chosen shutter speed, and pick ISO or turn on Auto ISO.
Canon shows Av on the dial; Nikon and Sony show A. If your lens has an aperture ring, set it to A so the camera body controls the aperture, or use the ring directly on systems that support it for tactile control.
If you use Auto ISO, set a minimum shutter speed that matches your focal length and subject, and cap the maximum ISO you accept for noise. Learn where your exposure compensation button sits and how to use the AE-L/AF-L lock to hold a meter reading while you recompose.
When the camera picks a shutter that is too slow, open the aperture or raise ISO; if that is not enough, brace or use a tripod. When the shutter is too fast but you want controlled blur in bright light, add an ND filter or switch to Manual. Knowing your lens’s maximum aperture tells you how far you can open up for light and blur.
Caption: Top-plate diagram with Av selected, front dial set to f/5.6, exposure compensation at +0.7, and Auto ISO minimum shutter at 1/250s (EXIF: 85mm, f/5.6, 1/250, ISO auto).
When to use aperture priority mode (practical tips, common mistakes and quick cheat sheet)
Use Av for portraits when you want subject isolation. Pick a wide aperture like f/2 or f/2.8, keep an eye on shutter speed, and let Auto ISO keep the exposure steady as light shifts.
For landscapes and architecture, Av lets you prioritize depth and edge-to-edge sharpness. Choose f/8 to f/11 outside, or f/11 to f/16 on ultrawides, and add a tripod if the shutter dips too low.
Street work benefits from speed and focus control. Set f/4 or f/5.6 with Auto ISO and a minimum shutter of 1/125 to 1/250 so you can react fast while holding your preferred depth of field.
Wildlife can suit Av when depth control is key, but pair it with a higher minimum shutter. Start around 1/500 or faster depending on the species and your focal length, and open up when you need more light.
Avoid Av when you must control motion precisely, like indoor sports or concerts with flickering lights; use Shutter Priority or Manual there, often called Tv or S mode on the dial. In studio flash, Manual gives predictable results because you fix aperture, shutter, and ISO against a constant strobe power.
The big advantages are quick creative control, fast handling in variable light, and a smoother workflow than full manual. The main limitation is that the camera controls shutter speed, so motion blur risk remains and the meter can be fooled by extreme contrast or reflective scenes; exposure compensation and AE lock handle most of those traps.
Common mistakes are easy to avoid. Many beginners forget to check the chosen shutter and end up with blur; others leave ISO too low and get slow shutters, stop down to f/22 and hit diffraction, or skip exposure compensation when the meter misses. Always check your shutter speed and histogram between bursts to stay sharp and well exposed.
Cheat sheet: Portraits f/1.4–f/4; Landscapes f/8–f/16; Street f/2.8–f/5.6; Wildlife f/4–f/8, with minimum shutters of about 1/125–1/250 for street and 1/500+ for wildlife.
For practice, run an aperture sweep. Frame one subject and shoot at f/1.8, f/2.8, f/5.6, and f/11, then compare background blur and note the shutter speeds the camera chose.
Next, try a subject-motion test. Set one aperture, photograph a jogger or cyclist in bright and dim spots, and watch how the auto-selected shutter speed changes and how motion blur appears.
Finally, do a portrait distance test. Keep the same aperture and lens, make one portrait close and one a few steps back, and observe how depth of field expands with distance; save these as your own aperture practice drills.
Caption: Side-by-side portrait at f/2.0, 85mm, 1/500, ISO 200, versus landscape at f/11, 24mm, 1/60, ISO 100, showing how Av gives fast control over depth and clarity.
What People Ask Most
What is AV on a camera?
AV is Aperture Priority mode, where you pick the aperture and the camera automatically sets the shutter speed for correct exposure.
When should I use AV on a camera?
Use AV when you want control over depth of field, like for portraits or landscapes, while the camera handles exposure settings.
How does AV on a camera affect background blur?
Choosing a wider aperture in AV creates more background blur, while a smaller aperture keeps more of the scene in focus.
Will AV on a camera help in low light?
Yes, AV lets you open the aperture to let in more light, but the camera may choose a slower shutter speed that can cause motion blur.
Is AV on a camera hard for beginners to use?
No, AV is beginner-friendly because you only set one creative control and the camera handles the rest.
What common mistakes do people make when using AV on a camera?
People often pick too wide an aperture and miss focus or forget the camera may choose a slow shutter speed that blurs the image.
How do I know the right aperture to set in AV on a camera?
Decide if you want a blurred background or front-to-back sharpness, choose a wider or narrower aperture accordingly, and check your preview to fine-tune it.
Final Thoughts on Aperture Priority (Av) Mode
Av hands you the one lever most photographers want: clean control over depth of field while the camera quietly handles shutter speed and exposure. Even a stray number like 270 in a filename or EXIF tag won’t change that simple tradeoff. This article showed how choosing aperture shapes background blur and when to nudge ISO or compensation to keep shots sharp.
Use Av to shape mood and isolate subjects, but be realistic: the camera can pick a shutter speed that’s too slow for handheld motion or fast action, and meters can be fooled by bright or reflective scenes. It’s particularly useful for portrait and street shooters, travel photographers, and anyone who wants creative depth-of-field without full manual fiddling. The how-to steps and practice drills in the piece showed exactly when to trust Av and when to take over.
Try the simple drills—aperture sweeps and subject-motion tests—and you’ll feel more confident making light and blur choices on the fly. Keep shooting, and you’ll find Av becoming a dependable creative partner for many scenes ahead.


0 Comments