Tired of wavy edges, nicked corners, and uneven borders ruining your favorite prints?
If you obsess over clean, professional-looking photos, this guide compares the five best paper cutters for photos in 2026 and helps you pick the right one.
We tested models across portability, cutting precision, safety features, and build quality to give practical buying guidance.
Whether you trim casual family prints, craft scrapbook pages, or run a small studio, we explain which design choices matter most.
Beyond specs, you’ll read real-world notes about how different cutters handle delicate photo paper, heavier stock, and frequent use.
Footprint, ease of alignment, and long-term durability all influence how well a cutter performs under real workloads.
We also include concise tips for achieving clean, straight cuts and simple maintenance routines to keep blades sharp and mechanisms smooth.
These pointers are geared toward preserving print quality and extending the life of your tool without complicated servicing.
Keep reading to discover the best match for your bench space, volume needs, and safety preferences.
The right cutter can turn trimming from a chore into a quick, satisfying final step in your workflow.
As a photographer who trims hundreds of prints, I value tools that save time and protect delicate images.
This article will make that choice easier and help you keep your prints looking their best for years.
1. Firbon A4 Paper Cutter Review
Firbon A4 12
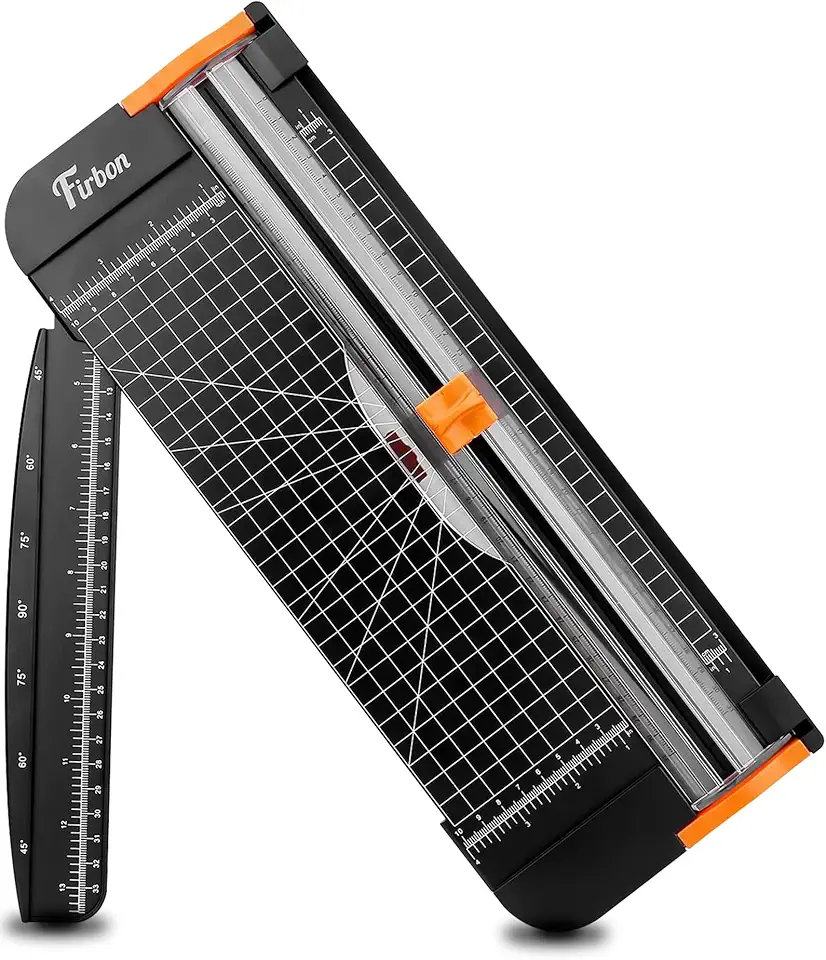
Effortlessly trim paper with a precise edge guide, automatic blade safety and integrated ruler for accurate, fast office or craft projects.
Check PriceAs a photographer who often trims prints on the go, I appreciate the Firbon A4 rotary cutter for its compact, travel-friendly design. It’s lightweight and highly portable, so it fits easily in most tote bags and slips into a small craft kit without fuss.
Despite its small size, it cuts cleanly through up to 8 sheets of standard paper, photos, and card stock. The rotary blade produces precise, tear-free edges on delicate photo paper, which is essential when trimming final prints or making quick proof crops.
The cutter includes a foldout ruler that extends the cutting width and a ruler printed with both ANSI and DIN measurements. Pre-printed angle guides (45°, 60°, 75°, 90°) make it simple to set up creative crops and consistent trims for layouts or mats.
Operation is straightforward and safe. There’s no exposed blade, so it’s a good choice when you need a household-friendly tool that won’t intimidate guests or family members helping with a project. It’s also affordable and simple to use, which is great when you don’t need a heavy-duty machine.
That said, don’t expect professional-volume performance. The Firbon’s strength drops off beyond 8 sheets—edges can become jagged if you overload it. If you regularly trim thick stacks or run long print jobs, a more robust cutter is a better long-term choice.
- Lightweight, portable (fits in most tote bags)
- Precise, clean cuts on photos and delicate papers
- Pre-printed angle guides: 45°, 60°, 75°, 90°
- Foldout ruler with ANSI and DIN measurements
- Performance drops with more than 8 sheets
- Not built for heavy-duty or professional-volume use
2. Swingline ClassicCut Ingento Guillotine Trimmer Review

Swingline ClassicCut Ingento 1132 12
Heavy-duty guillotine delivers clean, accurate cuts up to 15 sheets with ergonomic handle and built-in measurement guide for reliable office performance.
Check PriceAs a working photographer, I value tools that make quick, accurate trims without fuss — the Swingline ClassicCut Ingento fits that need. This guillotine-style trimmer has an 18-inch-square cutting bed that accommodates most photo prints and standard paper sizes, so I rarely have to reposition larger prints for a single pass.
Its capacity to cut cleanly through up to 15 sheets at once is genuinely useful when I’m batching proof prints or trimming multiple copies for clients. The blade is sharp and durable, producing consistent straight cuts that minimize finishing time and avoid re-trims.
Precision is where this cutter shines: a dual-scale ruler with ANSI and DIN measurements plus an alignment grid makes lining up borders and crop lines fast and repeatable. It also handles multiple angles for creative layouts, which is handy when I’m preparing series or mounting photos.
Two practical caveats: the unit lacks rubber feet and can slide on slick surfaces, so clamp it or place a non-slip mat underneath. Also, the safety latch can disengage easily, so it’s not my go-to around kids or in a busy classroom setting.
Overall, if you’re a photographer or hobbyist needing a dependable cutter for medium-volume and occasional bulk trimming, this model offers a great balance of cutting area, capacity, and precision without being overly complex.
- 18-inch cutting area fits most prints
- Handles up to 15 sheets in one pass
- Dual-scale ruler & alignment grid for precision
- Sharp, durable blade for consistent straight cuts
- No rubber feet — can slide on slick surfaces
- Safety latch can disengage easily
3. Swingline 12-Inch Guillotine Paper Cutter Review

Swingline ClassicCut Lite 9312 12
Lightweight desktop cutter handles up to ten sheets, featuring safety latch, clear guide markings and easy storage for home or small-office tasks.
Check PriceThe Swingline 12-inch guillotine is a straightforward, classroom-friendly trimmer that handles everyday photo and paper trimming. As a photographer I appreciate its 12-inch cut length and guillotine design for straight, quick trims.
It uses a self-sharpening blade that can cut up to 10 sheets in one pass, though I typically keep stacks to 7–8 for the cleanest edges. Grid lines and a dual-scale ruler make aligning prints fast and precise, which helps when cropping series of shots to the same dimensions. It’s ideal when you need repeatable trims for prints destined for frames or albums.
Safety is well thought out: a guard rail and blade lock make it classroom-safe and friendly around clients or children. It’s lightweight and stable, so you can move it between a home studio and desk without strain.
The trade-offs are real: the mostly plastic construction isn’t as durable as metal cutters, so it won’t stand up to professional, high-volume workflow. The blade lock can also stick occasionally, so I wouldn’t rely on it as the primary cutter in a busy print shop. For educators, students, hobbyists, and home photographers who need reliable, clean cuts on single photos and small stacks, it’s a very good, affordable choice.
- Clean cuts on single photos and small stacks
- Self-sharpening blade — cuts up to 10 sheets (7–8 optimal)
- Strong safety features (guard rail, blade lock)
- Lightweight and portable with dual-scale ruler and alignment grid
- Plastic construction limits durability
- Not ideal for heavy, frequent use; blade lock can stick
4. CGOLDENWALL 24.8-Inch Rotary Trimmer Review
CGOLDENWALL A2 Rotary Paper Trimmer 24.8
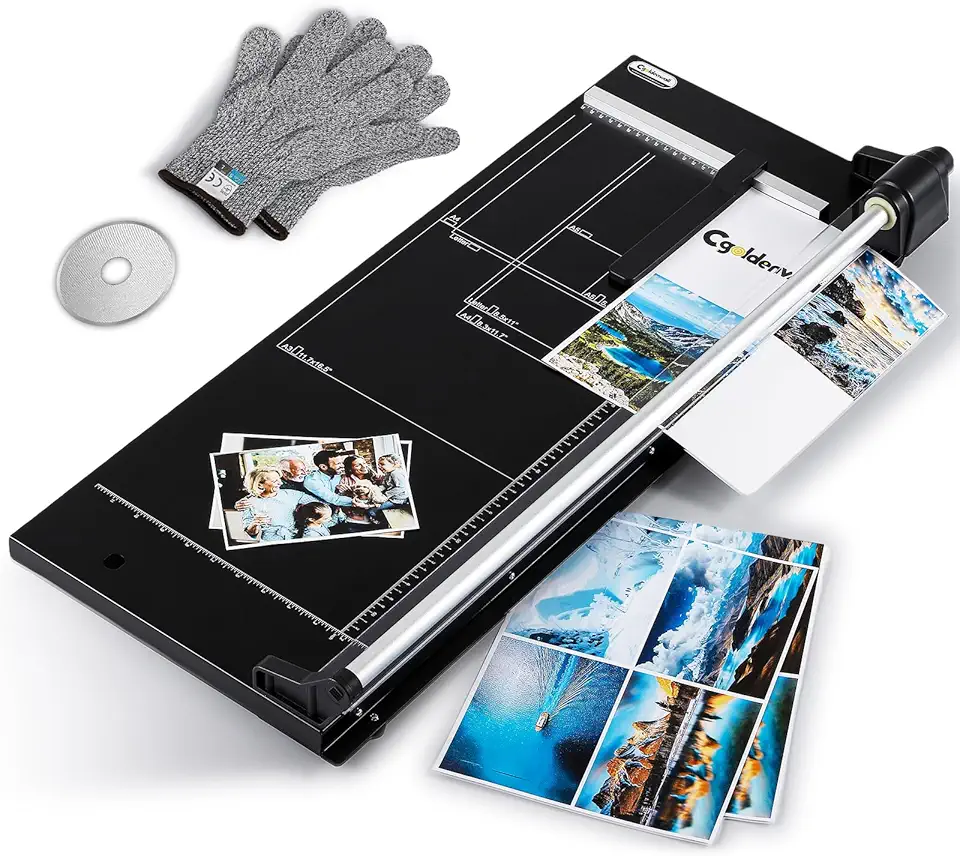
Extra-long rotary cutter cuts large formats smoothly; includes spare blade and protective gloves for precise, safe crafting and presentation prep.
Check PriceAs a working photographer, I look for tools that hold up to frequent use, and the CGOLDENWALL 24.8-Inch Rotary Trimmer feels built for that kind of workload. Its heavy-duty metal frame minimizes flex, so long runs and repeated trims stay accurate—important when you’re finishing prints for clients or prepping a batch for a gallery.
The rotary head uses smooth bi-directional blade action, which makes cutting multiple prints faster and more consistent than a single-direction stroke. In practice it cuts up to 12 sheets at once, so it handles small bulk jobs without slowing you down or needing constant blade babysitting.
Another practical advantage is the large cutting area—14.9 inches—so you can trim oversized prints without juggling or awkwardly aligning multiple passes. The package also includes safety features like an encased blade, a blade lock, and safety gloves, which matter in a busy studio where helpers and clients might come close to work surfaces.
If you have a dedicated workspace and regularly trim heavy batches of photos, this unit is mostly a win: durable, efficient, and designed for professional environments like print shops and artist studios. The downsides are worth noting—this is not a grab-and-go trimmer. It has a large footprint and carries extra weight and cost, so it’s less appealing for casual hobbyists or those with limited desk space.
- Heavy-duty metal frame
- Cuts up to 12 sheets at once
- Bi-directional blade action
- Large cutting area (14.9 inches)
- Needs significant desk space
- Higher price and heavy
5. Cregear 12-Inch Paper Cutter Review

CreGear 12
Sturdy wooden-base cutter offers adjustable alignment, secure blade lock and integrated safety guard for accurate, dependable trimming every time.
Check PriceAs a photographer who trims prints and builds mounts, I appreciate tools that deliver clean, repeatable results. The Cregear 12-inch rotary cutter is built for accuracy, safety, and versatility in photo and craft projects.
It features dual blades that handle both cutting and scoring. That makes it easy to trim a print and score backing or fold lines without switching tools.
Safety is well considered: the blade only engages when pressure is applied. That pressure-activated system reduces accidental cuts while still giving firm, controlled strokes.
The cutter handles up to 12 sheets at once and offers a full 12-inch cut length. That covers most common photo sizes and small mounts you’ll work with in a studio or at a craft table.
Alignment tools are baked in. You get an integrated cm/inch scale, an alignment grid, and a 5°–90° angle measuring plate for creative or precise angled cuts.
In practice this means clean edges, consistent trimming, and the ability to score for neat folds or clean mat windows. It’s especially useful when you want repeatable, professional-looking results.
Keep in mind it may feel heavier and bulkier than entry-level models. There’s also a steeper learning curve because of the advanced features and dual-blade workflow.
Overall, if you’re a serious hobbyist, scrapbooker, or photographer wanting pro-level precision and safety, the Cregear 12-inch cutter is a strong choice. It favors accuracy and control over ultra-portability.
- Dual blades for cutting and scoring
- Blade safety system (pressure-activated)
- Up to 12-sheet capacity; 12-inch cut length
- Integrated cm/inch scale, alignment grid, 5°–90° angle plate
- Heavier and bulkier than entry-level models
- Steeper learning curve for beginners
Tips for Clean Straight Photo Cuts
Clean, straight cuts start long before you pull the blade. In my studio I always pick a stable table, good lighting and a non-slip mat under the cutter to prevent movement. Small shifts are the enemy of a crisp edge.
Aligning the print perfectly against guides saves me more time than any blade trick. Use the trimmer’s ruler, a metal edge, or the rotary corner trick — make a tiny diagonal cut at the corner so the paper seats flush — then finish the cut. That keeps squares true and corners sharp.
Choose the tool that matches the job: rotary and guillotine trimmers give the most consistent, tear-free edges while an X‑Acto plus a metal ruler and cutting mat works for tiny detail work. Always set blade depth for the paper stock; too shallow tears, too deep bites into the mat. If you’re trimming stacks, respect the cutter’s sheet capacity.
Make each cut in one smooth, confident motion. Hesitation or sawing creates feathered edges, so steady pressure and a single pass are ideal. For sandwiching thick cardstock or photo paper, I score first then complete the cut to avoid delamination.
A sharp, well-aligned blade is non-negotiable. Do a quick test cut on a scrap before cutting a treasured print and service or replace blades when they start to drag. Keep the bed clean of dust and bits so the print glides flat against the guide.
Hold prints firmly or use small clamps and low-tack tape to prevent shifting during the stroke. Avoid touching the image surface with oily fingers; wear gloves if needed and store freshly trimmed edges flat so they don’t curl. Little rituals like these make a big difference in presentation.
Paper Cutter Maintenance and Care
Keeping a paper cutter in top shape will save you time and protect your prints. In my studio a small maintenance habit keeps cuts crisp and photos pristine. A few minutes after each session prevents bigger problems later.
Start with daily cleaning. Use an anti‑static cloth or soft brush to clear dust, paper scraps and toner from the cutting surface and tracks. Compressed air can help in hard‑to‑reach places, but avoid blowing debris deeper into mechanisms or onto fresh prints.
Lubrication matters, but less is often more. Follow the manufacturer’s guidance: use light oil (not heavy grease) on leadscrews to avoid dust build‑up, and a thin smear of grease on knife bar guides to reduce friction. Wipe away excess; over‑greasing can leave residues that stain photos.
Blade care is the heart of clean cuts. Test cut on scrap before trimming important prints and watch for tearing or a dragging feel—those are signs you need sharpening or a blade change. Guillotine blades benefit from professional sharpening, while many rotary blades can be rotated or replaced at home; also swap out cut‑sticks when they show grooves.
Don’t skip safety checks. Inspect guards, blade locks and any latches regularly, and tighten loose screws or replace worn rubber feet to prevent slipping. Always lock or retract the blade before storage and keep spare blades and a small toolkit nearby.
Keep a simple maintenance calendar: daily quick wipes, weekly lubrication and alignment checks, and scheduled professional servicing if you use the cutter heavily. A sticker on the machine or a short log helps you track blade life and service dates.
Finally, treat every valuable print like it’s irreplaceable: do a final test cut, use clamps or low‑tack tape to prevent shifting, and work on a well‑lit, stable surface. With these small rituals your cutter will reward you with clean, repeatable results for years.
What People Ask Most
What is the best paper cutter for cutting photos?
There is no single best cutter for everyone; the right choice depends on your priorities like portability, precision, and how often you cut. Pick a model that balances safe, clean cutting with the size and volume of prints you handle.
Which paper cutter is best for photos and scrapbook projects?
Choose a versatile cutter that offers reliable alignment guides, angle options, and a stable cutting surface for layered materials. Safety features and a smooth cutting action help protect delicate photos and detailed scrapbook work.
What features should I look for in a paper cutter for photos?
Look for a sharp, well-mounted blade or rotary mechanism, clear measurement and alignment guides, and a stable base to prevent shifting. Built-in safety features and ease of maintenance also improve long-term results.
Are rotary trimmers better than guillotine cutters for photos?
Rotary trimmers are often gentler and safer for delicate photographic paper, while guillotine cutters can handle larger straight cuts and thicker stacks more efficiently. The best choice depends on whether precision or high-capacity cutting is more important to you.
How do I choose a paper cutter for photo printing?
Match the cutter’s cutting length and capacity to the largest prints you plan to trim and the volume you expect to process. Also consider stability, measurement guides, and safety features to ensure consistent, clean results.
Can I cut photos with a regular paper cutter without damaging them?
Yes, if the cutter has a sharp blade, stable bed, and you align the photo properly before making a single smooth cut. Handling the print carefully and testing on a scrap piece first reduces the risk of damage.
What size paper cutter do I need for photo trimming?
Choose a cutter with a cutting width that accommodates your largest print plus room to hold the paper securely during the cut. Consider your workspace and how much clearance you need to maneuver larger prints comfortably.
Conclusion for Best Paper Cutter for Photos
This guide compared five top paper cutters and bundled practical tips for clean trimming and routine maintenance so photographers and crafters can select the right tool and keep prints looking their best.
In short: Firbon suits portable, light home use; Swingline ClassicCut handles medium-volume guillotine needs; the Swingline 12-inch is ideal for everyday or classroom trimming; CGOLDENWALL fits heavy‑duty professional workflows; and Cregear offers precision and scoring for serious hobbyists.
Choose by balancing portability, cutting capacity, safety features, and the level of precision you need rather than picking solely on price or brand.
If you want to sharpen your trimming technique and gear knowledge, explore more articles on our site to build skills and confidence.
Have a question or a trimming tip of your own? Leave a comment below and we usually reply within a few hours.


0 Comments