
Ever wondered how cinematographers tame blazing sunlight and still capture natural motion blur and creamy background separation? Neutral density filters do that quiet, essential work — cutting light without skewing color — so you can open the aperture or slow the shutter and keep the look you intended. They let you shoot wide-open in harsh midday, hold a classic shutter angle at cinematic frame rates, or stretch exposures for silky water and cloud motion.
This article compares five ND solutions tailored to filmmakers and videographers, from adaptable variable systems to steadfast fixed stops and hybrid designs that pair polarization with exposure control. I’ll weigh the practical trade-offs you actually encounter on set — flexibility versus absolute image purity, ergonomics versus size and weight, and the glass and coating choices that influence flare, contrast, and color neutrality. Expect hands-on observations about how each option behaves in real shooting conditions and which workflows benefit most.
If you’ve ever been tempted by bargain variables or puzzled by costly fixed pieces, this guide will help you cut through marketing and buy with purpose. I’ll focus on matching each approach to camera systems, lenses, and shooting style so you pick tools that earn their place in your kit. By the end you’ll have clear, practical guidance for choosing an ND that fits your budget and cinematic goals rather than gathering dust on a shelf.
1. Hoya Variable Density II Gen 2

Hoya 82mm Variable ND Filter II ND3-400 1.5-9 stops
Smooth, precise 1.5–9-stop light reduction for sharper long-exposures and controlled motion; optimal for landscape and video with high optical clarity.
Check PriceThe Hoya Variable Density II Gen 2 is a workhorse variable ND that covers ND3 to ND400, giving you a massive range of exposure control without swapping glass. As a cinematographer this lets you dial in precise stops to hold a 180° shutter at 24fps or open the aperture for shallow depth of field in bright light.
Mechanically it feels thoughtful — front and rear frame markings and a discrete, fingerprint-resistant knob make repeatable adjustments simple. The dual-frame design spins smoothly and the clear markings help you note positions between takes, which speeds up setups on busy shoots.
Optically it’s reassuring: users report minimal impact on sharpness, color fidelity, and contrast at typical ND values, so your skin tones and fine detail stay honest. Rotation is smooth, and in normal cinematography use you shouldn’t see issues; cross-polarization artifacts are rare and only show up beyond typical settings.
That said, if you’re pushing extreme darkness or stacking filters, be aware of the limitation: potential cross-polarization artifacts can appear at the far end of the range. The filter is also slightly bulkier due to the dual-frame and knob, which matters if you’re packing compact rigs or matte boxes with tight clearances.
Overall, the Hoya Variable Density II Gen 2 is an excellent choice for filmmakers and videographers who want a versatile, durable variable ND that keeps image quality high in everyday use. If you need extreme, flawless behavior at the deepest stops, test it first; for typical on-set exposure control it’s mostly a win.
- Excellent image quality retention
- Precise, easy adjustment (markings + fingerprint-resistant knob)
- Durable build
- Versatile ND range (ND3 to ND400)
- Potential cross-polarization artifacts at extreme settings
- Slightly bulkier due to dual-frame and knob
2. Kenko Pro1D NDX3-450

Kenko 52mm PRO1D Smart Variable ND NDX3-450
Compact smart variable neutral density offering smooth 3–9-stop control for handheld video and photography with minimal color shift.
Check PriceThe Kenko Pro1D NDX3-450 is a straightforward variable ND that covers a very wide range — ND3 to ND450 — in a simple, no-frills design. It doesn’t have advanced coatings, so what you get is optical density rather than the last word in anti-reflection engineering. That simplicity keeps it affordable and easy to use.
In practice you’ll find the darkening range excellent for landscape work and basic video scenarios where you need lots of stops without swapping filters. The filter lets you dial down exposure substantially for long-exposure looks or to maintain aperture choices in bright light. For entry-level shooting and experimentation this flexibility is very useful.
Be honest about limits: compared with higher-end glass there are slight image-quality compromises. Users report a modest hit to sharpness and color fidelity under critical inspection, and the lack of advanced coatings makes it less effective at controlling glare and flare. If you shoot challenging lighting or need pristine color and contrast, this may show up in your footage.
That said, for hobbyists and videographers on a budget the Kenko Pro1D is a practical tool. It produces minimal visible difference for non-critical work and lets you experiment with motion blur, shallow depth of field, and exposure control without a big investment. Treat it as a learning and utility filter rather than a final-grade piece for client delivery.
If you want wide stop flexibility and low cost, it’s a good buy. If you need pro-level coatings, color fidelity, and absolute sharpness, consider stepping up from this model.
- Wide ND range (ND3–ND450)
- Affordable for experimentation
- Minimal visible difference for non-critical use
- Good darkening range for landscape and video
- Lower coating quality; prone to flare/reflections
- Not recommended for professional color/sharpness demands
3. H&Y Revoring with Polarizer and Variable ND

H&Y RevoRing 67-82mm Variable ND + Polarizer and ND400 9-stop Magnetic
Versatile magnetic filter system combining adjustable density, circular polarization and a dedicated 9-stop option for creative exposure and glare control.
Check PriceThe H&Y Revoring system combines a circular polarizer with a variable ND in one modular kit, which is a huge time-saver on set. As a cinematographer, having reflection control and exposure control in the same unit means fewer filter swaps and cleaner, faster setups.
Optically it’s described as very high quality, so you won’t be trading away sharpness or color fidelity for convenience. The glass and overall image fidelity are solid points if your work demands clean, cinematic results.
Mechanically the system uses a spring-loaded attachment that fits multiple filter sizes, so one Revoring can adapt to different lenses without carrying a stack of threaded filters. That versatility is especially useful when you’re switching lenses between shots or rigs.
Both the polarizer and the ND elements rotate independently, which gives precise control over polarization strength and the amount of light reduction. There’s a learning curve to coordinating the two rings, but once you get used to it the workflow becomes very efficient.
Be aware it’s more complex to operate initially and it does add some bulk and weight compared with a single-function filter. If you prefer the simplest rig possible, this might feel like overkill; but for most narrative and commercial shoots the tradeoff is worth it.
Overall, the Revoring is a smart choice for cinematographers who want dual functionality, high optical quality, and quick adaptability across lenses — provided you’re willing to spend a little time learning the independent rotations.
- Dual functionality (polarizer + ND)
- High-quality glass and image fidelity
- Adaptable to many lens diameters
- Fast setup via spring-loaded mechanism
- More complex to operate initially
- Adds bulk/weight vs single-function filters
4. 7 Artisans Variable ND Filter

7artisans 77mm Variable ND 2-5 stops
Lightweight 2–5-stop neutral density for fast exposure adjustments, perfect for street and daylight portraits with subtle motion blur control.
Check PriceThe 7 Artisans Variable ND Filter covers roughly ~2 to 8 stops of light reduction, giving you flexible exposure control without swapping glass. That range makes it useful for daylight aperture work or mild motion-blur adjustments on set.
Optically it punches above its price class. Users report excellent clarity and color handling, with better control of vignette and color shift than other budget options.
Mechanically the filter feels well put together. The operation is smooth and tactile, which matters when you need precise stops while shooting handheld or on a gimbal.
For indie filmmakers and videographers working on a moderate budget this is a very practical tool. It delivers an affordable, professional-grade feel while preserving image quality in most common shooting scenarios.
Be aware of the limits: the maximum is about ~8 stops, so it won’t replace high-end variable NDs when you need extreme light cuts for ultra-slow shutter or long-exposure effects. In heavy light-cut situations it trails higher-end variable options in absolute performance.
My takeaway as a working shooter is that this filter is a smart compromise: you get reliable image fidelity, controlled vignette and color, and a solid, user-friendly build — all at a price that keeps kits light and budgets sane. If your work rarely demands more than ~8 stops, this is a keeper.
- Superior optical performance for the price
- Controls vignette and minimizes color casting
- Smooth, tactile adjustment
- Affordable professional-grade feel
- Limited maximum (~8 stops)
- Falls behind high-end variable NDs on heavy light cuts
5. Breakthrough Photography X4 Fixed ND Filter
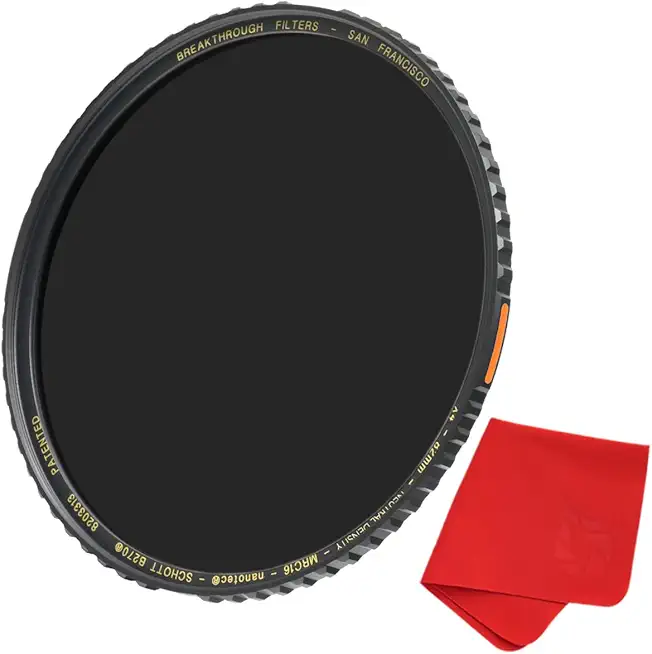
Breakthrough Photography 49mm X4 3-stop Fixed ND
High-transmission 3-stop fixed density delivering neutral color, exceptional sharpness and easy stacking for quick daylight exposure control.
Check PriceThe Breakthrough Photography X4 fixed ND is a tool I reach for when color fidelity matters above all. The outline highlights a notably praised 3‑stop variant and very high optical glass quality, which translates to images that stay true to the scene rather than the filter. In practical terms that means skin tones, landscapes and subtle hues hold together across takes without the need for corrective grading.
Durability is another strong point. The filter’s coatings resist flare and reflections, so highlights stay clean and contrast remains reliable even in bright, backlit scenarios. That reliability makes it easy to trust exposure decisions on set and to match shots across multiple lenses or cameras.
Of course, it’s a fixed-strength filter, so flexibility is limited compared with variables; you’ll need a set of strengths if you want multiple stop reductions. Still, for controlled setups—product work, controlled daylight scenes, or projects where color consistency is paramount—the X4 is a professional-grade choice that rewards careful planning.
If you care about true color reproduction and durability in a single fixed ND, this is largely a very good buy. The trade-offs are clear: you give up adjustable stops for near-neutral color and robust anti-flare performance, and it comes at a higher price than budget options. For pros who prioritize image fidelity, that trade is often worth it.
- Nearly neutral color cast
- Preserves subtle hues
- Robust build with anti‑flare coatings
- Consistent, reliable exposure reduction
- Fixed strength lacks flexibility of variable NDs
- Higher cost vs budget alternatives
Using ND Filters for Exposure and Creativity
An ND filter reduces light without changing the scene’s luminance relationships, so you can hold the aperture and shutter you prefer while shooting outdoors. It’s the simplest way to keep a shallow depth of field or a proper cinematic shutter look under bright conditions.
If you shoot at 24 fps and adhere to the 180° shutter rule (about 1/48 or 1/50), bright daylight will often force you to stop down into tiny apertures. Using ND lets you keep wider apertures like f/2.8–f/4 and preserve natural motion blur without mangling the exposure.
Variable NDs are a great on-set tool because you can fine‑tune exposure quickly. Be aware many are optically clean only in the lower mid-range (roughly 2–7 stops); at extreme settings you may see X-patterns, shifts in tint, and softer contrast. For demanding color work or very heavy stops, go with a fixed ND.
NDs also open the door to long exposures and painterly motion effects. Silky waterfalls typically appear with 0.5–2s exposures, ghosted crowds and banding clouds often need 5–60s or more, and those times call for heavier NDs. Always use a tripod, remote trigger and low ISO when stretching exposures.
Use ND in-camera rather than trying to fake dark foregrounds or motion blur in post; that keeps highlights intact and avoids boosting noisy shadows later. Check exposure with the histogram, zebras or false‑color, and capture a white‑balance reference through the filter for accurate grading.
For workflow simplicity carry a light, medium and heavy ND (roughly 3, 6 and 10 stops) or combine a trusted variable with at least one solid heavy filter. Keep a circular polarizer handy for reflections and saturated skies, but don’t stack polarizers with variables — the cross‑pattern and vignetting aren’t worth it.
Treat NDs like creative gear, not a last‑minute hack. Learn how each filter behaves on your lenses, test before the take, and they will give you cleaner, more cinematic images straight out of camera.
Using Graduated ND Filters for Balanced Landscapes
Graduated neutral-density filters are one of the most straightforward tools for calming a blown-out sky while keeping foreground detail intact. They are dark at the top and clear at the bottom, so you reduce sky brightness without sacrificing exposure on your subject.
Line the filter’s transition with the horizon and you’ll get the most natural result. Use a hard-edge GND for straight horizons like the ocean, and a soft-edge for broken, irregular lines such as mountains, trees, or cityscapes.
Choosing the right strength comes down to measuring the scene. Meter the brightest part of the sky and then the foreground; the difference in stops tells you roughly whether a 2-, 3- or 4-stop GND is needed. I often carry a 3-stop and a 1–2 stop soft to blend when the contrast shifts during sunrise or sunset.
Small positional changes make a big visual difference. Sliding the transition a touch below the horizon usually reads more natural than clipping the sky halfway down a silhouette. Watch for abrupt dark bands where the gradient crosses a bright edge and move the filter until the blend looks seamless.
For precision, a square/slide-in system is worth the extra kit weight. It lets you nudge the gradient up or down quickly and swap hard and soft plates depending on the scene. When the horizon isn’t horizontal, that ability to fine-tune vertical placement is invaluable.
Always check your histogram and highlight warnings as you adjust the GND. Bracket a couple of frames if the light is changing fast, and shoot raw so you retain latitude for small tweaks in post. I also recommend practicing placement on a tripod so you can see subtle shifts without losing composition.
GNDs shine in high-dynamic-range situations like sunrise, sunset or bright backlit scenes and can save hours of masking in post. When foreground and sky brightness are wildly different across the frame or the horizon is extremely chaotic, consider exposure blending instead.
With practice, reading the scene and selecting the right edge and strength becomes second nature. A little patience while you slide and recompose will reward you with images that look balanced and organic straight out of camera.
What People Ask Most
What ND filter should I use for filmmaking?
Choose a filter type that fits your workflow: variable NDs are convenient for on-the-fly exposure changes, while fixed NDs often offer the best color neutrality. Prioritize optical quality and coatings when image fidelity is important.
How many stops of ND do I need for a cinematic look?
That depends on the aperture and shutter you want to maintain for depth of field and motion blur; use ND to reach those exposure settings in bright conditions. Test different strengths in your shooting environment to find the balance that preserves natural motion and desired shallow focus.
What is the difference between solid ND and variable ND filters?
Solid NDs provide a fixed, consistent light reduction and are often more color-stable, while variable NDs let you adjust exposure without swapping filters. Variable systems are more flexible but can show artifacts or polarization effects at extreme settings.
Are variable ND filters suitable for professional cinematography?
Yes, many professional shoots use high-quality variable NDs for their flexibility, especially when quick adjustments are needed. However, professionals often test for image artifacts and may choose fixed NDs when ultimate color fidelity is required.
How do I choose the right ND filter for my camera and lens?
Match the filter diameter to your lens and pick the construction and coatings that suit your shooting conditions and durability needs. Consider whether you need the flexibility of a variable system or the color neutrality of fixed filters for your workflow.
How do ND filters affect image quality and color in cinematography?
Good-quality NDs reduce light without altering color balance, preserving contrast and hue differentiation. Lower-quality filters can introduce color shifts, reduced sharpness, or flare, so choose well-made glass and coatings for critical work.
Conclusion for Cinematography ND Filters
These five vetted options give you a clear spectrum of choices — from flexible variable systems and dual‑function kits to budget‑friendly options and high‑fidelity fixed NDs — helping you weigh image quality, operational flexibility, coatings, and workflow.
Which filter suits you best depends on priorities: opt for color neutrality and robust coatings when fidelity matters, choose dual systems to control reflections without swapping glass, or select affordable variable options for lightweight, versatile setups.
Always test candidates in the lighting and with the lenses you shoot most, since real‑world ergonomics and behavior can matter as much as lab specs.
If you want to sharpen your technique and gear decisions, read more articles on the site to build practical skills and learn real‑use tips at your own pace.
Share your rig, shooting scenario, or questions in the comments below — we usually reply within a few hours and are happy to help you refine your ND workflow.


0 Comments