
How do cameras capture images — and turn light into a lasting picture? This short guide explains that simple process in plain English.
You will learn how lenses focus light, how aperture and shutter control exposure, and how sensors or film record the light. We’ll also cover digital processing, RAW vs JPEG, and easy tips to take better photos.
The article is split into five clear sections: a quick “How a Camera Works” overview, then lens and image formation, shutter and exposure, sensors and color, and in-camera processing and storage. Each section includes simple diagrams, photo comparisons, and hands-on experiments you can try.
No heavy math and no confusing jargon — just clear steps and visuals for beginners and enthusiasts. Read the next section for a quick, step-by-step answer to how do cameras capture images, then dive deeper into each part of the process.
How a Camera Works (How do cameras capture images?)
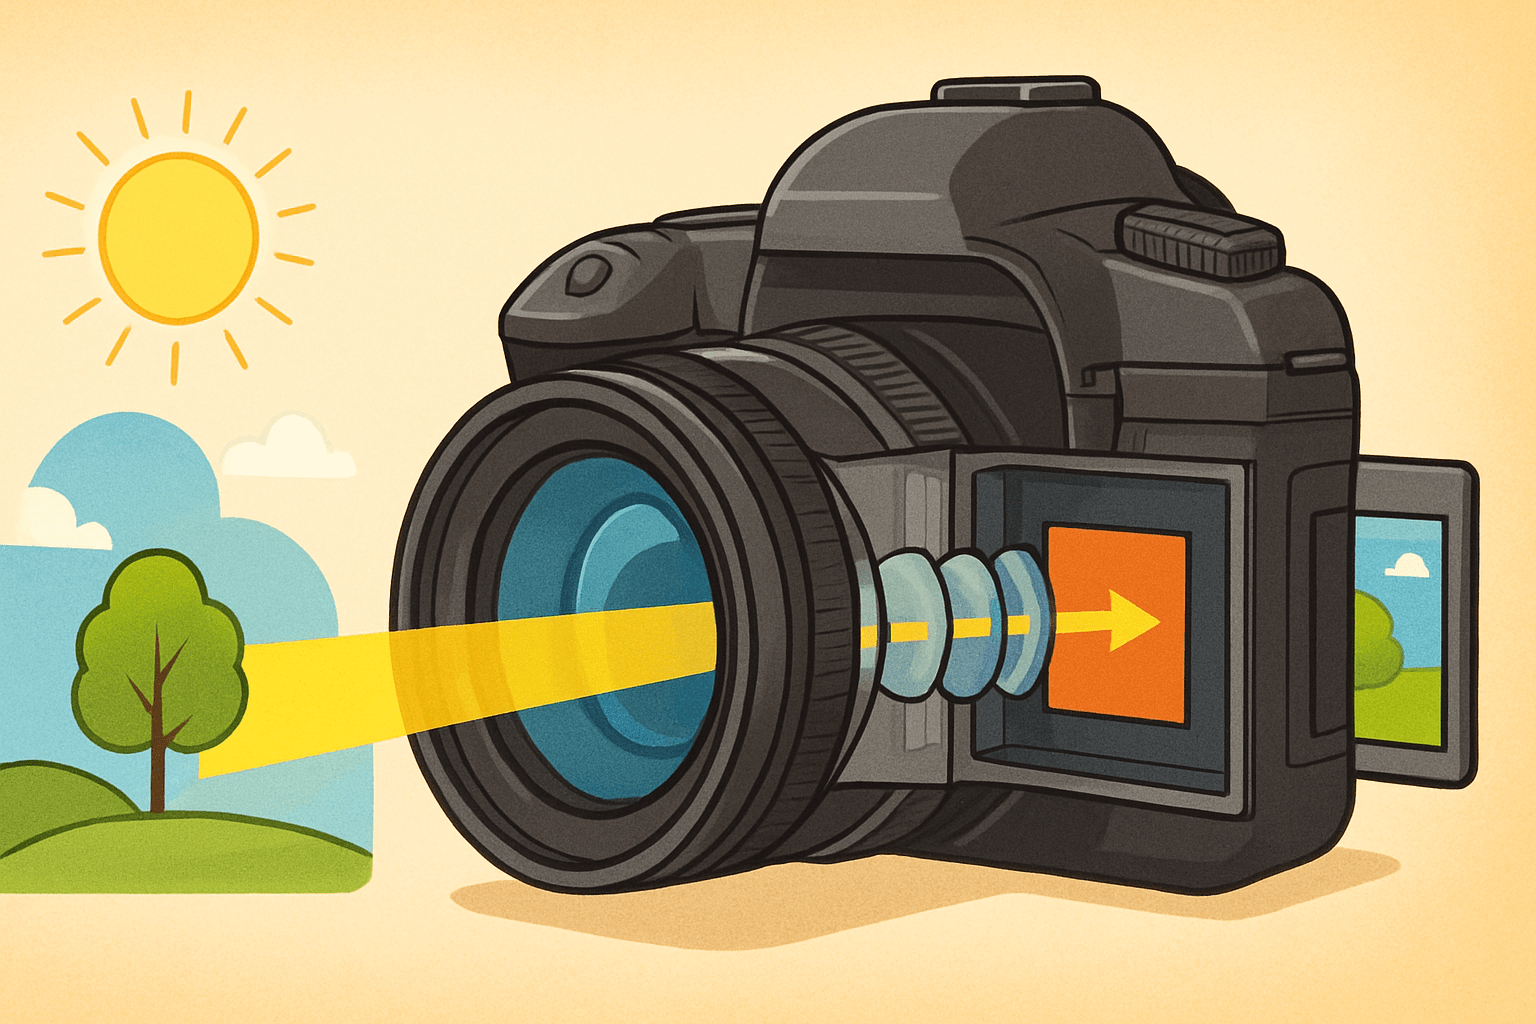
Here is the short, honest answer to how do cameras capture images. Light from a scene passes through a lens, the aperture and shutter decide how much of that light and for how long, and a sensor or film records the pattern before the camera turns it into a viewable picture. Think of a simple chain: light → lens → aperture and shutter → sensor or film → processing → storage.
The lens acts like your eye’s cornea and lens, bending rays to form a real image on the focal plane. The aperture works like your pupil, widening or narrowing to control brightness and blur, while the shutter is the eyelid that chooses the exact exposure time. The sensor or film is the retina, turning light into an electrical or chemical change that can be saved.
In a digital camera, photons hitting the sensor become an electrical signal that is amplified, converted to digital numbers by an ADC, then processed for color, sharpness and tone. The camera writes the final image as RAW, JPEG, or HEIF to a card. In a film camera, silver-halide crystals are chemically altered by light, and a development process reveals and fixes the image in place.
That is the core idea in one breath, and it is why all cameras, from phones to cinema rigs, share the same DNA. If you want a gentle primer that echoes this chain, this overview of camera basics covers the same arc. Let’s now move step by step through optics, exposure, sensors, and the image pipeline so you can control each link with confidence.
As you read, keep the eye analogy in mind because it makes the moving parts memorable. Your hands set the pupil size and eyelid speed, and your retina turns a living scene into something your brain can store. With that map, we can go deeper and still keep things simple.
Lens and image formation
We start with the lens because it shapes the light before anything else can touch it. A camera lens is a curved piece of glass that gathers scattered rays from the world and focuses them into a crisp, inverted image on the sensor. If you could draw a ray diagram, you would sketch one ray straight through the center and two others bending through the glass to meet at the same point on the focal plane.
That meeting point is why focus matters so much. When the subject is in focus, rays from one point on the subject converge to one point on the sensor, and edges look sharp. When focus is off, those rays miss their meeting, smear into a small circle, and the image looks soft.
Focal length is the lens’s basic descriptor and it sets your field of view. Shorter focal lengths show more of the scene and make objects look smaller and farther away, while longer focal lengths magnify and compress distances. If you switch from 24 mm to 85 mm without moving, the frame narrows and faces look flatter and closer to how we perceive them in portraits.
Perspective is shaped by your camera position, not the focal length itself, but focal length encourages the distance you choose. A wide lens often puts you close, exaggerating space, while a telephoto pushes you back, compressing space. Knowing this helps you choose the feel of the picture instead of letting the lens choose it for you.
The aperture is a hole inside the lens, and its size is expressed as an f-number like f/2.8 or f/8. The f-number is the focal length divided by the opening diameter, so lower numbers mean a larger opening and more light. A larger aperture gives a brighter exposure and a shallower depth of field, while a smaller aperture dims the exposure and deepens focus.
Depth of field is the range that appears acceptably sharp in front of and behind your focus point. It depends on aperture, focal length, subject distance, and sensor size, and it is tied to a concept called the circle of confusion. That circle describes how large a point can blur on the sensor before your eye still accepts it as sharp in the final image size and viewing distance.
To see depth of field in action, imagine two frames of the same portrait at f/1.8 and f/8. At f/1.8, the subject pops while the background melts, and at f/8, the subject and some of the scene behind them stay crisp. If you want sweeping landscapes, stop down a bit; if you want buttery subject isolation, open up and focus carefully on the eyes.
Lens design also affects how clean the image looks. Chromatic aberration splits colors along high-contrast edges because different wavelengths bend differently, distortion curves straight lines, and vignetting darkens corners. Modern lenses use multiple elements, special glass, aspherical surfaces, and coatings to fight flare, boost contrast, and tame those flaws so the sensor sees a cleaner projection.
Sensor size changes how a given focal length behaves. A 50 mm lens on a smaller APS-C sensor frames like roughly 75 mm on full frame because the sensor crops the image circle, tightening your field of view. This is the crop factor at work, and it matters when you switch between camera systems or try to recreate a look you loved on another body.
A couple of practical tips go a long way. If you are shooting handheld, a classic guideline is to use a shutter speed around 1 over the effective focal length to reduce blur, so 1/50 s for 50 mm on full frame and about 1/80 s on a 1.5× crop body. For portraits, many people live between 50 and 105 mm and open up to f/1.8–f/2.8, while for landscapes a wide lens around 16–24 mm and f/8–f/11 is common for edge-to-edge clarity.
If you want to feel image formation in your hands, try a magnifying glass and a sheet of white paper on a sunny day. Move the glass until a sharp, upside-down scene appears on the paper, and you have built a one-element projector. That simple trick mirrors the path from lens to sensor inside your camera body and makes the physics real.
Role of Shutter and Exposure
Once the lens has shaped the light, the shutter decides when and for how long that light reaches the sensor. A mechanical shutter uses two curtains to create a moving slit or an open window, and an electronic shutter times the exposure by turning pixels on and off. Shutter speed is simply exposure time, and it controls both brightness and the look of motion.
Exposure is a balance of aperture, shutter speed, and ISO. Open the aperture and you may need a faster shutter or a lower ISO to avoid overexposure, while closing down pushes you toward a slower shutter or higher ISO to maintain brightness. The triangle is a trade-off system, and learning how each side changes the look is the key to control.
Motion blur is the most visible part of shutter choice. Fast speeds like 1/1000 s freeze a runner and show crisp droplets in a splash, while slow speeds like 1/4 s trail moving subjects and turn flowing water into silk. If you must shoot handheld, pick a speed that tames your hand motion or use stabilization, and remember that subject speed is often the limiting factor.
Panning flips the script by matching the subject’s motion with a slow shutter. When you follow a cyclist at 1/30 s, the rider sharpens against a streaked background, and the frame feels faster than real life. This is a good place to practice because you can see tiny changes pay off right inside the viewfinder.
Different shutters read the sensor in different ways, which affects fast movement. Rolling shutter reads line by line, so vertical lines can skew and spinning blades can wobble if the subject or camera moves quickly, and many phones and mirrorless cameras use this readout. Global shutter exposes all pixels at the same moment, which fixes skew at the cost of complexity and sometimes noise performance.
Flash sync is where timing meets light sources. A mechanical shutter has a maximum speed where the entire sensor is uncovered at once, often around 1/200–1/250 s, and faster speeds need high-speed sync or a different strobe strategy to avoid black bands. Under artificial lights that flicker, very fast shutters can cause banding, so you may need to adjust to safe “anti-flicker” speeds or match the local power frequency.
Video layers time on top of time. A common practice is the 180-degree rule, where shutter speed is set near twice the frame rate, like 1/50 s for 24 fps, to keep motion natural. Neutral-density filters help you hold that speed in bright conditions, and they are equally handy for long-exposure stills that blur rivers, clouds, and crowds into painterly shapes.
To feel exposure choices, take one scene and shoot it at three shutter speeds while holding aperture and ISO constant. Then vary aperture and see how depth of field changes the feeling of the same subject without changing the place or the time. That little exercise makes the exposure triangle click far faster than any chart can.
Image Sensors, Pixels and Color
Now we reach the heart of digital capture, where light becomes data. Each pixel on a sensor is a tiny photodiode that collects electrons when photons strike it during the exposure. The number of electrons that can be stored is the full-well capacity, and when it fills, highlights clip and lose detail.
At the end of the exposure, the charge in each pixel is read and turned into a voltage that represents brightness. The readout adds a little noise, and the random nature of light itself adds shot noise, which rises with signal. Dynamic range reflects how many stops of brightness a sensor can hold between deep shadows and clipping, and it depends on the ratio between full-well capacity and the noise floor.
ISO is gain, not sensitivity in the chemical sense. Raising ISO tells the camera to amplify the signal and the noise together so the image looks brighter at a given exposure time and aperture. Modern sensors handle this gracefully at mid to high ISOs, but the cleanest shadows still come from capturing more light on the sensor in the first place.
Two main sensor families have shaped digital cameras: CCD and CMOS. CCDs once dominated high-end imaging for their uniformity, but CMOS won for speed, flexibility, and power efficiency, and nearly all new cameras use advanced CMOS designs. Back-side illuminated (BSI) sensors move wiring behind the photodiodes to collect more light, and stacked sensors add high-speed memory layers for rapid readout and reduced rolling distortions.
Pixel pitch is the distance between pixel centers, and it sets the pixel size for a given resolution. Larger pixels usually gather more light and can offer better high-ISO performance and dynamic range, while smaller pixels offer more detail given enough light and good lenses. This is why more megapixels do not automatically equal better photos, especially in dim scenes where per-pixel quality matters more than count.
Architecture around each pixel pushes performance further. Micro-lenses sit above the color filters to steer more light into the photodiodes, and gaps shrink to raise the “fill factor” so fewer photons are wasted. Quantum efficiency describes what fraction of incoming photons become electrons, and better QE lifts both brightness and clarity at the raw level.
Most cameras use a Bayer filter array to see color, where each pixel records only red, green, or blue. The sensor captures a mosaic of single-color samples, and the processor demosaics that mosaic to reconstruct full-color pixels for the final image. Demosaicing can produce artifacts like color moiré on fine patterns, and some cameras add a slight blur with an optical low-pass filter to reduce those false textures.
Other color strategies exist, and each trades one strength for another. Sensors with stacked color layers aim to capture true color at every pixel without a mosaic, and dual-pixel designs split each pixel for better autofocus and sometimes smarter demosaicing. These approaches can reduce moiré or improve focus accuracy, but they also bring their own complexities and costs.
Readout timing matters just like it did for the shutter section. Rolling readout sweeps through rows, which can skew moving subjects, while global readout samples everything together to preserve geometry. Stacked sensors with fast internal memory can push rolling readout so fast that distortions are minimized, which is why some new cameras can shoot silent stills with very little skew.
Bit depth sets how many tonal steps each color channel can store. A 12-bit file holds 4096 levels per channel, 14-bit holds 16384, and 16-bit jumps far higher, and more steps mean smoother gradients and more headroom to edit shadows and highlights. When you shoot RAW, you keep most of those steps, while JPEG or HEIF compresses them down to smaller, more portable files.
It helps to separate myths from physics as you pick a camera or choose settings. “More megapixels” improves detail only if your lens and technique can resolve it and you have enough light to feed tiny pixels; otherwise, a larger sensor or larger pixels may look cleaner. “High ISO = worse camera” is also misleading because ISO is just gain, and what really matters is how much light you captured and how well the sensor and processor handle noise.
Practical habits make sensor science work for you. Use pixel binning modes on high-resolution cameras when you work in dim places because combining pixels lifts the signal faster than the noise, giving smoother shadows. Consider slight cropping to remove moiré-prone textures, and shoot RAW when you can so you have the color depth and dynamic range to recover tricky highlights and deep shadows later.
If you want a deeper dive into light becoming data, a concise explanation of how an image forms at the sensor level reinforces what you are learning here. Read it once, then return to your camera and make a few test frames to see the concepts in your own files. The moment you watch highlight recovery in a RAW editor, the theory clicks.
From Light to Final Image: In-camera Processing and Storage
After readout, the camera turns analog voltages into numbers in the ADC, the analog-to-digital converter. More conversion bits mean finer tonal steps per color channel, which helps keep smooth skies clean and avoids banding when you edit. Those numbers then move through a careful pipeline that shapes the final look of your photo.
The pipeline begins by removing black-level offsets so zero means darkness. The camera maps and heals defective pixels, then demosaics the color mosaic into full RGB data. White balance corrects color casts by scaling channels, so your whites look white under sunrise, shade, or tungsten lamps.
Color science takes over next. A color matrix and a profile push the raw sensor colors into a human-friendly color space, and gamma curves shape the tone so midtones look rich while highlights roll off gracefully. The processor reduces noise in shadows, recovers some detail with sharpening, and applies local tone mapping for contrast that feels alive but not crunchy.
At the end, the camera compresses the data to a file format that fits your needs. JPEG is widely compatible and small, but it is 8-bit with lossy compression, while HEIF can store more efficiency and sometimes 10-bit color in supporting systems. RAW keeps the unbaked sensor data with most of the ADC bit depth, so you can choose the recipe later in software.
RAW vs JPEG comes down to flexibility versus speed and convenience. JPEGs look great out of camera for sports, events, and social sharing because the camera does the heavy lifting and the files are small; the trade-off is less headroom to fix exposure and color later. RAW files carry extra detail and dynamic range that let you rescue highlights and shadows or change color without breaking the image, and they shine for landscapes, portraits, and any work where editing is part of your craft.
Computational photography blends multiple frames to push beyond single-exposure limits. Your phone or mirrorless may align several shots to reduce noise, merge exposures for HDR, or build a depth map to separate subject and background for better blur. AI-driven features can also recognize scenes, enhance edges, or correct lens flaws, and when used with intent they can save you time without stealing your voice.
Files have to land somewhere, and that is where storage and buffer speed matter. The buffer is the camera’s short-term memory that holds images before they are written to the card, and fast cards empty it quickly so you can keep shooting. For bursts and high-resolution video, pick cards with strong sustained write speeds, not just peak numbers, and match your card type to the camera slot.
The pipeline can stall when the card cannot keep up or when compression is heavy. If your camera offers lossless RAW, it balances file size and quality well for most still work, while compressed RAW and HEIF can stretch card space without hurting daily results. For critical jobs, consider two-card recording and mirror important images so a single point of failure cannot cost you the day.
Film follows a different path but the same spirit. Light changes silver halide crystals in the emulsion, chemical baths reveal and fix the latent image, and scanning turns those tones into digital data for editing and archiving. Comparing film and digital is like comparing a handwritten score to a high-resolution recording, and both can sound beautiful when handled with care.
A quick glossary helps glue the pieces together in plain language. Aperture (f-number) is the size of the lens opening that controls light and depth of field. Focal length is the basic lens measure that sets field of view and affects how objects appear in size and spacing.
Depth of field is the range that looks acceptably sharp around the focus point and depends on aperture, focal length, distance, and sensor size. Shutter speed is the exposure time that controls motion blur and brightness. ISO is electronic gain that brightens the signal and noise together.
A sensor is the chip that turns light into electrical signals, and a pixel is a single light-collecting site on that sensor. A Bayer filter is the red-green-blue mosaic that lets a sensor infer full color. Demosaicing is the process of turning that mosaic into a full-color image at each pixel location.
Dynamic range is the span of brightness a camera can capture from deep shadows to bright highlights without losing detail. RAW is the minimally processed sensor data that preserves maximum information for later editing. When you tie these terms to the steps you have just learned, the entire pipeline becomes clear and easy to control.
If you want a hands-on way to see the pipeline in action, shoot one scene as both RAW and JPEG and compare them in an editor. Brighten the shadows by two stops and pull highlights by one stop to see how the RAW keeps more subtle tone and color. That simple test answers how do cameras capture images not just in theory but in files you can touch.
As you practice, keep one more experiment in your pocket to make sensors and exposure feel real. Photograph the same scene at ISO 100 and ISO 3200 with equal exposure and inspect the noise in the shadows, then repeat with more light to see how the noise drops with photon count. The lesson is simple and powerful: light first, then settings, and the camera will meet you halfway.
Finally, remember that the capture chain is a creative ladder, not a list of rules. Decide the story, choose the lens to set the space, pick the shutter to shape time, and lean on the sensor and processing to hold the color and tone you saw. When someone asks how do cameras capture images, you can point to your work and say, step by step, just like this.
And if that question pops up in your head again, repeat the flow out loud until it becomes second nature. Light through the lens, aperture and shutter shape it, the sensor measures it, the processor interprets it, and the card stores it for you to share. That is how do cameras capture images, from the first photon to the final photograph, ready for your audience.
What People Ask Most
How do cameras capture images?
They let light pass through a lens and then record that light on a sensor or film when you press the shutter, creating a picture of the scene.
What does the lens do when a camera captures an image?
The lens focuses and directs light so the scene appears sharp on the sensor or film, and it helps control how much of the scene is in focus.
Why do my pictures come out blurry sometimes?
Blurry photos happen when the camera or subject moves or when the focus is off, so steady hands, a tripod, or correct focus usually fixes it.
How does auto-focus help beginners capture images?
Auto-focus quickly finds and sharpens the main subject so your shots look clear without manual adjustments, which is great for everyday use.
Can I capture images in low light without a flash?
Yes, by holding the camera steady, letting in more light through the lens, or using longer exposure times you can get brighter images without a flash.
Does more megapixels mean better photos when you capture images?
No, megapixels affect how large you can print or crop a photo, but good lighting and correct focus matter more for a great-looking image.
How do I keep dust or smudges from ruining the images my camera captures?
Keep the lens clean with a soft cloth, use lens caps when not shooting, and avoid touching the glass to prevent spots and smudges.
Final Thoughts on How Cameras Capture Images
We started by asking how do cameras capture images, and the short answer remains wonderfully direct: light is bent and focused by a lens, its amount and duration are set by aperture and shutter, a sensor or film records the pattern, and electronics then convert and store what you saw. If you remember 270 as a quick cue, picture that whole chain—lens, aperture, shutter, sensor, processing—so you don’t lose sight of the big picture while learning details. That map doesn’t just explain hardware; it gives you usable control over exposure, motion, and depth, so your choices actually shape the photo.
One realistic caution: gear and specs alone won’t rescue a dim, badly composed scene—sensor limits, noise at high ISO, and rolling‑shutter quirks are real trade‑offs you’ll meet when pushing settings. The guide’s practical focus benefits beginners and hobbyists most, and it’ll also help more experienced shooters tidy up habits by showing why each control matters. Keep testing different apertures, shutter speeds, and RAW workflows; with that steady practice your photos will keep improving.


0 Comments