Have you ever wondered how to make your text stand out in a Canva design?
Highlighting text is a powerful way to draw attention and emphasize essential messages, whether creating a social media post, a presentation, or a blog banner.
You’re in the right place if you need help highlighting in Canva.
By the end of this quick guide, you’ll learn:
- How to highlight text in Canva with a few simple clicks.
- The secrets of using the Canva text box background color to enhance your designs.
- Steps to create a colored text box in Canva that makes your content pop.
- Tips for applying these techniques to Canva and how to highlight text in Photoshop.
Stay with us as we break down the process into easy-to-follow steps, ensuring that by the time you finish reading, you’ll highlight words in Canva like a pro.
Let’s dive in and transform your text into eye-catching elements of your design!
Step 1: Open Your Canva Document
Log in to your Canva account and select the design you wish to work on. If you’re starting from scratch, choose a template that suits your project or create a new design by clicking the “Create a Design” button.
Step 2: Add or Select Your Text
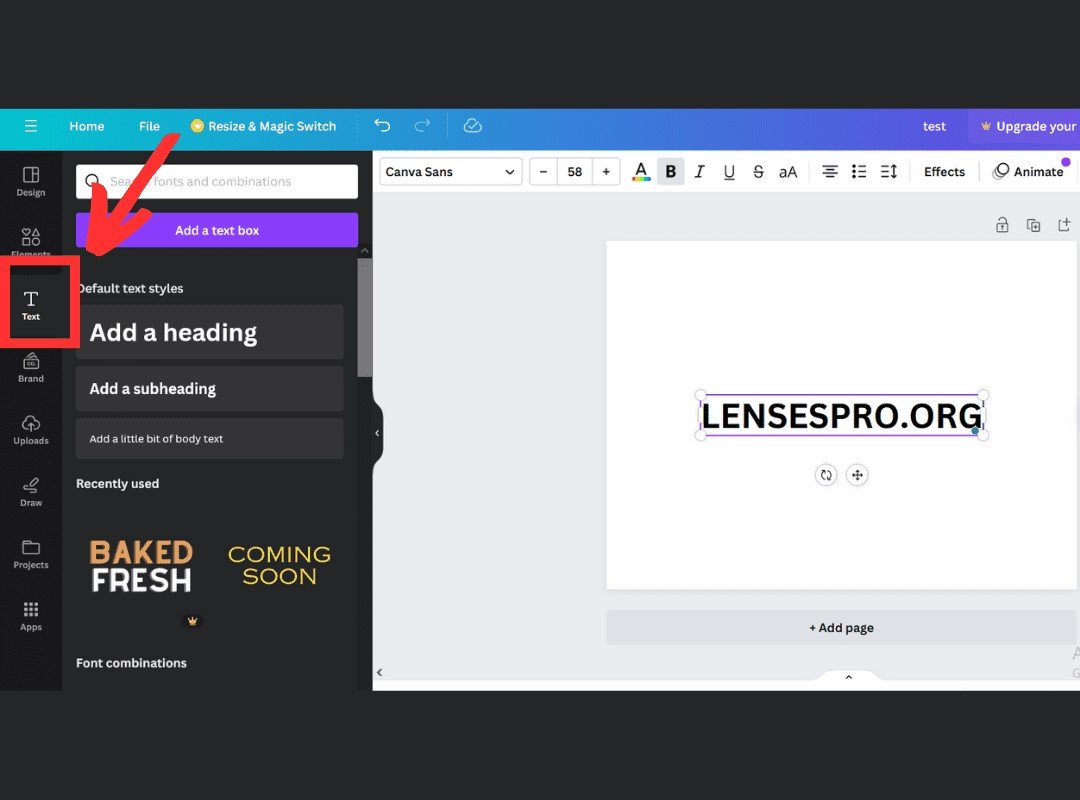
If you haven’t already, add text to your design by clicking on the “Text” button (usually on the left-hand side toolbar). Choose a heading, subheading, or a bit of body text, and type in your message. If you already have text in your design, click on it to select it.
Step 3: Highlighting Your Text
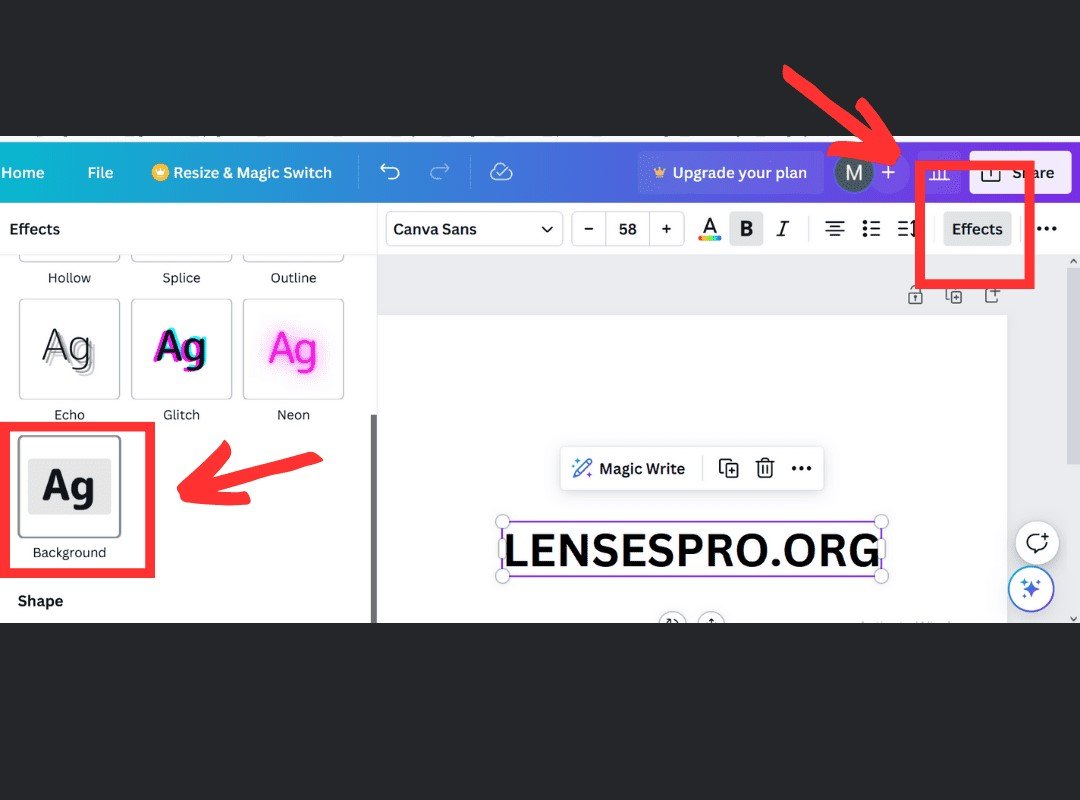
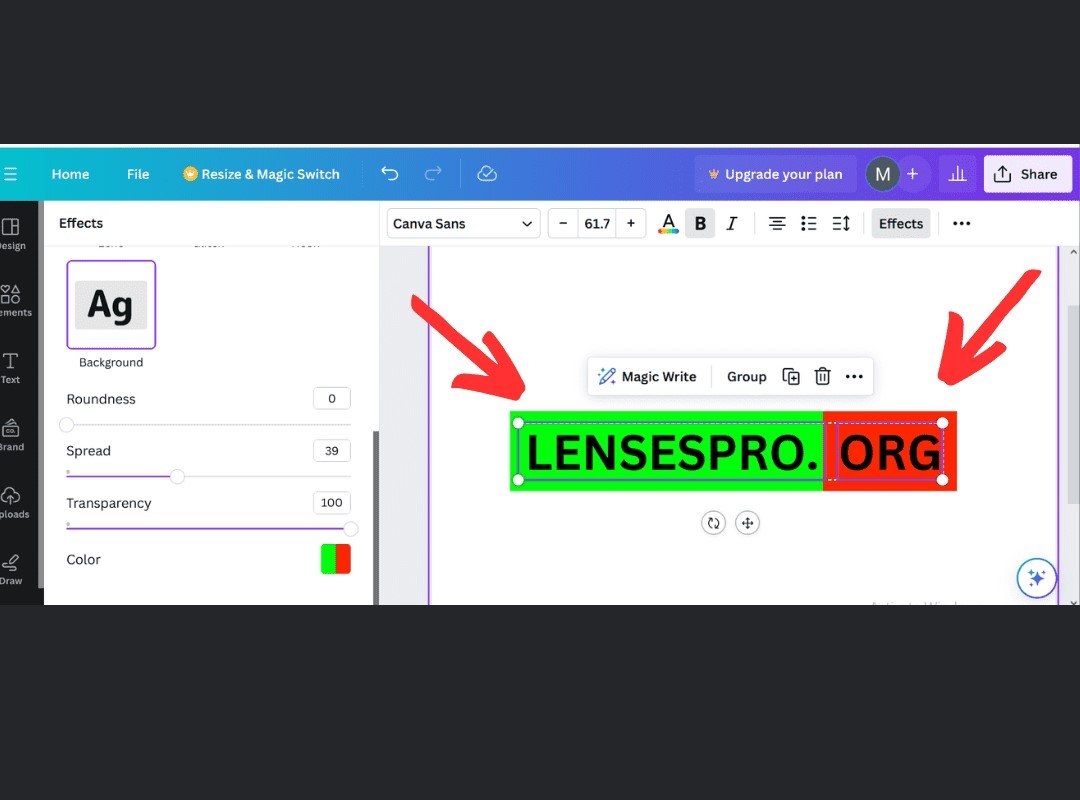
Once your text is selected, look for the ‘Effects’ button on the toolbar above your canvas. Click it and then choose the ‘Background’ option. This will allow you to add a background color to your text, effectively highlighting it.
Step 4: Customize Your Highlight
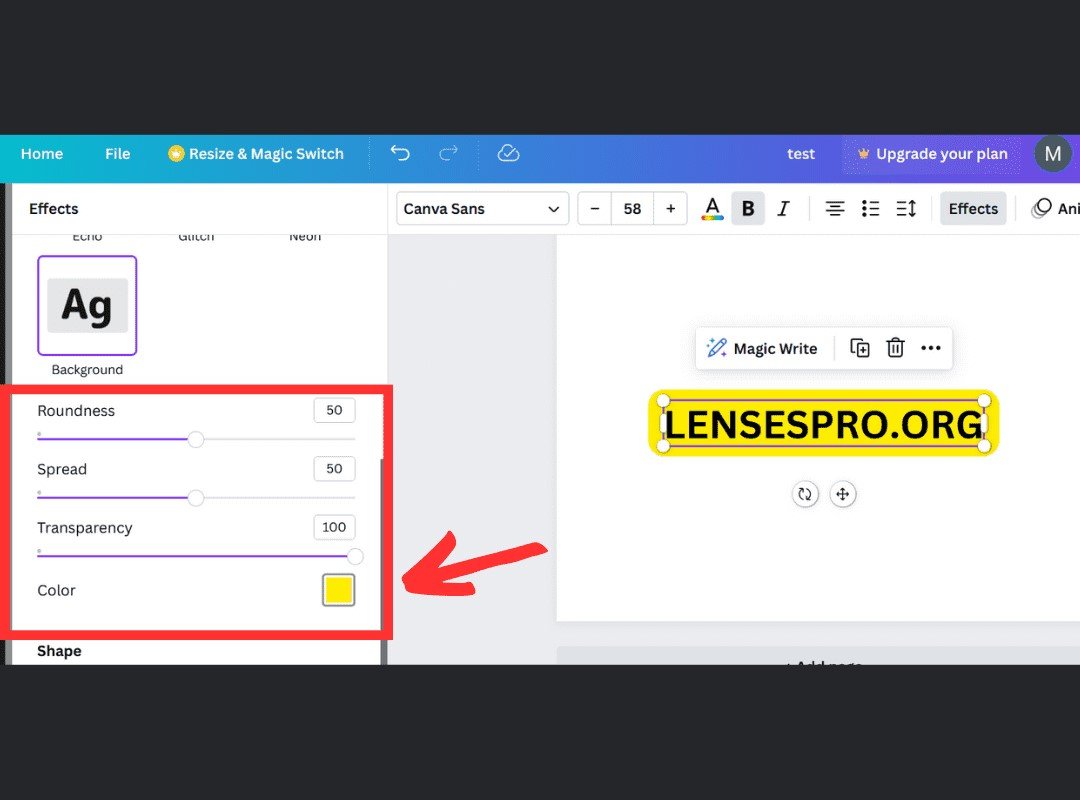
A new menu will appear where you can adjust the background color, which is your highlight. Click on the color tile to pick a new color, or use the color code if you have a specific shade in mind. You can adjust the transparency to make the highlight more subtle or leave it bright and bold for maximum impact.
Step 5: Adjust the Size of Your Highlight
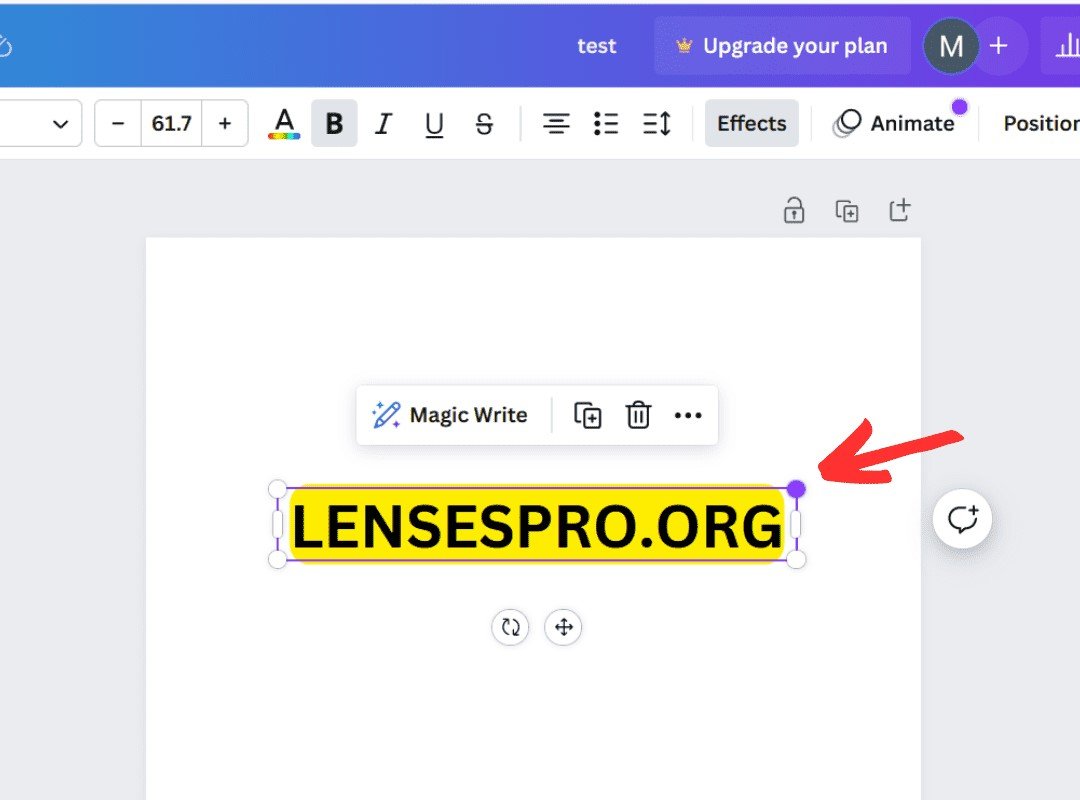
If the highlight doesn’t fit your text correctly, you can resize it manually. Click on the text box and drag the corners to make the highlight larger or smaller, ensuring it fits the text just right.
Step 6: Highlighting Individual Words
If you only want to highlight individual words, you’ll need to create separate text boxes for each word you want to highlight and then follow the same process as above for each box.
Bonus Tip: Canva Text Box Background Color
To make a text box with a colored background without the highlight effect, add a shape behind your text and color it as needed. This is useful for creating buttons or special content blocks.
Step 7: Finalizing Your Design
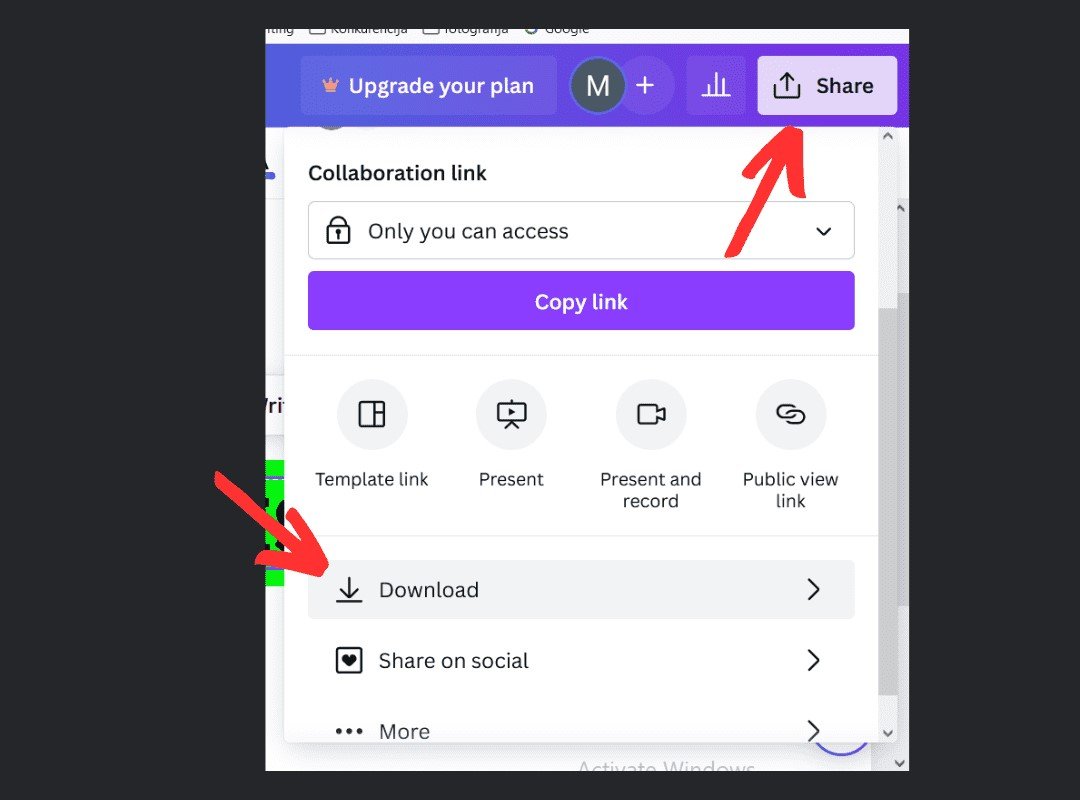
Once satisfied with the highlights, click the “Download” button at the top right corner to save your design or share it directly from Canva.
By following these simple steps, you can effectively highlight text in Canva to make your designs stand out. Remember, practice makes perfect, so don’t hesitate to experiment with different colors and transparency levels to achieve the desired effect.
Tips for Effective Text Highlighting in Canva
Highlighting text can significantly enhance the visual appeal of your design and help communicate your message effectively. Here are some valuable tips to keep in mind:
Choose the Right Color
Contrast is Key: Select a highlight color that stands out against the background but still complements the overall design palette.
Color Psychology: Be mindful of color psychology. Warm colors can evoke excitement, while cool colors are more calming.
Keep It Readable
Transparency: Adjust the transparency of your highlight to ensure that the text remains easy to read. A highlight that’s too opaque can obscure the text.
Text Color: Make sure the color of your text contrasts with the highlight for clarity. Dark text on a light highlight or vice versa works best.
Size Matters
Fit to Text: Resize the highlight to fit snugly around your text. Too much excess can make the design feel cluttered.
Consistency: If you’re highlighting multiple pieces of text, keep the size and shape of your highlights consistent across the design.
Highlight with Purpose
Emphasize Sparingly: Use highlights to draw attention to the most critical parts of your text. Overusing this effect can dilute its impact.
Contextual Highlighting: In some cases, highlighting can signify interaction, such as buttons or links. Keep this in mind when designing interactive elements.
Creativity with Shapes
Shapes and Lines: Instead of the standard background highlight, use shapes or lines to create custom highlights that add a creative touch.
Layering: Layer text over shapes for a clean, modern look that naturally draws the eye to the highlighted words.
Canva Pro Features
If you can access Canva Pro, take advantage of the additional features like brand kits for consistent color schemes and the ability to save templates with pre-set highlights.
Cross-Platform Consistency
If you’re also working with other software, like Photoshop, try to maintain consistency in your highlighting techniques across platforms. This ensures your branding is coherent, no matter where your designs are displayed.
Remember, highlighting text aims to make your content stand out and guide the viewer’s attention to where you want it most. With these tips, you should be able to create visually engaging designs that communicate effectively with your audience.
Additional Options for Highlighting in Canva
While the essential background highlight is a great starting point, Canva offers several creative ways to make your text pop. Here’s how you can explore further:
Highlighting Specific Words or Phrases:
Text Boxes: Create separate text boxes for the words you want to highlight and follow the background color method for each.
Layering: Place shapes such as rectangles or circles behind specific words or phrases to serve as the highlight. This can create a more custom and dynamic look.
Creative Highlights with Shapes and Lines:
Shapes Behind Text: Use geometric shapes from the ‘Elements’ section to add behind your text. This can be a simple rectangle or something more stylized.
Lines and Stroke: Lines can underscore words or phrases, adding a minimalist highlight that’s subtle yet effective.
Experimenting with Opacity and Blending:
Opacity Adjustments: Play with the opacity of your highlights to create different effects. Lower opacity can look sophisticated and modern.
Blending Modes: If you’re comfortable with blending modes, these can offer a unique way to integrate highlights into your design.
Using Canvas Design Library for Inspiration:
Templates: Browse the Canvas template library for designs that innovatively use text highlights.
Elements: Explore the ‘Elements’ section for premade graphics that can double as highlights.
By taking advantage of these additional options, you can elevate your Canva designs beyond essential highlights. It’s all about letting your creativity shine while maintaining the functionality of directing viewer attention. Try new techniques to see what works best for your project.
Conclusion
Highlighting text in Canva is a simple yet impactful way to enhance your designs and emphasize essential messages. By following the steps and tips provided in this guide, you should now be equipped with the knowledge to:
- Select and highlight text using Canvas built-in tools.
- Adjust the color and transparency of your highlights for optimal readability and visual appeal.
- Use creative techniques to highlight individual words or phrases for added emphasis.
- Incorporate shapes and lines for a more customized and artistic approach to text highlighting.
Remember that the best designs are often the result of experimentation. Don’t hesitate to try different styles, colors, and effects to discover what works best for your design goals.
The power of a well-placed highlight can transform your content from ordinary to eye-catching, guiding your audience exactly where you want them and ensuring your message isn’t just seen but remembered. So open up Canva and start highlighting with confidence and creativity!
Now that you’ve got the know-how, it’s time to implement these skills. Dive into Canva and start playing with highlights in your next project. If you are hungry for more advanced features, consider exploring Canva Pro to unlock more design possibilities. Your next stunning design is just a few clicks away—happy highlighting!


0 Comments