
Ready to lock down a tripod that keeps your Sony A6000 razor-sharp in low light, time-lapses, and windy rooftops?
Choosing one can feel overwhelming with so many shapes, head styles, and portability tradeoffs to weigh.
This concise guide brings together five well-reviewed picks and real-world impressions to simplify that decision for A6000 shooters.
We focused on what matters when you are shooting in the field: portability for hikes, stability for long exposures, and usable height for comfortable framing.
Beyond specs, the guide leans on user feedback and hands-on notes about setup speed, lock reliability, and how heads perform under real stress.
That perspective helps you match a tripod to your shooting habits instead of chasing marketing claims you won’t notice in practice.
Whether you prefer a featherweight travel setup that tucks into a backpack or a rock-steady studio stand that survives wind and heavy lenses, we explain the practical tradeoffs.
You’ll also get straightforward advice on head types and height range so you can frame faster, reduce strain during long shoots, and avoid wasted purchases.
Read on to discover which tripod characteristics truly matter for the Sony A6000 and how to choose one that earns a permanent spot in your kit.

Manfrotto 055 Aluminum 3-Section Tripod with Horizontal Column (MT055XPRO3)

Manfrotto 290 Xtra Aluminum 3-Section Tripod Kit with 3-Way Head (MK290XTA3-3WUS)

Sirui Traveler 7C Carbon Fiber Tripod 65.55 in with E-10 360° Panorama Ball Head, Arca-Swiss plate, 17.6 lb capacity, convertible to monopod
1. Manfrotto 290 Xtra Aluminum 3-S Tripod Kit
Manfrotto 290 Xtra Aluminum 3-Section Tripod Kit with 3-Way Head (MK290XTA3-3WUS)
Sturdy aluminum support for reliable stability, smooth three-way positioning, and quick setup, perfect for hobbyist photographers on the move.
Check PriceThe Manfrotto 290 Xtra Aluminum 3‑S Tripod Kit is a workhorse that’s ideal for beginners and semi‑pros who want a dependable setup without breaking the bank. Its aluminum construction and three leg sections give a useful height range, so you can go low for creative angles or reach up for portraits and landscapes.
In the field it feels solid rather than fancy. Despite the lightweight aluminum frame it holds the Sony a6000’s weight well and prevents shaking or camera movement during longer exposures or telephoto shots.
Leg locks are quick and secure, which speeds up location changes and keeps you framed where you want to be. Setup is straightforward, though the initial unfold can require two hands until you get the rhythm down.
Durability is another plus — this tripod stands up across different terrains and stays reliable after repeated use. It’s suited to general photography work: outdoor travel, studio sessions, and hobbyist shoots where you need flexibility without a heavy professional rig.
If you’re choosing between ultralight travel tripods and something sturdier, the 290 Xtra sits in a comfortable middle ground. It’s a bit bulkier than ultra‑compact designs, and aluminum won’t beat carbon fiber for weather resistance or the absolute lightest carry, but for overall stability and versatility it’s hard to beat at its price point.
- Stable on uneven surfaces
- Easy to carry due to light weight
- Reliable leg locks under repeated use
- Good height versatility for low and high shots
- Slightly bulky vs ultra-compact tripods
- Aluminum heavier and less weather-resistant than carbon fiber
2. Manfrotto Befree 3-Way Live Tripod Kit

Manfrotto Befree Live 3-Way Tripod Kit with Fluid Head (Aluminum, 6 kg capacity)
Compact video tripod with fluid head for buttery smooth pans, foldable design, supports cameras up to 6 kg, ideal for vloggers.
Check PriceThe Manfrotto Befree 3-Way Live is a travel-minded tripod built for shooters who move a lot and shoot video. Its compactness and backpack-friendly profile make it an easy pack for day trips and vlogging outings.
What stands out is the 3‑way head, which gives precise control over pan, tilt and level — ideal for framing video shots and controlled compositions. The head movements are described as smooth, so you can make fine adjustments without hunting for the right position.
Setup and teardown are quick, which is a real boon when I’m hopping between locations or trying to catch changing light. Foldable legs save storage space and make the whole kit unobtrusive in a bag.
For a Sony a6000 user, the Befree balances the camera well and feels surprisingly sturdy for its size. On flat, calm surfaces it holds steady and gives you reliable shots for handheld-replacement stability.
Be aware of the limits: it’s less stable on uneven or slippery ground, so I avoid relying on it in rough terrain or gusty conditions. Also, some users find the head a bit stiff out of the box, which can be remedied with a little break‑in or adjustment.
In short, if your priority is portability and video-friendly controls, the Befree 3‑Way Live is a practical, user-friendly choice. If you shoot a lot in windy or uneven environments, consider whether that trade-off fits your workflow.
- Excellent portability without sacrificing function
- 3‑way head ideal for video work
- Sturdy for its size; balances Sony a6000 well
- Foldable legs save storage space
- Less stable on uneven or slippery surfaces
- Head can feel stiff/tight out of the box for some users
3. Peak Design Carbon Fiber Travel Tripod
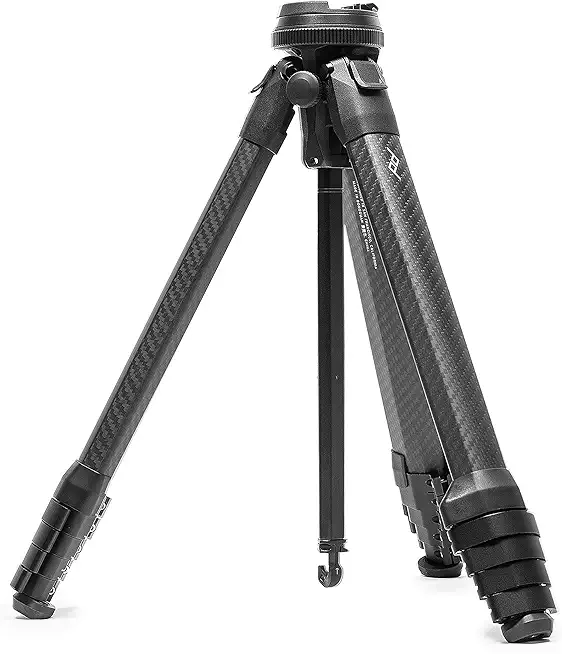
Peak Design Travel Tripod (Carbon Fiber) with Ball Head, 20 lb capacity
Ultra-compact carbon fiber travel tripod delivering professional stiffness, fast setup, and secure ball-head control for heavy lenses.
Check PriceWhen I pack for a long hike or a city shoot, the Peak Design Travel Tripod (Carbon Fiber) is the one I reach for when weight and compactness matter. Its carbon fiber + aluminum construction gives a premium strength‑to‑weight ratio, and the ultra‑compact fold size genuinely changes how much gear I can carry.
Setup is a breeze thanks to Peak Design’s single‑motion design and cam lock leg mechanism — I can go from bag to shooting in seconds. The smooth ball head is excellent for precise framing and low‑angle work, which I use often for landscapes and architecture.
Load capacity goes up to 9.1 kg, which is overkill for a Sony A6000 but reassuring if you occasionally mount heavier lenses or accessories. That said, the tripod is lighter by design, so it is less stable in strong winds; I lower the legs and avoid extending the center column when it gets gusty.
There are a few practical extras I like: a smartphone mount and a carrying cover are included, so switching to phone shots or protecting the tripod on the trail is easy. The cam locks are quick, though some users report occasional security concerns under very high loads — something to keep in mind if you push the 9.1 kg limit often.
If you prioritize portability and fast deployment, this tripod is hard to beat. If you need maximum height or absolute wind resistance at the expense of bulk, consider other options.
- Exceptionally lightweight and portable
- Premium carbon fiber + aluminum build
- Smooth, precise ball head control
- Fast single‑motion assembly
- Higher price than many competitors
- Less stable in strong winds; limited max height
4. Manfrotto 055 Aluminum 3S Tripod
Manfrotto 055 Aluminum 3-Section Tripod with Horizontal Column (MT055XPRO3)
Versatile heavy-duty aluminum support with horizontal column for low-angle and macro shooting; robust build for studio and field use.
Check PriceAs a working photographer I reach for the Manfrotto 055 when stability matters more than packability. It’s a robust, heavy‑duty tripod built for studio and demanding outdoor shoots where you need rock‑steady support.
This tripod is larger and heavier than travel options, but that bulk buys you excellent stability and a high load capacity. It’s compatible with the Sony a6000 and comfortably handles heavier setups too.
For long exposures, portraits and landscapes the 055 is a superb choice—its durability and rock‑steady performance on rough ground make it easy to trust during multi‑minute exposures or precise composition work. The weight is the trade‑off, but in the field that solidity pays dividends.
The ball head gives smooth, accurate positioning which landscape and portrait shooters will appreciate for fine framing. Combined with an extended height range and broad accessory compatibility, the 055 adapts well to diverse shooting styles and studio rigs.
Setup is straightforward, but expect a bit more time and effort than with compact travel tripods because of its size. If you move locations frequently or hike with your gear, the tripod’s weight and bulk will quickly become a practical limitation.
In short: if your priorities are durability, stability and load capacity for controlled shooting environments, the Manfrotto 055 is an excellent, professional‑grade tool. If you need ultra‑light or ultra‑compact gear for constant travel, look elsewhere.
- Superior stability and load capacity
- Durable build quality for intensive use
- Extended height range for diverse shooting styles
- Broad accessory compatibility
- Heavy and bulky; not ideal for frequent transport
- Longer setup time vs compact models
5. SIRUI A-Series Camera Tripod
Sirui Traveler 7C Carbon Fiber Tripod 65.55 in with E-10 360° Panorama Ball Head, Arca-Swiss plate, 17.6 lb capacity, convertible to monopod
Tall carbon fiber system with 360° panorama head and Arca-Swiss compatibility; converts to monopod for lightweight, flexible shooting.
Check PriceAs a working photographer, I appreciate the SIRUI ASeries for how it balances weight and stability. It’s a mid‑range carbon fiber tripod that feels light in the bag but surprisingly solid when you’re mounted up.
The included ball head is smooth and gives fluid panning and tilting, which makes framing fast during events or landscape shoots. The quick‑release plate is reliable and genuinely speeds camera changes when you need to move between handheld and tripod shots.
Legs lock securely and the anti‑slip feet give confidence on mixed terrain, so you can use this tripod on gravel, grass or pavement without worrying about sudden slips. For travel and event work the combination of lightness and dependable stability is where this kit shines.
There are a few practical caveats to bear in mind. Some users (myself included at first) find the leg adjustments a little fiddly until you get a feel for the locks. Also, if you need a lot of reach for studio or very tall subject work, this model isn’t the tallest option out there.
Overall, if you’re a hobbyist or semi‑pro shooting a Sony a6000 and you want something portable but trustworthy for landscapes, travel and events, the SIRUI ASeries is a very sensible choice. It’s a good middle ground between lightweight portability and the sturdiness you need for critical shots.
- Lightweight carbon fiber construction
- Smooth, precise ball head movement
- Stable across terrains due to sturdy locks and feet
- Fast camera mounting/dismounting
- Leg locks can be tight or tricky initially
- Not as tall as some competing tripods; limited height range
How to Stabilize a Tripod in Wind
Wind is one of the quickest ways to ruin a sharp shot, especially with a light mirrorless body like the Sony a6000. Lowering the tripod and keeping it compact reduces sail area and makes a huge difference in gusty conditions.
Whenever possible extend the thickest leg sections first and avoid the thinnest sections unless you need the extra height. That simple ordering gives the legs more stiffness and cuts down on flex that translates to blur.
Keep the center column down — it’s the weakest part of any tripod — and hang weight from the center‑column hook when your tripod has one. A camera bag, sandbag or even a small backpack will dampen vibration and hold the rig down through gusts.
Don’t be shy about bracing the tripod with your body or wedging a leg against a rock or root for extra security. Remove or secure loose straps and anything that can flap in the wind, because those tiny movements show up in long exposures.
Use natural windbreaks like walls, berms or trees whenever you can and consider shooting closer to the ground to slip beneath the worst airflow. If a lens hood is acting like a sail in very strong wind, remove it until things calm down.
Finally, test image stabilization (IS/VR) for your setup — in some cases leaving IS on helps, but always compare results with quick bursts. Take several frames over a minute; the wind is fickle, and multiple exposures increase your chance of a usable, razor‑sharp shot.
Tripod Height Adjustment Tips
Think of tripod height as the first step in your composition. For everyday shooting I set the tripod roughly at eye level so framing and focusing feel natural. If you find yourself constantly crouching or stretching, adjust the legs instead of relying on the center column—it’s an easy way to save stability and speed up workflow.
When you do need different perspectives, lower the whole tripod for low‑angle or macro work by spreading the legs wide or reversing the center column if your tripod supports it. For taller subjects or portraits, extend the thicker, lower leg sections first; they give the most rigidity. Avoid extending the thinnest sections unless you really need the extra height.
Treat the center column as a last resort. It’s convenient but introduces flex, especially with longer lenses. If you must use it, keep it short and make sure the head and quick‑release plate are securely mounted before composing.
On uneven ground, think of the tripod base as a table—level the camera by shortening uphill legs and lengthening downhill legs. That keeps the center of gravity centered and reduces the chance of the rig tipping. After any adjustment, give the setup a gentle push to test the locks; if it moves, tighten and retest before shooting long exposures.
When space is tight, collapse one or two sections to create a compact footprint rather than extending everything high. For travel days, quick‑release plates and fast leg locks save time and let you change heights between shots without hunting for tools. A small habit I use: set height first, then fine‑tune framing with the head—your compositions will be steadier and you’ll spend less time fiddling.
What People Ask Most
What is the best tripod for Sony a6000?
There is no single best tripod; choose one that matches your priorities like portability, stability, head type and height range. Consider how and where you shoot most often to narrow the options.
What size tripod do I need for the Sony a6000?
Pick a tripod that reaches a comfortable eye‑level height for general use and can also get low for close‑to‑ground shots. Make sure it folds small enough for your typical transport needs.
Can I use any tripod with the Sony a6000?
Most tripods will work with the camera as long as they have a standard mounting plate and a compatible head. Verify the tripod can comfortably support your camera plus any lenses or accessories you use.
What tripod head is best for the Sony a6000 — ball head or pan-tilt?
Ball heads offer quick, compact adjustments and are great for fast framing, while pan‑tilt heads provide precise control for axis‑specific movements. Choose the head that fits your shooting style and preference for speed versus fine control.
Is a heavy-duty tripod necessary for the Sony a6000?
A heavy‑duty tripod is not usually necessary for the camera body alone; lighter tripods often provide sufficient stability. Consider a sturdier model if you use large lenses, heavy accessories, or shoot in challenging conditions.
What is the best travel tripod for the Sony a6000?
Look for a travel tripod that balances low folded size, light weight, and reliable stability for your gear. Secure leg locks and a user‑friendly head are important for quick setups on the move.
How tall should a tripod be for shooting with the Sony a6000?
Choose a tripod tall enough to compose comfortably at eye level without bending, while still allowing lower angles when needed. Adjustable leg sections help cover a wider range of shooting heights.
Conclusion for Sony A6000 Tripods
Whether you favour travel-friendly compactness or rock‑solid studio stability, the five tripods covered here span practical options from ultra‑portable designs to heavy‑duty stands.
Your best choice comes down to priorities: match stability, portability, head type and usable height to the way you shoot with the Sony a6000.
Put the tips in this guide to work during real shoots—stabilizing in wind, choosing which leg sections to extend and keeping center‑column use minimal will quickly reveal what suits your workflow.
If you want to build technique and confidence, explore more articles on the site to learn practical approaches and refine your gear choices.
Have a question or a tripod experience to share? Leave a comment below and we usually reply within a few hours.




0 Comments