How do i know what lens fits my camera? This quick guide gives step-by-step checks so you can match mounts, sensor size, and electronics with confidence.
You will learn how to identify your camera’s lens mount and read lens labels. A simple 6-step checklist will show you how to test fit, AF, infinity focus, and vignetting.
We also explain crop-sensor vs full-frame rules and when adapters help or cause trouble. Plus, get buying-used tips and common troubleshooting fixes.
Scroll down for the one-sentence quick answer box, real examples, and clear photos. By the end you’ll know which lenses will physically and electronically work with your camera.
What Is a Lens Mount?
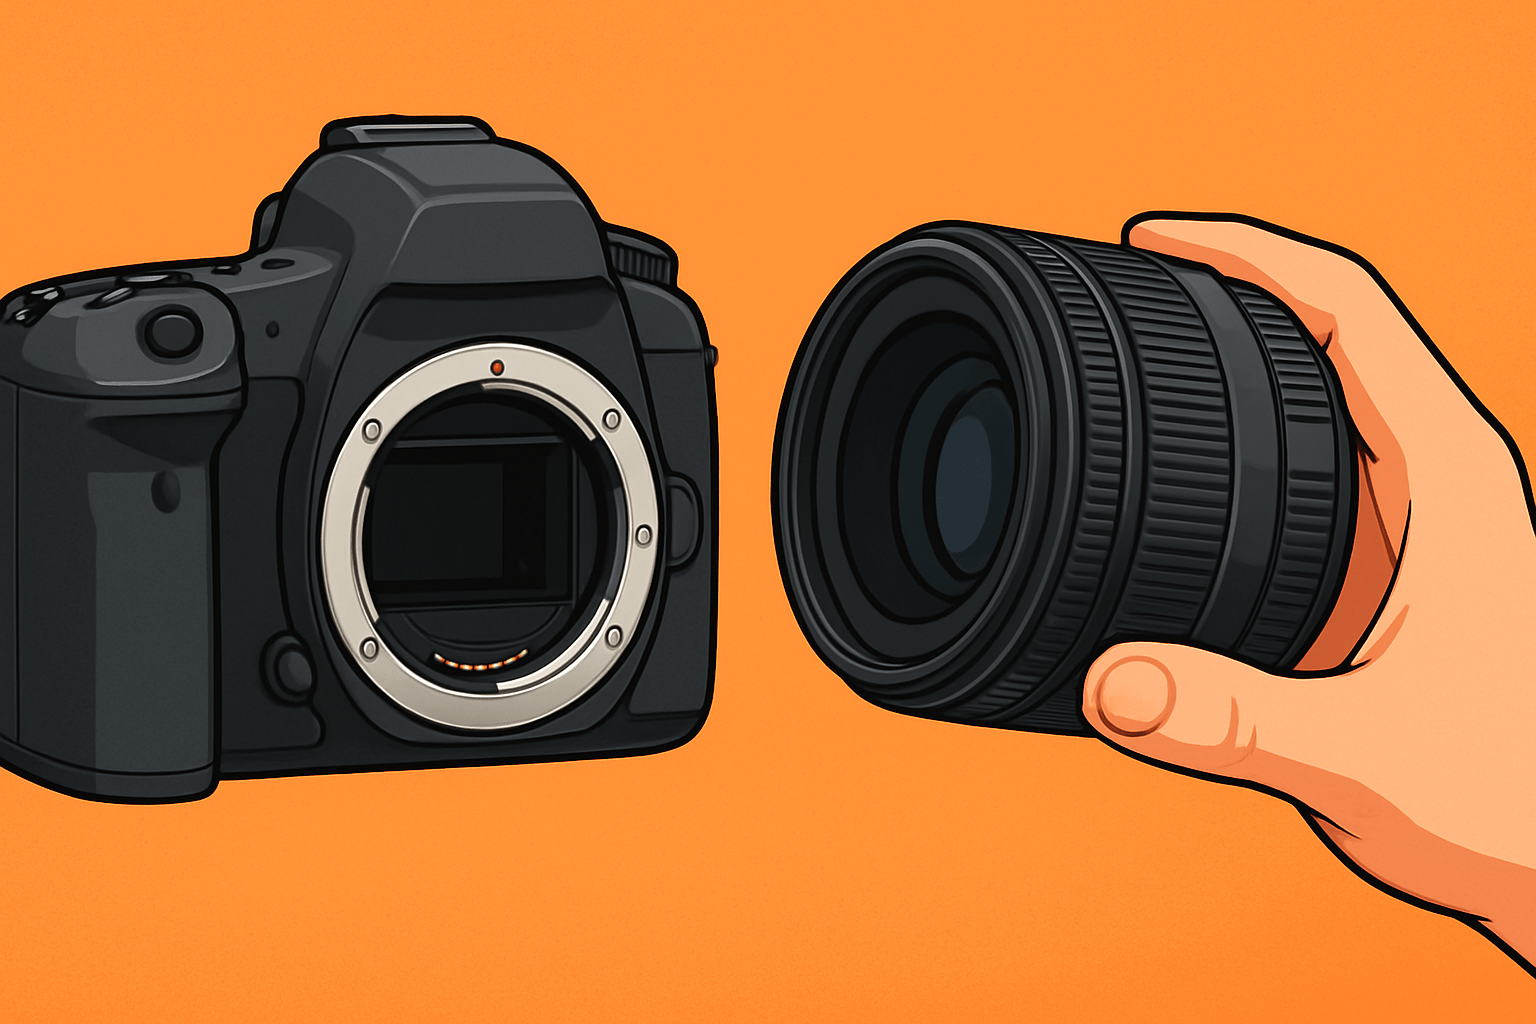
A lens mount is the connection between your camera and your lens. It is the metal bayonet that locks the lens in place and the electronic interface that lets the lens and camera talk to each other. When people ask, how do i know what lens fits my camera, this mount is the first thing to check.
The mount’s job is twofold. First, it provides the mechanical fit that holds the lens at the correct distance from the sensor, a measurement called flange focal distance. Second, it passes electronic signals for autofocus, aperture control, image stabilization, and EXIF data.
Why does this matter? If the mount name does not match, the lens will not attach or it will attach but lose key features. If the flange distance is wrong, the lens may not focus to infinity or may focus poorly.
Common mount codes you will see include Canon EF, EF-S, and RF; Nikon F and Z; Sony A and E; Fujifilm X and G; Micro Four Thirds (MFT); Pentax K; and Leica L. These codes are the keys you will use throughout this guide.
How to Identify Your Camera’s Lens Mount
The fastest way is to find your camera’s full model name and search the manufacturer site for “lens mount.” This is the most reliable answer, and it avoids guessing based on looks alone. If you prefer printed info, your user manual and spec sheet also list the mount.
Many cameras print the mount name near the lens release button or on the front badge. Some brands use color dots or squares to guide alignment, but the label in the specs is what you want. If the body is used, check the serial plate and manual to confirm.
You can also remove the lens and look at the mount itself. Count the bayonet lugs and find the contact pins around the edge, then compare with photos in the official system pages. This visual check helps when the camera is older or when the manual is missing.
Brand mappings are straightforward once you learn them. Canon DSLRs use EF for full-frame and EF-S for APS-C; Canon mirrorless uses RF and RF-S. Nikon DSLRs use the F-mount; Nikon mirrorless uses the Z-mount.
Sony used A-mount on older DSLRs and SLTs; Sony mirrorless uses E-mount, with FE denoting full-frame E-mount. Fujifilm uses X for APS-C and G for GFX medium format; Micro Four Thirds is shared by Olympus/OM System and Panasonic; Pentax uses K; Leica, Panasonic, and Sigma share the L-mount.
If you shoot Sony and need an official confirmation, check the brand’s own lists of supported lenses. Similar pages exist for other makers, and they are invaluable when a lens name or mount code looks confusing.
How to Check If a Lens Fits Your Camera
Quick answer: match the lens mount name to your camera’s mount, then confirm sensor format and electronic features before you buy or attach. That is the whole secret packed into one line.
1) Confirm your camera mount name. Look it up in the manual or on the maker’s site, or use the tips from the previous section for a visual check.
2) Confirm the lens mount name. It is printed on the lens barrel, the rear cap, the box, or on the maker’s product page. Do not rely only on the focal length or brand name.
3) Check the sensor format noted on the lens. Terms like full-frame, APS-C, DX, EF-S, E (APS-C), or MFT tell you how big the image circle is and whether it covers your sensor.
4) Verify mechanical fit. If the mount names match, the bayonet should lock with a smooth twist and a click. Watch for rear elements that protrude too far, especially on crop-only DSLR lenses that were not designed for full-frame bodies.
5) Verify electronic compatibility. Make sure autofocus, aperture control, and stabilization are supported by your camera body and the lens firmware. This is vital for third-party lenses, older models, or when using adapters.
6) If unsure, test in person. Mount the lens, focus to infinity, try autofocus across the frame, and take a few shots at wide open and stopped down. Check for vignetting, AF accuracy, and any error messages.
Those six steps answer the heart of “will this lens fit my camera” in a practical way. They also prevent the most common surprises when mixing brands or mixing older and newer gear. Keep them handy when shopping or borrowing.
Compatibility charts from camera and lens makers are your best friend. Search by exact lens name and camera model, and read notes about firmware updates. For Nikon users, the official overview of NIKKOR lens types helps decode AF-P, AF-S, and older AF lenses that rely on the body’s screw-drive motor.
Flange focal distance matters too. Mirrorless bodies have a shorter distance from mount to sensor, which makes it easier to adapt DSLR lenses with a simple spacer adapter. If an adapter is poorly made or the distance is off, the lens may fail to focus at infinity.
Watch out for image circle limits. A lens built for APS-C will not fully cover a full-frame sensor, so you may see dark corners or a hard circle. Some cameras enter auto crop mode, which uses a smaller portion of the sensor and avoids black edges.
Electronics can be a curveball. Older lenses or budget adapters may lose autofocus, stabilization, or lens metadata. Check for firmware updates on both camera and lens, and read user reports for your exact pair before relying on it for paid work.
Buying used online requires extra care. Verify the mount code in the listing, ask for clear photos of the rear mount and contacts, and request test images at wide and mid apertures. Make sure there is a return policy in case the lens does not communicate with your camera.
Here are two quick real-world examples. A Canon Rebel T7 (EF-S mount) with a Canon EF 50mm f/1.8 will fit and work perfectly; the lens is full-frame, so it covers the APS-C sensor with no issue. A Sony a7 III (FE mount, full-frame) with a Canon EF 24–70mm f/2.8 and a smart EF-to-E adapter can work well, but AF speed may be slower than a native FE lens.
Troubleshooting is simple when you stay methodical. If the lens will not mount despite the correct mount name, inspect for bent bayonet tabs, a missing locking pin, or a jammed release button. If the lens mounts but autofocus fails, clean the contacts, update firmware, and try switching to manual focus to confirm optics are fine.
If your camera is older and uses a body-driven AF screw, a newer lens without a screw-drive gear will not autofocus. The reverse is also true: a body without a motor cannot drive older screw-drive lenses. This is why verifying electronics is as important as the physical mount.
The more you practice this process, the faster it becomes. You will quickly answer, how do i know what lens fits my camera, by instinct: match the mount, confirm the format, verify electronics, then test. That habit saves time, money, and headaches.
Crop Sensor vs Full-Frame Lenses
Crop factor is a simple multiplier that tells you how much smaller your sensor is than full-frame. Canon APS-C is 1.6×, while Nikon, Sony, and Fujifilm APS-C are about 1.5×; Micro Four Thirds uses 2×. This number affects field of view, not the lens’s true focal length.
A full-frame lens on a crop body works great because the lens’s image circle is larger than the sensor. The field of view becomes narrower, so a 50mm lens behaves like a 75mm on 1.5× APS-C or an 80mm on Canon’s 1.6× bodies. This can be useful for portraits and tighter framing.
A crop-sensor lens on a full-frame body is the opposite. The smaller image circle may not cover the larger sensor, causing heavy vignetting or a round image. Some cameras switch to crop mode automatically, reducing resolution but removing the dark corners.
Here are a few brand-specific notes that help in the real world. Canon EF lenses fit both EF and EF-S DSLR bodies, but EF-S lenses generally do not mount on full-frame EF bodies. On Canon’s RF mirrorless bodies, adapters and firmware add more flexibility, but always double-check the official notes.
For Sony, FE lenses are full-frame E-mount and work fine on APS-C E bodies with a crop. APS-C E lenses also mount on FE bodies, but the camera will either crop or show vignetting if crop mode is disabled. The behavior is predictable once you learn your camera’s crop settings.
A quick mental rule helps when choosing a focal length. Multiply by the crop factor to estimate the full-frame equivalent field of view, so a 35mm on a 1.5× APS-C acts like a 52.5mm. This tiny habit keeps your framing consistent across different cameras.
Using Lens Adapters: Pros and Cons
Adapters come in three main flavors. Passive mechanical adapters provide the correct spacing and mount conversion but no electronics. Smart adapters pass autofocus, stabilization, and aperture control; optical adapters, such as speed boosters, also change focal length and effective aperture.
The benefits are real. You can access unique rendering from legacy glass, stretch your budget, and fill gaps in a system with a single adapter. A speed booster can even reduce the crop factor and add up to a stop of light.
There are trade-offs to expect. Autofocus may slow down or hunt more, stabilization can be lost, and EXIF may not record correctly. Cheap adapters sometimes miss infinity focus or wobble, so buy with care and test right away.
Compatibility is always specific to the camera, lens, and adapter model. Read the adapter maker’s notes, keep firmware updated, and plan for a short test session. Check AF speed, infinity focus, aperture control, and stabilization before your first real shoot.
If you are just starting, a concise lens compatibility guide can help you set expectations. Combine that with the six-step checklist above, and you will answer how do i know what lens fits my camera every time, even when cross-mount adapting.
What People Ask Most
How do I know what lens fits my camera?
Match the lens mount on your camera to the lens mount type and check the camera manual or lens label to confirm compatibility.
What is a lens mount and why does it matter?
The lens mount is the physical and electronic connection between lens and camera, and if it doesn’t match the lens won’t attach or work properly.
Can I use lenses from different brands on my camera?
Often yes if they share the same mount or with an adapter, but features like autofocus or image stabilization may not work perfectly.
Do lenses made for crop sensors fit full-frame cameras?
Not always—crop-sensor lenses can cause dark corners or image issues on full-frame cameras, so check the lens coverage before using one.
Will a lens adapter make any lens fit my camera?
Adapters can allow physical fit between different mounts, but they may limit electronic functions and change handling, so test before relying on them.
How do I know if a lens will autofocus on my camera?
Look for compatibility notes that confirm electronic communication; even if a lens mounts, autofocus may be limited or manual only with some combinations.
What’s a common beginner mistake when choosing a lens?
Beginners often focus only on focal length and forget to check mount compatibility, sensor coverage, and whether key features will work with their camera.
Final Thoughts on Lens Compatibility
This guide turns lens compatibility from a mystery into a clear, step-by-step check you can follow. If you jot down a quick reference, even a simple note like 270 can remind you to run the six-step checklist before you buy. It’s built to help you avoid costly mismatches and get straight to shooting.
Be realistic: adapters and third-party combos can slow or lose autofocus and sometimes mess with infinity focus or vignetting. For shoppers switching systems, buying used, or learning the ropes, this piece gave the practical tests, compatibility charts, and visual checks that answer the opening question — will this lens fit my camera? We showed how to ID mounts, check image circle, and test electronics so you won’t be surprised at checkout or in the field.
You’ve got a simple method—identify mounts, confirm sensor coverage, verify electronics, and run a quick on-camera test—that saves time, money, and lens-related headaches. Trust those steps, trust your eyes, and enjoy exploring new glass with more confidence.


0 Comments