
How to photograph mountains and make them feel huge, dramatic, and true to life?
This guide shows how to photograph mountains step by step. You will learn to plan, shoot, vary your shots, and process images for better results.
We cover timing and light, composition and framing, lens choice and camera settings. You’ll also get planning tips, safety checklists, and printable cheat sheets.
Follow the simple workflow and gear lists in this article. By the end you will know what to shoot and how to capture mountain scenes with confidence.
How to Photograph Mountains (step‑by‑step workflow)
If you want to learn how to photograph mountains, use this simple workflow: plan, shoot, vary, process, repeat. This keeps you focused and ready for any light or weather.
Step 1 — Plan: choose a peak and a viewpoint, then check the sun’s path, wind, cloud cover and the season. Use PhotoPills, The Photographer’s Ephemeris, Sun Surveyor and Windy to see sun angles, shadows, moon times and gusts that could shake your tripod.
Step 2 — Pack and prep: bring a camera body, two lenses, a sturdy tripod, a polarizer, graduated ND and an ND, a remote or intervalometer, spare batteries and cards, rain cover, and a map or GPX. Lay your gear out the night before and format cards so you hit the trail relaxed.
Step 3 — Arrive early and scout: walk the area to find strong foregrounds, S‑curves or ridges for leading lines, and safe vantage points. Look for water for reflections, and mark a second composition so you can pivot if the clouds shift.
Step 4 — Set up and compose: level the tripod, lock the head, and attach a polarizer or GND if needed. Compose with a clear foreground, middle ground and background, and take a few test frames to verify edges and horizon.
Step 5 — Exposure and focus routine: shoot RAW at base ISO, pick an aperture that gives the depth you need, and bracket ±1–2 EV for safety. Watch the histogram and highlight warnings, and use hyperfocal distance or focus stacking if you need edge‑to‑edge sharpness.
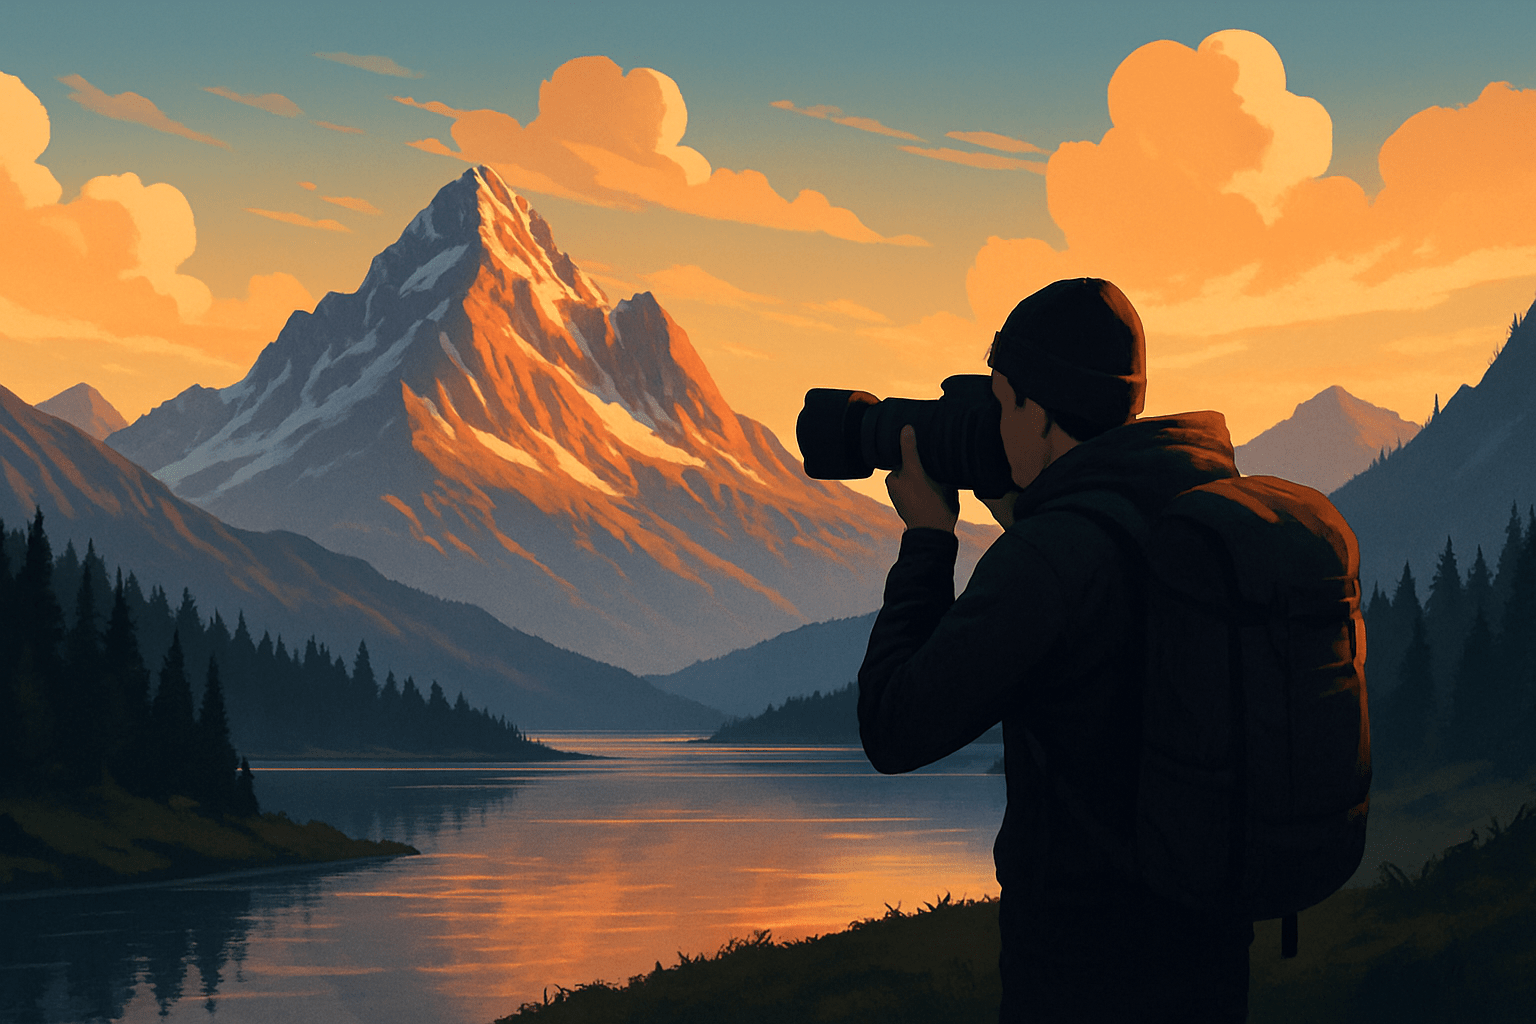
Step 6 — Shoot variations: make a wide scene with a strong foreground, then switch to a telephoto to compress ridges or isolate the summit. Add a panorama, a long exposure for clouds or streams, a sunstar at the edge of the peak and a silhouette with a person for scale.
Step 7 — After the shoot: back up right away, do a quick cull, and jot notes about wind, haze, and your exact spot. These notes save time later when you process and plan a return visit.
– Sunrise/sunset wide + foreground: ISO 100, f/8–11, bracket; shutter varies (tripod).
– Telephoto ridge isolation: ISO 100–400, f/5.6–8, shutter ≥1/500 handheld (or use tripod).
– Long exposure smoothing (water/clouds): ND filter, 1–30s (or longer), f/8–16, ISO 100.
– Milky Way: wide f/2.8, 15–20s, ISO 3200 (use 500/400 rule).
– Sunstar: small aperture f/16–22, low ISO, bracket for sky.
Common mistakes to avoid include skipping a foreground, putting the horizon dead center, ignoring your histogram and leaving after the first light. Slow down and fix these before pressing the shutter. That one minute of care often makes the photo.
Photo shot list for any mountain day: a sunrise panorama from your main ridge, a tight telephoto of layered ridges, a mirror reflection in a lake, a long‑exposure waterfall or stream, the Milky Way over a peak, a human silhouette on a ridge at blue hour, and a sunstar breaking around a summit. Add a cloud‑inversion frame if the weather gifts you one.
15 quick tips: chase the light, not the clock; include a foreground for depth; use a polarizer to tame glare; bracket exposures for safety; arrive early and scout; stay 30–45 minutes after sunset; level your horizon; lower the tripod in wind; carry spare batteries in warmth; wipe rain or spray often; check the histogram after key moments; try a telephoto view; shoot verticals as well; step closer to the foreground; note your settings and location after each keeper. Print these and keep them in your bag so the habits stick.
Timing & Light: when to shoot mountains
Light is what shapes peaks and reveals texture, so timing decides how your photo feels. If you wonder how to photograph mountains with power, learn to read the direction and quality of light, then match your composition to it. For more ideas, study trusted mountain photography tips and return to the same spot in different seasons.
Golden hour gives warm, low‑angle light that grazes ridges and pulls out detail. Blue hour gives cool, even light and rich color, which is perfect for silhouettes and reflective lakes, so arrive 30–45 minutes before sunrise and stay 30–45 minutes after sunset.
At sunrise, east‑facing walls get the first glow and often calmer air. At sunset, west‑facing cirques catch last light, and you may get lenticular clouds or alpenglow, so plan for both and let the weather decide.
Weather is your ally. After storms, the air clears and peaks pop with contrast, while fog makes soft layers that invite simple shapes and long lenses; meter for the highlights and keep the histogram off the right wall.
Seasons change the story. Winter brings clean shapes and high contrast, so expose carefully and use a GND; autumn adds color and mist, so look for backlit leaves; spring has meltwater and waterfalls, so pack an ND; summer can mean haze, so try telephoto compression and moderate dehaze in post.
Night mountain photography opens new options. Place the Milky Way arc behind a peak, use the 500 or 400 rule for sharp stars, and add a low, soft light to the foreground if rules allow; for star trails, shoot long sequences and stack later. Always bring a headlamp and watch footing on ridges.
Planning tools make timing easy. PhotoPills, Sun Surveyor and The Photographer’s Ephemeris show sun, moon and galactic center, while Windy and MeteoBlue give cloud cover, gusts and visibility so you can pick the right day.
Sidebar — top apps list: PhotoPills for plans and AR, The Photographer’s Ephemeris for light direction on maps, Sun Surveyor for sun and Milky Way timing, Windy and MeteoBlue for forecasts, and Mountain‑Forecast for summit winds and freezing levels. Check them at home and again at the trailhead.
Composition & Framing Techniques for mountains
Start with the mountain’s story and choose a frame that says scale, drama, or intimacy. This is the heart of how to photograph mountains in a way that feels intentional rather than lucky. Ask what the light is doing and build the frame around that answer.
Use leading lines to pull the eye toward the peak. A curving river, a trail, or a knife‑edge ridge can point at the summit and give the photo flow.
Add foreground interest for depth and context. A textured rock, wildflowers, driftwood or a stream can anchor the scene and give a sense of place, and it also helps stabilize the frame in wind when you keep the tripod low.
Think in layers: foreground, middle ground and background. Let atmospheric haze separate distant ridges so the scene breathes, and place the main peak on a rule‑of‑thirds intersection for balance.
Frame with what nature gives you. Tree trunks, an arch, a snow cave or the inside edge of a moraine can make a strong natural frame, and when the subject stands alone, leave negative space so the peak feels bold and minimal.
People add scale and story if used with care. Place a hiker on a ridge line, keep them off the horizon line of the peak, and ask them to wear a bright jacket so they pop against rock or snow.
Know when to go wide and when to compress. A 14–35mm view shows the whole valley and a dramatic foreground, while a 70–200mm or longer lens compresses distance and turns light and shadow into abstract patterns.
For big scenes, shoot a panorama when your lens is not wide enough. Keep the camera level, overlap frames by about 20–40 percent, and rotate around the lens’s nodal point or use a pano head to avoid parallax.
Work with clouds and shadows. When clouds cast bands of shade, wait for a light patch to sweep across the peak and expose for the highlights so the ridge structure shows.
Watch for composition pitfalls. Do not cut off the summit, avoid cluttered or messy foregrounds, and move the horizon off the center unless you are making a clean reflection or a strict minimalist frame.
Visual assets idea: add a map overlay that shows your vantage point and the sun angle at shot time, plus a few annotated frames that mark leading lines and the focus point. Include EXIF callouts so readers can match settings to the look they want.
For more examples that break down framing and light, study a set of exceptional mountain images and note how each uses foreground and weather to guide the eye.
Lens, gear & camera settings (practical guide)
Choose lenses that fit your story. An ultra‑wide like 14–24mm or 16–35mm is perfect for big vistas and close foregrounds, a 24–70mm covers most scenes, a 70–200mm isolates ridges and compresses layers, and a 100–400mm or longer can pick out distant details or wildlife without hiking closer.
Use a sturdy tripod and a reliable head, and keep the center column down in wind. Trigger with a remote or a 2‑second timer, and consider a pano head if you stitch often.
Filters are simple but powerful. A polarizer deepens skies and cuts glare on wet rock, a graduated ND balances a bright sky against a darker valley, and a solid ND gives long exposures for silky clouds and streams; square systems are flexible while circular ones are fast and compact.
Keep settings practical. Start at f/8–11 for landscapes, open to f/5.6–8 on telephoto to reduce diffraction, and stay at base ISO unless you need speed; bracket three shots at ±1 EV when in doubt. Use the histogram and highlight blinkies, and focus either at the hyperfocal distance or stack a few frames for perfect sharpness.
Process with a light touch. Shoot RAW, set a white balance that matches the mood, blend exposures or use HDR only to recover range, and keep contrast and saturation natural so the scene still looks like the moment you saw.
Printable gear checklist: camera body with RAW, two lenses that cover wide and telephoto, a sturdy tripod, circular polarizer plus GND and ND, remote or intervalometer, two or more spare batteries, fast memory cards, microfiber cloth, lens wipes, rain cover or dry bag, headlamp with spare batteries, and a compact first aid kit. Print this and tick it off before every trip.
Before/after edit example to try: start with a flat RAW sunrise frame, pull highlights down and open shadows a bit, set white balance warmer, add a touch of dehaze to the distant ridges, and crop to strengthen the leading line. Compare before and after, then save a preset when you like the balance.
If you want an outside perspective on gear choices and field craft, read a concise guide to mountain landscapes and adapt it to your mountains and seasons.
Planning, location, weather & safety
Research is your secret weapon. Use Google Earth to check lines of sight, browse Flickr or Instagram to see common vantage points, and read local trip reports and topo maps so you can find fresh angles and safe routes.
Check forecasts and light with tools you trust. PhotoPills or TPE show sun and moon, Windy and Mountain‑Forecast give gusts, cloud ceilings and freezing levels, and avalanche advisories are essential in winter when slopes can be loaded or wind‑slabbed.
Sort logistics before you go. Confirm trailhead parking and any park passes, learn drone rules and seasonal closures, and plan extra time for traffic or snowed‑in roads so you are not rushing in the dark.
Carry safety essentials and tell someone your plan. Pack warm layers, gloves and a hat, a headlamp, first aid kit, paper map and GPS, extra water and food, and set a turnaround time that you will keep even if the sky looks promising.
Shoot with care for the place. Stay on durable surfaces, respect private land and wildlife distance rules, and avoid trampling fragile alpine plants while building your foregrounds.
Sample packing list for a day hike: camera, two lenses, tripod, filters, remote, spare batteries and cards, microfiber cloth, rain cover, windproof layer, hat and gloves, one to two liters of water, snacks, and a printed map. Add microspikes in shoulder seasons if ice is possible.
Sample packing list for an overnight: the day kit plus tent or bivy, sleeping bag and pad, stove and fuel, extra base layer and socks, power bank for batteries, and a second headlamp. Pack a bear‑safe food system or canister where required.
Sidebar — common mistakes to avoid in the field: trusting the LCD instead of your histogram, leaving when the light gets moody, putting the horizon in the middle out of habit, and forgetting to try a telephoto view after the wide frame. Fix these and your keepers will jump.
Visual assets to plan: bring a printed map with your intended vantage marked and a note of the sun azimuth at key times. Back home, add EXIF captions and a simple diagram of leading lines on three or four favorites so you can repeat what worked next time.
What People Ask Most
How do I photograph mountains to make them look dramatic?
Use strong side or back light, include a clear foreground, and shoot from a low angle to add depth and drama.
What is the best time of day to photograph mountains?
Shoot at golden hour or blue hour when the light is soft and colors are rich, and avoid harsh midday sun when possible.
How can I show the size of a mountain in a photo?
Include a familiar object like a person, tree, or building for scale, or frame the scene to emphasize distance and layers.
How do I avoid flat-looking mountain photos?
Look for side light, shadows, and texture, and include a strong foreground or leading line to create depth.
What are common beginner mistakes when photographing mountains?
Beginners often shoot in harsh midday light, center subjects too often, or forget to scout angles and foregrounds.
How can I protect my camera while photographing mountains?
Keep gear dry and warm with protective covers and spare batteries, and avoid changing lenses in windy or dusty conditions.
How should I plan a mountain photo shoot as a beginner?
Check the weather and sunrise/sunset times, scout locations ahead of time, and arrive early with proper clothing and supplies.
Final Thoughts on Photographing Mountains
Take the workflow—plan → shoot → vary → process → repeat—and the practical settings and checklists, including that 270 note, as your field manual for mountain shoots. Using this approach will remove a lot of guesswork and let you focus on shapes, light and story rather than fiddling with settings. The result is more deliberate, layered images that actually feel like the place you stood in.
Be real about one thing: mountains and weather don’t cooperate on schedule, and some shoots will demand patience, a better forecast or a safer plan. This guide was written for hikers, travel photographers and weekend landscape shooters who want clear steps, useful gear lists and reliable settings.
You came wondering how to photograph mountains, and the article answered that with a compact workflow, composition techniques and camera‑settings cheat sheets you can follow on a ridge or at a lake. Keep practicing with intention, and you’ll see your mountain pictures become more confident and true to the view.


0 Comments